
1. Starting Your Journey in the Gamma Portal #
To begin the FibreXchange ordering process, log in to the Gamma Portal using your credentials.
Once logged in, navigate through the following menu path:
Provisioning & Service Management → Data Services → FibreXchange → Suitability Check & Order
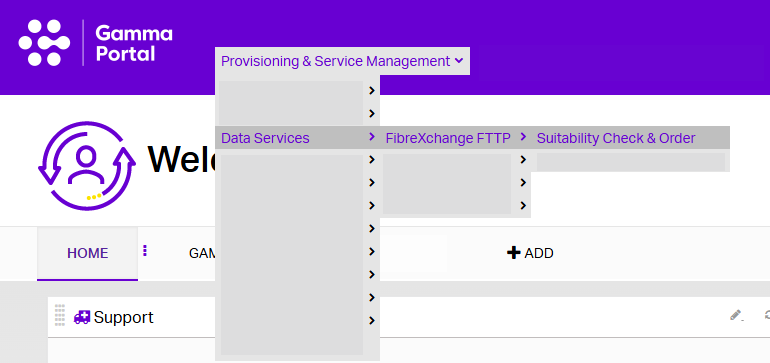
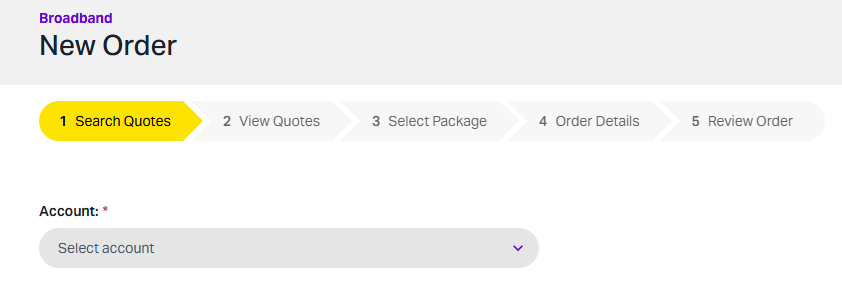
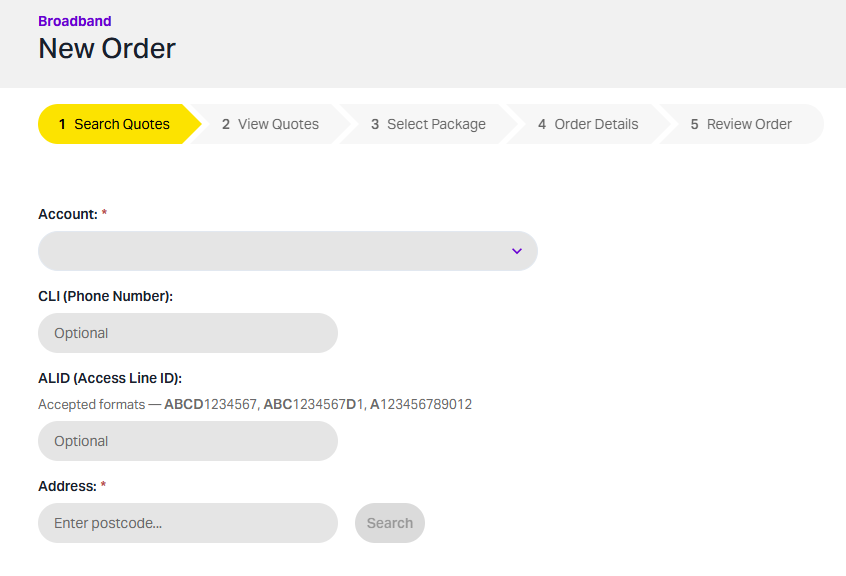
Your first task on this page is to select your Channel Partner account from the drop‑down menu.
2. Entering Number Details #
At this stage, you can enter one of the following:
CLI (Customer’s Phone Number) #
Adding the CLI is highly recommended if you intend to include Simple Swap later, as this cannot be added after this point.
Access Line ID #
If available, you may enter the Access Line ID.
This is a unique identifier associated with a broadband or telephony line and is used to check availability and suitability.
Note:
Neither the CLI nor the Access Line ID is mandatory to place an order.
The Portal will guide you on accepted formats.
3. Checking Availability #
Once the availability check completes, the Portal will display:
- All available products
- Download and upload speeds
- Contract length
- ONT (Optical Network Terminal) status at the premises.
The presence or absence of a valid ONT at the site will determine the installation options later in the journey.
4. Confirming the Address #
Please confirm that the address is correct before continuing. After entering your customer’s site address, you will see a list of available providers.
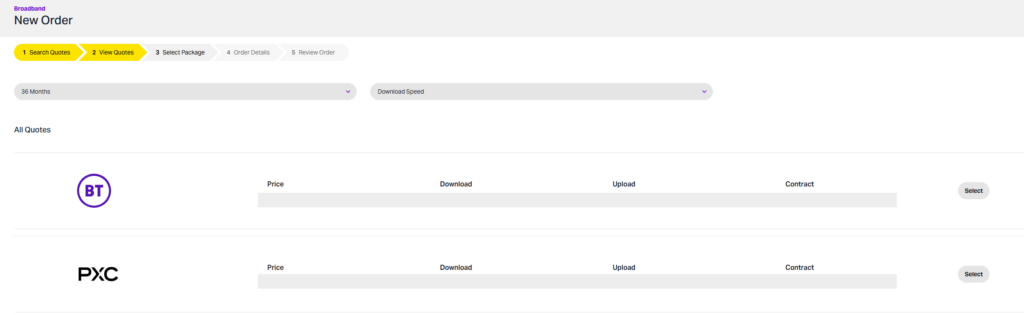
5. Viewing FTTP Quotes #
The Portal will now display all FTTP broadband quotes for the selected address.
(If you need to place a SoGEA order, please refer to the dedicated SoGEA training video on the Gamma Academy’s Broadband training area).
Each quote will show:
- Supplier name
- Monthly price
- Download and upload speeds
- Contract length (default: 36 months)
Use the filters at the top of the page to narrow your search.
Take time to compare quotes. Any available discounts or special pricing will appear alongside the relevant package.
Once you find the best option for your customer, click Select.
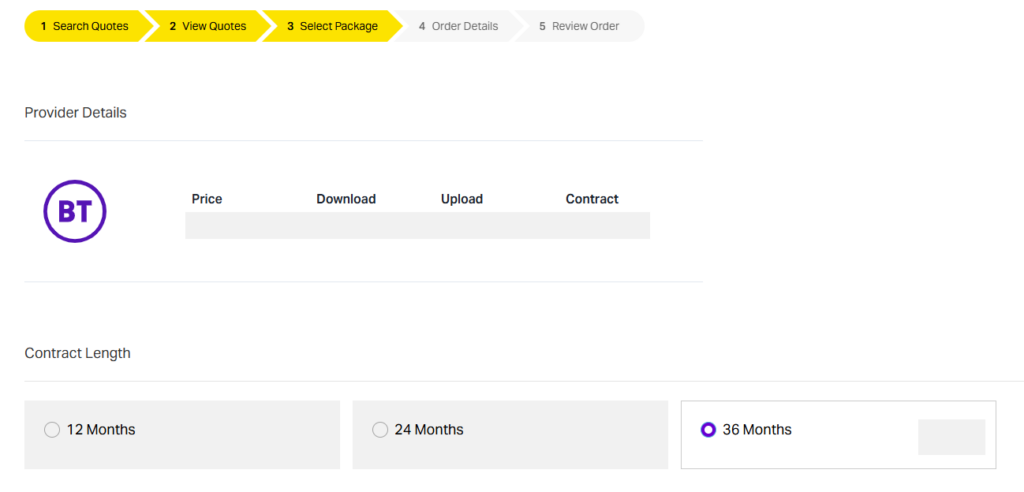
6. Selecting the Package and Contract #
You will now be taken to the Select Package screen, where you can:
- Review provider details
- Adjust the contract length
- Add a router
- Provide router shipping details.
Router Selection #
If your customer requires a router:
- Choose whether it should be shipped to the site address or an alternative location
- Shipping costs will be calculated at the end
- Select the Gamma voice product the router will be associated with.

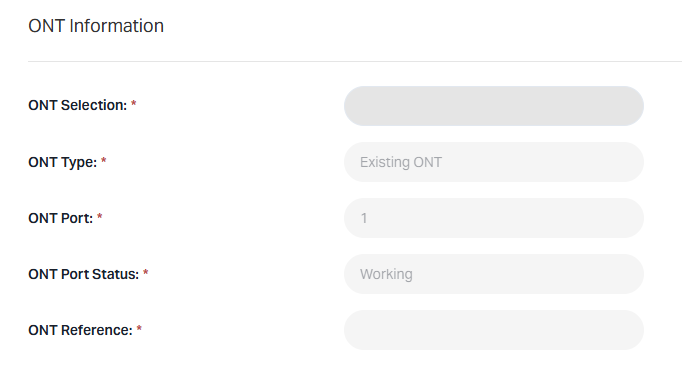
7. Reviewing ONT Information #
If an ONT is detected at the premises, the ONT Information section will display:
- ONT serial number and location
- Selectable ports (if active and not damaged)
- ONT’s current status
- Option to order a replacement ONT if needed.
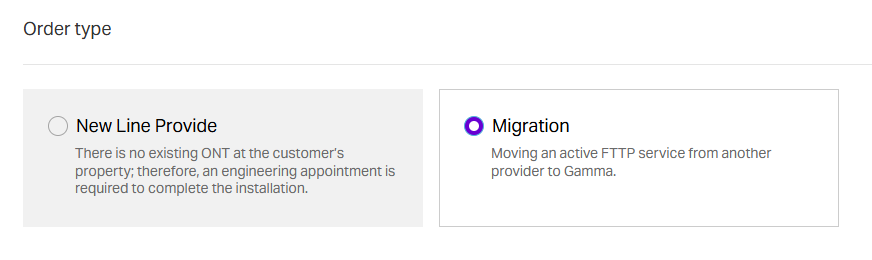
8. Choosing the Order Type #
Based on the information entered so far, you will see the relevant order type options:
New Line Provide #
Choose this if no ONT is present.
An Openreach engineer will need to attend to install the ONT.
Migration #
Select this when moving an active FTTP service from another provider to Gamma.
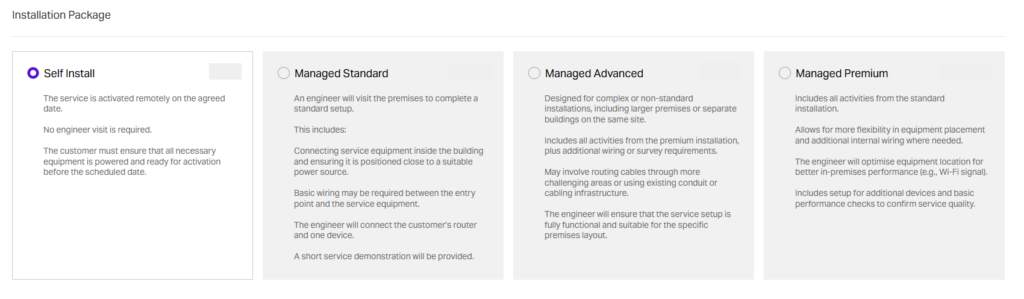
9. Selecting Installation Options #
Choose an installation package based on the ONT status and customer needs.
If an ONT is already present, Self Install will be unavailable.
Discuss suitable installation dates with your customer and select from available slots (greyed‑out dates are unavailable).
You must add:
- Customer reference
- Maximum amount the customer is willing to pay for installation
Installation Options #
Please note! Placing an order with an incorrect install type may result in an additional charge and/or delay to the order.
- Self Install
This service is activated remotely on the agreed date – no engineer visit is required. - Managed Standard
- An engineer will visit the premises to complete a standard setup
- This includes connecting service equipment inside the building and basic wiring between the entry point and the service equipment
- The engineer will connect the customer’s router and one device.
- Managed Advanced
- This installation package is designed for more complex, or non-standard installations (for example on a larger premises or for separate buildings on the same site)
- May involve routing cables through more challenging areas
- The engineer will ensure that the service setup is fully functional and suitable for the premises layout.
- Managed Premium
- Includes all activities from the standard installation
- This installation type allows for more flexibility in equipment placement, and additional internal wiring where needed
- The engineer will optimise the location of equipment for better in-premises performance (e.g. Wi-Fi signal)
- Includes the setup for any additional devices and basic performance checks to confirm service quality.
Use the arrow icons to browse available dates and select AM or PM appointments.
10. Additional Routed IPs #
If your customer requires additional routed IPs, select the quantity here.

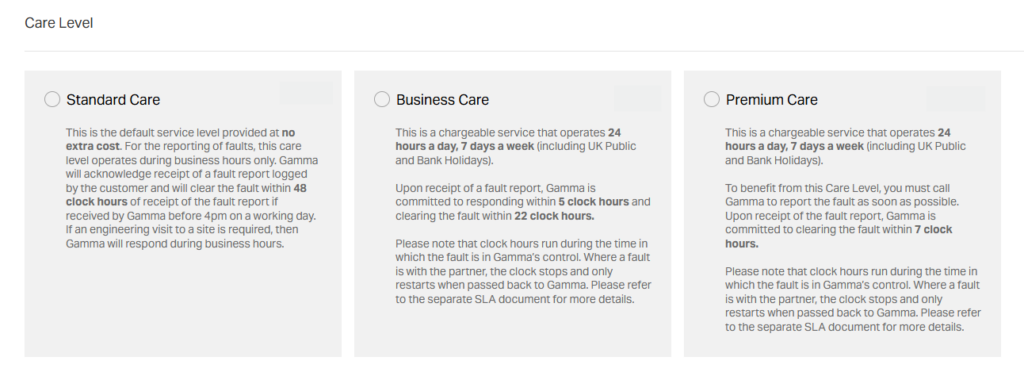
11. Choosing a Care Level #
Gamma provides three care levels:
- Standard Care (default, no extra cost)
- Business Care
- Premium Care.
12. Add‑Ons: Simple Swap #
Simple Swap can be added only if:
- You entered the CLI earlier
- The number is eligible for porting.
If eligible, you will see:
- The porting number (greyed out and uneditable)
- The destination product (e.g., PhoneLine+)
- A drop‑down to select the Losing Communications Provider.
Note:
The losing communications provider (LCP) provides the service to the customer as defined by Ofcom.
They only become the LCP when a request is made to move the service from them to another provider.
13. Final Steps #
You’re almost done!
- Enter your Channel Partner details
- Enter your customer’s site details
- Click Review Order
- Share relevant information with your customer
- Keep the Order ID so you can track and manage it within the Gamma Portal.
