
Place a new order #
Placing an order for a Gamma SIP Trunks for Cloud Connect for Webex Calling order #
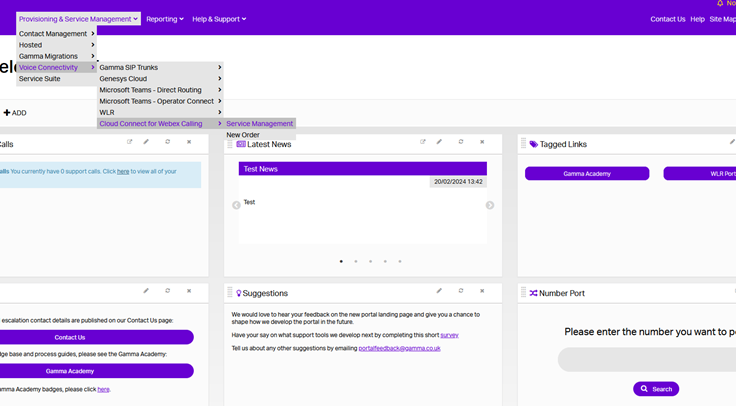
You can start a new order from the Gamma Portal homepage. Once logged in, go to “Provisioning and Service Management”, “Voice Connectivity”, “Cloud Connect for Webex Calling” and “New Order”.
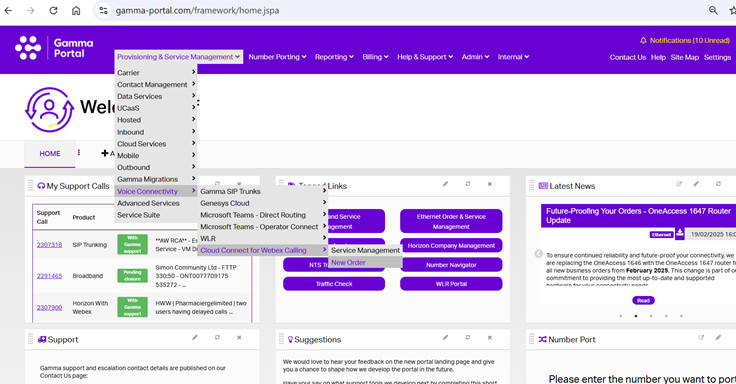
If you cannot see the Cloud Connect menu option, please contact your account manager to get this enabled.
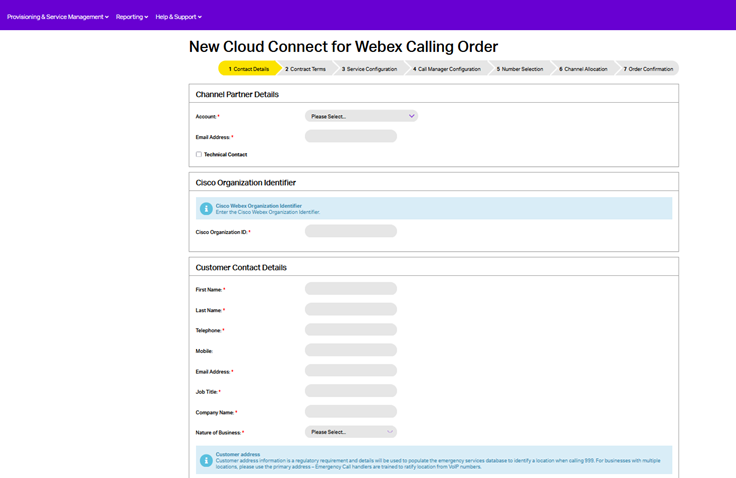
Partner and Customer Details #
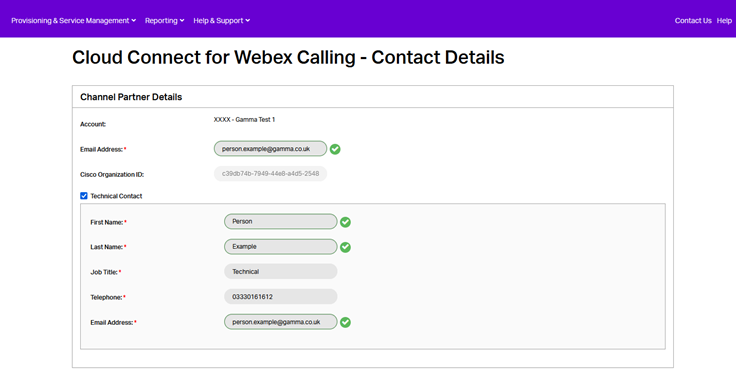
Select the account under which you wish to provision the Gamma SIP Trunks for Cloud Connect for Webex Calling order and enter the following details:
- Your email address.
- Your associated Organization ID in the “Cisco Organization ID” field. This can be found within the Webex Control Hub of your Cisco Organization.
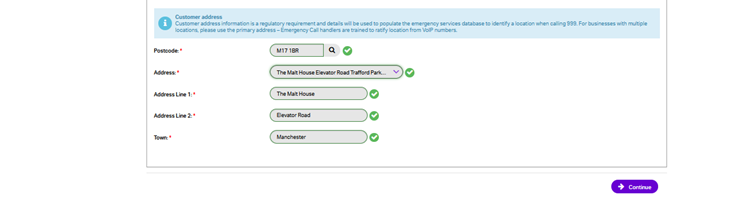
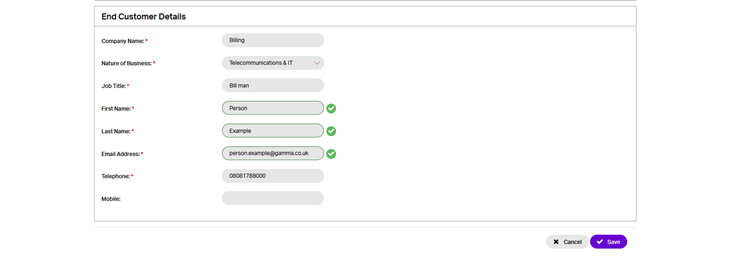
- The relevant customer details in the “Customer Contact Details” section. The customer contact details must include the name of an individual at the site where calls are being delivered.
Please see https://help.webex.com/en-us/article/k5pal8/Look-Up-Your-Organization-ID-in-Control-Hub#id_119023 for more information on how to view an organisation’s Organization ID.
Note that once provisioned, you will be unable to change the Organization ID that is associated with a trunk. A different Organization ID will require a new trunk.
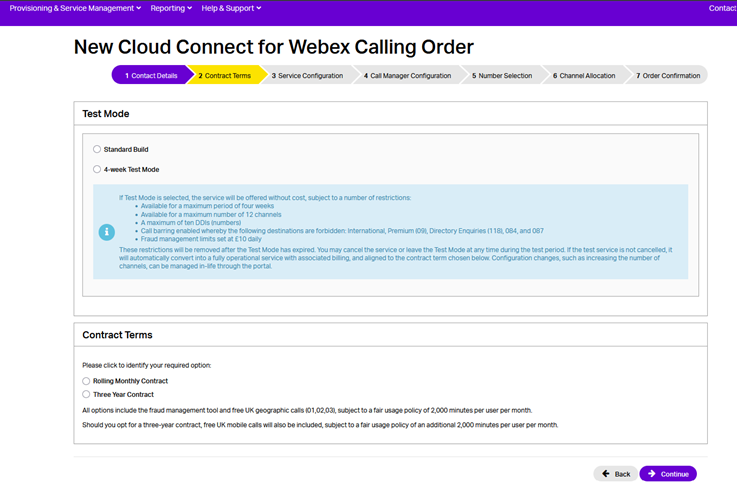
Test Mode #
A Test Mode option is available as an alternative to the standard order. If the Test Mode option is selected, the service will be offered without cost, subject to several restrictions:
- Available for a maximum period of four weeks.
- A maximum of ten DDIs (numbers).
- Available for a maximum number of 12 channels.
- Call barring enabled whereby the following destinations are forbidden: International, Premium (09), Directory Enquiries (118), 084 and 087.
- Fraud Management limits set at £10 daily.
The restrictions will be removed after the Test Mode has expired. You may cancel the service or leave the Test Mode at any time during the test period (see In-Life changes section for details). If the test service is not cancelled, it will automatically convert into a fully operational service aligned to the contract term chosen during provisioning and with the associated billing. Configuration changes, such as increasing the quantity of DDIs can be managed in-life through the Portal.
Contract Terms #
Select the contractual terms you wish to apply. Check the service description and the price list for more information on these options.
There are two options available for selection:
- One Month Rolling
- Three Year
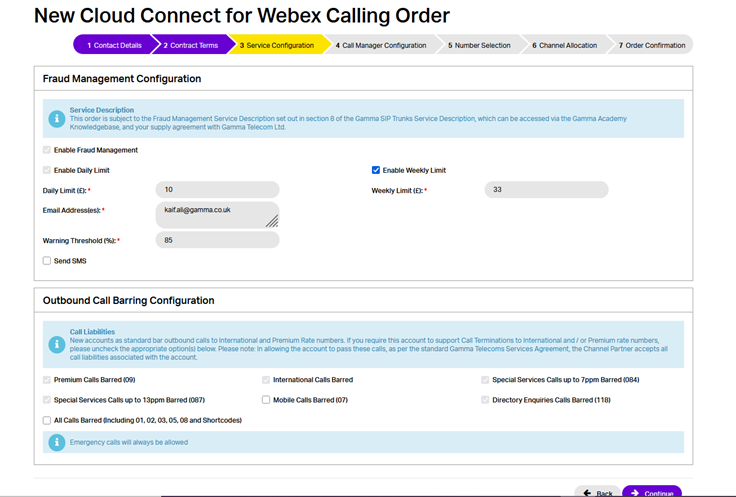
Service configuration #
You can enable Fraud Management and configure its various settings here. The Fraud Management System (FMS) feature allows Cloud Connect for Webex Calling channel partners to protect themselves from fraudulent activity on endpoints that have fallen victim to hacking or excessive unauthorised call spends. The feature allows partners to pre-set individual call limits against specific Cloud Connect endpoints and have automatic call barring invoked if these thresholds are breached.
For more information on Fraud Management please see the associated configuration section of this guide, and the Gamma SIP Trunks for Cloud Connect for Webex Calling Service Description.
The FMS is the default option when you are provisioning a Cloud Connect endpoint, unless you choose to remove this default as part of the order provisioning. You can add/remove the FMS back on at any time, following the below steps outlined in the configuration section.
If you want to set up Fraud Management and have it go to multiple email addresses, you can do this by separating the email addresses with a semi colon. For example:
test.person1@gamma.co.uk; test.person3@gamma.co.uk

In addition, you can also configure your preferred Outbound Call Barring settings. Calls to international and premium numbers are initially barred, but the user is able to allow or restrict access to:
- International Numbers
- Mobile Numbers
- Premium rate numbers
Emergency calls (to services such as 999, 112, 18000) remain unaffected by any barring that is applied.
Please Note: If proceeding to provision your Cloud Connect for Webex Calling order in Test Mode, restrictions on what can be configured whilst in Test Mode will apply. See the section on Test Mode for more information.
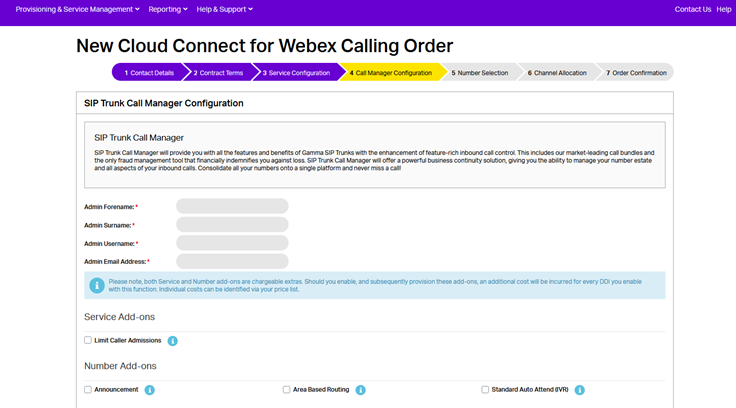
SIP Trunk Call Manager configuration #
The SIP Trunk Call Manager (STCM) service is provided as part of the Gamma SIP Trunks for Cloud Connect for Webex Calling offering, bringing together a suite of call control features and SIP trunk services. For a breakdown of the features provided, see the Gamma SIP Trunks for Cloud Connect for Webex Calling Service Description.
To set up the SIP Trunk Call Manager service, enter an admin username and admin email address. If the admin username is already in use, you will be notified when you type it in and will need to enter another username.
You will also be presented with some new options which will help you configure you SIP Trunk Call Manager Service. These options are:
| Announcement | Announcements can be combined with an underlying call plan to play a message to the caller prior to the call connecting, or alternatively as a broadcast which plays an announcement, such as notifying the caller of a change of numbers and then ends the call. |
| Area Based Routing | Area nodes are used to define an underlying call routing planning based on the originating telephone number, for a predefined area name consisting of one or more area codes or CLIs. |
| Standard Auto Attendant (IVR) | The Interactive Voice Response (IVR) control feature enables the creation of a personalised menu announcement with up to 10 options to be played to the caller, each leading to a defined call routing / action based on the caller’s key press on their keypad. |
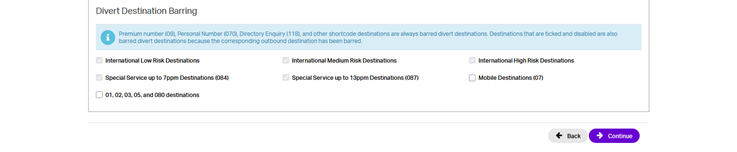
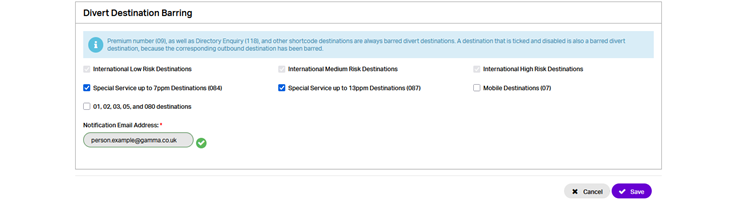
| Call Divert Barring | This allows you to bar diverts to certain destinations. These are: International Low Risk Destinations International Medium Risk Destinations International High Risk Destination Special Service Numbers (084) Mobile Destinations 01, 02, 03, 05 and 080 destinations For more information on International Destination Risks please see the Billing Home page on the Gamma Portal (Billing à Billing Home) |
Number Selection #
Now you can add Gamma ranged telephone numbers to your new Cloud Connect endpoint. Select up to 5 prefixes and the quantity of numbers required for each. Ticking consecutive will ensure you are provided with a consecutive range.
- You must check the availability of the range before proceeding with the order.
| If you require a specific number, you should use the Gamma Number Search under Help and Support to identify what numbers Gamma has available and then use the web chat facility to get the number allocated to your account. |
If there are any unavailable area codes for your selection, you’ll be presented with a message that advises there aren’t enough available. To progress the order, you should select any available number (which can be used for testing) and when your order is complete, you can contact Number Management who can review number availability.
If you are wishing to port your number(s) to Gamma, you still need to select one number from an area so that we can set the Endpoint up. Your endpoint also needs to be set up before you place your Geographic Port Order. For more information on porting please see our Gamma Numbers and Porting guide.
- The default format for both CLI and DDIs represented for incoming calls for Gamma SIP Trunks for Cloud Connect for Webex Calling is E.164 format (i.e. +441618703374).

Channel Allocation #
Channel capacity will initially be allocated to the Gamma SIP Trunk for Cloud Connect order based upon the quantity of numbers provisioned on the SIP trunk, up to a maximum threshold.
You will be shown the Allocated Channel Capacity that has been calculated from the number of DDIs selected for provisioning. This calculation is based on the following table:
| DDIs provisioned | Total Allocated Channel Capacity | Per Endpoint Allocated Channel Capacity |
|---|---|---|
| 1-25 | 36 | 9 |
| 26 – 50 | 68 | 17 |
| 51 – 100 | 136 | 34 |
| 101 – 250 | 336 | 84 |
| 251 – 500 | 668 | 167 |
| 501+ | 1000 | 250 |
The capacity values displayed apply to the total of both outgoing and incoming calls to the Gamma network and are allocated across 4 geographically diverse Session Border Controller (SBC) endpoints upon which the service is built. As a result, these capacity values will denote the total capacity across these 4 SBCs as a multiple of 4.
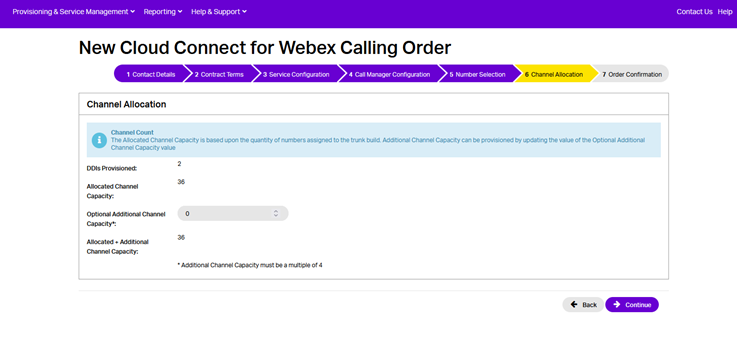
If desired, you can supplement this allocated capacity by specifying any additional channel capacity that may be required. As with the allocated capacity, this will be equally distributed across the 4 trunk endpoints and as such must be a multiple of 4. The total capacity of the trunk will therefore be a sum of the allocated channel capacity, based on the quantity of DDIs provisioned, and the specified additional channel capacity.
For more information, please see the Gamma SIP Trunks for Cloud Connect for Webex Calling Service Description.
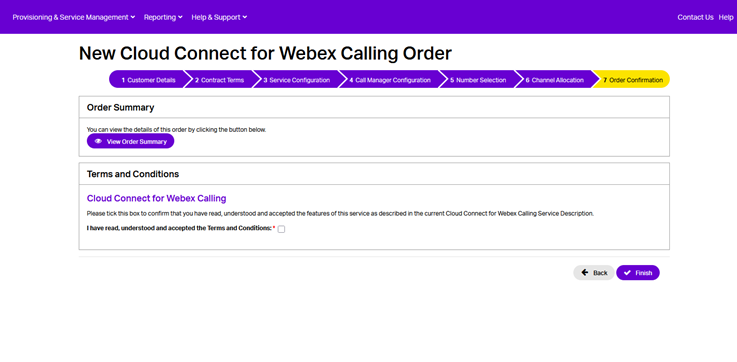
Order confirmation #
You should read and accept the terms and conditions and then click Submit.
Order in progress #
Once submitted, the Gamma portal will start to build your endpoint and will send you a confirmation email when complete.
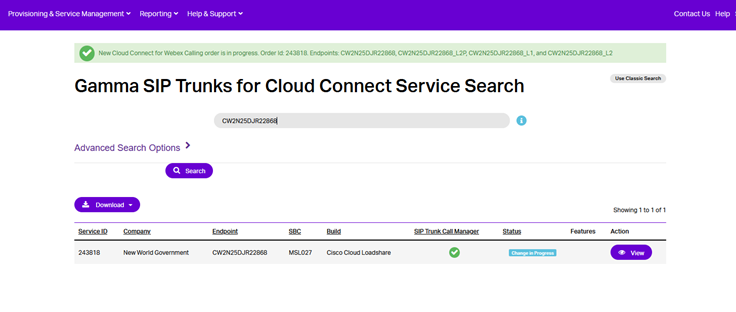
From the Gamma Portal, go to “Provisioning and Service Management”, “Voice Connectivity”, “Microsoft Teams – Operator Connect” and “Service Management” to see your order Status.
Service management and in-life changes #
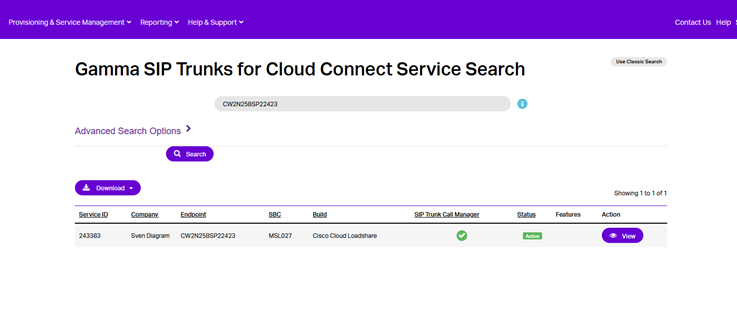
To make any in-life changes to your service, you will first need to search for the relevant endpoint on the Gamma Portal.
Go to Provisioning & Service Management > Voice Connectivity > Cloud Connect for Webex Calling > Service Management.
On the Service Search page, search for the required endpoint.
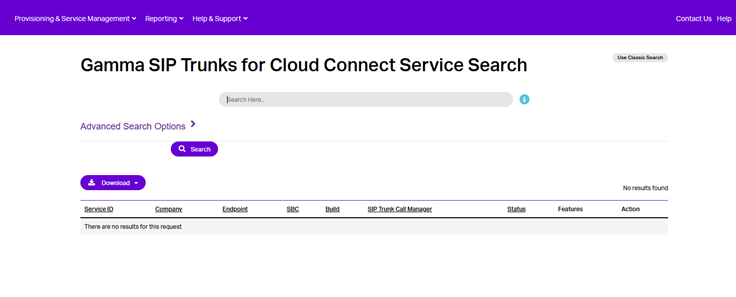

Click on View to access the endpoint details page, where you can subsequently select any required actions.

Numbers #
Add new numbers #
To add new DDIs, you can follow one of the following processes:
- Next Available Numbers can be used for geographic numbers by following the below process using the Cloud Connect for Webex Service Management page.
- Specific Number Requests can be done by following the Specific Geographic Number Request process and then, once the number has been allocated to your account, it can be added using the “Specific Number” tab of the Add New Numbers page.
- Non-Geographic Numbers can be done using the Reserving Non Geographic Numbers process (please see our Gamma Numbers and Porting guide) and then adding the number using the “Specific Number” tab.
Select the account that has the endpoint you wish to Add New Numbers for and click “View”.
Click on the “Add New Numbers” option in the Actions drop down and click “Continue”.
Click “Save” when all required numbers are added.

As numbers are added, the allocated channel capacity may vary depending on the total quantity of DDIs provisioned on the trunk, as highlighted during the new order provisioning process and detailed further in the Gamma SIP Trunks for Cloud Connect for Webex Calling Service Description.
Deallocate NGN #

Select the account that has the endpoint you wish to Deallocate NGNs for and click “View”.
Click on the “Deallocate NGNs” option in the Actions drop down and click “Continue”
This action allows users to deallocate any previously added NGNs from the endpoint.
Update Network CLI #
Select the account that has the endpoint you wish to change the Network CLI for and click “View”.
Click on the “Update Network CLI” option in the Actions drop down and click “Continue”.

This Action allows Users to change the Network CLI currently designated for the Endpoint.
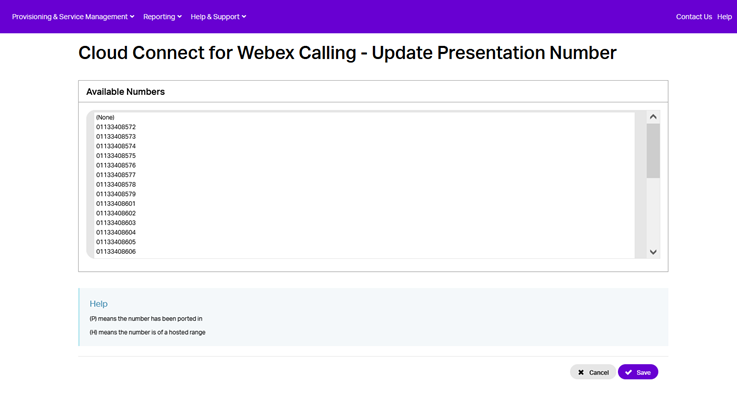
Update Presentation Number #
There is an option to Update Presentation Number which enables customers to select a single presentation number from the numbers associated with the Service. This is implemented within the Gamma environment and applied after any CLI presentation configured within the Webex Calling organization itself. Any Geographic or Non-Geographic number associated with the Service can be selected, given both are terminated natively within the service.
There are two areas within the portal where the presentation number can be edited:
- Within the Number Presentation section under the Service tab of Service Details, where the Edit function will take you to the screen that allows you to choose from the list of available numbers.
- As an in-life action where you would choose “Update Presentation Number” from the action list drop-down which will again take you to the screen that allows you to choose from the list of available numbers.
Endpoint #
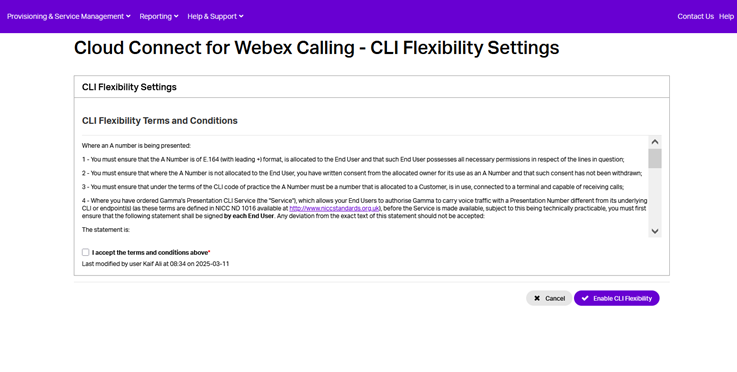
CLI Flexibility Settings #
Select the account that has the endpoint you wish to change the CLI Flexibility Settings for and click “View”.
Click on the “CLI Flexibility Settings” option in the Actions drop down and click “Continue”.
This Action allows Users to change the CLI Flexibility Settings for the Endpoint.
Update call barring settings #
Select the account that has the endpoint you wish to Update Call Barring Settings for and click “View”.
Click on the “Update Call Barring Settings” option in the Actions drop down and click “Continue”.
Gamma Microsoft Teams – Direct Routing offers five call barring options; all are controlled using the Gamma Portal. The call barring options which we offer are:
- No Call Barring
- International Call Barring
- Mobile Call Barring
- Premium Call Barring
- All Call Barring (expect freephone)
New endpoints as standard bar outbound calls to International and Premium Rate numbers. If you require this account to support Call Terminations to International and / or Premium rate numbers, please uncheck the appropriate option(s) below. Please note: In allowing the account to pass these calls, as per the standard Gamma Telecoms Services Agreement, the Channel Partner accepts all call liabilities associated with the account.
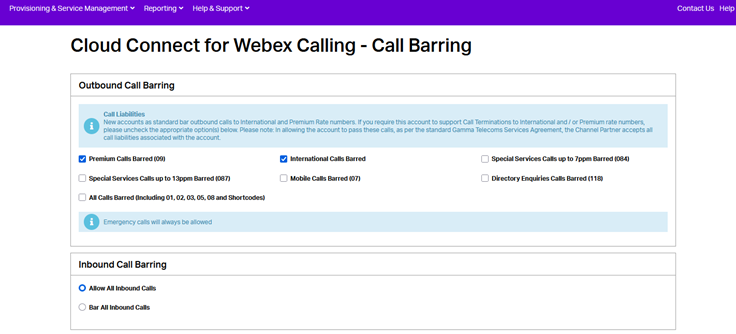
Once the required changes have been made to the call barring settings, click ‘Save’ to confirm them.
Update Endpoint Details #
Select the account that has the endpoint for which you wish to change the channel capacity and click “View”.
Click on the “Update Endpoint Details” option in the Actions drop down and click “Continue”.
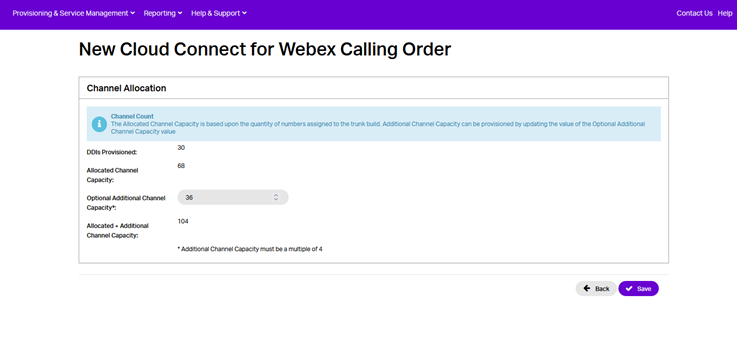
On the Channel Allocation page, you will see the Allocated Channel Capacity that has been provisioned based on the quantity of DDIs currently provisioned to the trunk. Channels will be calculated and provisioned according to the DDI quantity thresholds.
You will also see the current value of any previously specified Additional Channel Capacity, that you can now amend as you see fit.
The total capacity of the trunk will be a sum of the allocated channel capacity and the additional channel capacity, equally distributed across 4 SBCs.
For more information, please see the Gamma SIP Trunks for Cloud Connect for Webex Calling Service Description.
Click on the “Save” to submit any additional channel amendments.
Service #
Advanced diagnostics #
Select the account that has the endpoint you wish to access Advanced Diagnostics for and click “View”.
Click on the “Advanced Diagnostics” option in the Actions drop down and click “Continue”.
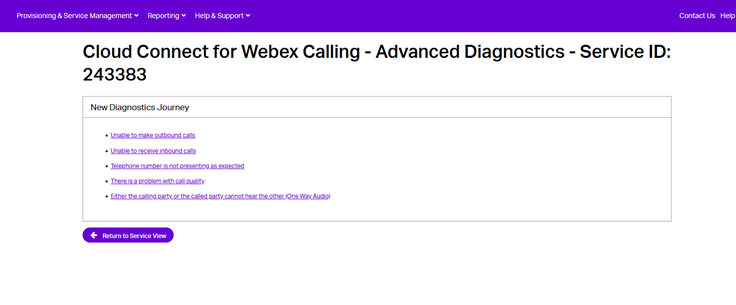
This Action Allows You to Start or Resume a Diagnostic Journey, or View Completed Journeys.
Our Cloud Connect for Webex Calling Advanced Diagnostics Tool has been designed to give you more information to help you determine where a potential fault may lie; making sure that if you do have a fault on your endpoint you can resolve the issue efficiently.
The Tool also allows you to log a fault directly into the Gamma Service Desk without needing to call / email the team.
The journeys we have available for the Advanced Diagnostics Tool are:
- Unable to make outbound calls
- Unable to receive inbound calls
- There is a problem with call quality
- Either the calling party or the called party cannot hear the other (One Way Audio)
Cease End Point #
Select the account that has the endpoint you wish to cease and click “View”.
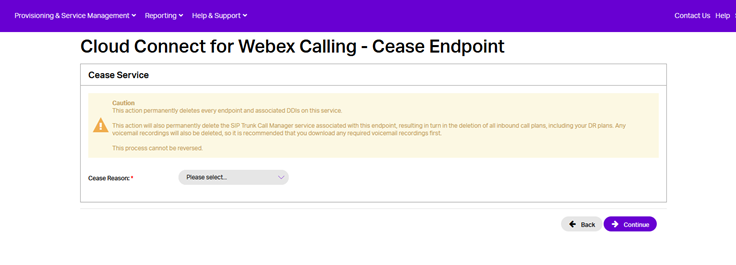
Click on the “Cease Endpoint” option in the Actions drop down and click “Continue”.
This Action Allows You to Cease this Endpoint or cancel the Service during Test Mode.
Leave Test Mode #
Select the account that has the endpoint which you wish to take out of test mode and click “View”.
Click on the “Leave Test Mode” option in the Actions drop down and click “Continue”.
By selecting to confirm ending Test Mode and clicking Continue, it will convert into a fully operational service aligned to the contract term chosen during order provisioning, with the associated billing. Configuration changes, such as increasing the quantity of DDIs or additional channel capacity, can be managed in-life through the Portal.

Configure Fraud Management #
Select the account that has the endpoint for which you would like to configure Fraud Management and click “View”.
As it is for other in-life actions, there are two areas within the portal’s endpoint view page from which Fraud Management settings can be accessed:
- Within the Fraud Management section under the Service tab of Service Details, where the Edit function will take you to the screen that modify various settings.
- As an in-life action where you would choose “Configure Fraud Management” from the action list drop-down, which will again take you to the screen that allows you modify various Fraud Management settings.
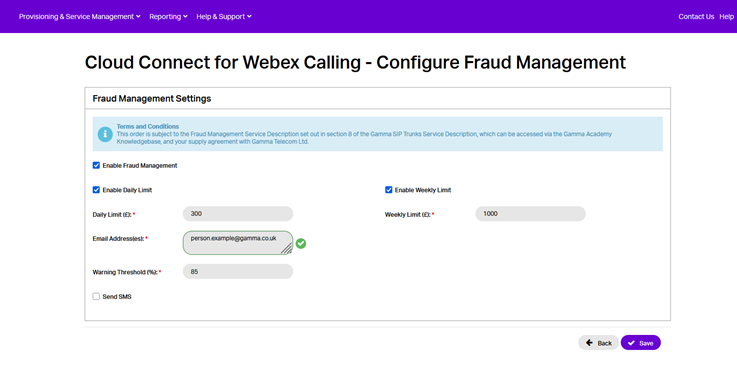
From here, you can switch Fraud Management On or Off and select your daily spend limit (defaulted to £300). The daily spend limit is a rolling 24 hr aggregation of call charges across all channels on that endpoint, the time starts when the endpoint is successfully commissioned as part of a new order or when the feature is configured and then ‘saved’ on an existing endpoint. The 24-hr clock will re-set if the threshold is breached and subsequently has the blocking removed.
The weekly spend limit is a rolling 7-day aggregation of call charges across all channels on that endpoint, the time starts when the endpoint is successfully commissioned as part of a new order or when the feature is configured and then ‘saved’ on an existing endpoint. The 7-day clock will re-set if the threshold is breached and subsequently has the blocking removed.
Within the “Warning (%)” text box, enter the threshold at which you’d like us to send a warning text/email out (defaulted to 85%).
If you want to set up Fraud Management and have the warning email sent to multiple email addresses, you can do this by separating the email addresses with a semi colon, for example:
test.person1@gamma.co.uk; test.person3@gamma.co.uk
Cloud Connect Endpoint is barred because of Fraud Management
If the endpoint exceeds either the 24 hour or 7 Day limit, the endpoint will be automatically barred from making any outbound calls, (with the exception of emergency service calls). An email will then be sent from ‘Gamma Fraud Management Systems’ containing the following details and will be delivered to the address configured in the original notification alert:
- Action: All Calls Barred
- Threshold Breach Period
- Endpoint Identification
- Total Call Duration
- Total Call Cost
- Total Number of Calls
The email will contain an attachment with the relevant CDRs for the period covered. This detail can be used to assist in the determination of whether fraudulent calls have been made.
It is the Channel Partner’s responsibility to inform the end user as to the reason that Call Blocking has been applied to their account. When attempting to make out-bound calls, end user’s call attempts will be diverted to a recorded announcement instructing them to contact their service provider.
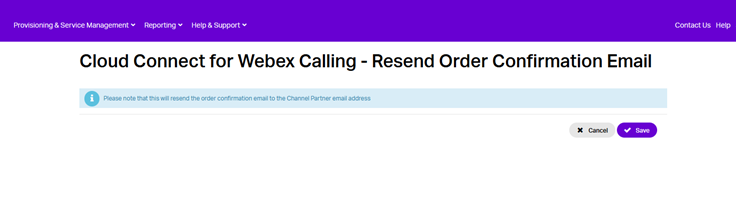
Resend order confirmation email #
If you need another copy of your confirmation email, you can resend this by going onto the Gamma Portal, select ‘Provisioning & Service Management’, ‘Voice Connectivity’, ‘Cloud Connect for Webex Calling’ then ‘Service Management’.
Select the ‘Actions’ drop down box and select ‘Resend Order Confirmation Email’.
Update Customer Details #
Select the endpoint for which you wish to update the Customer Details and click “View”.
Click on the “Update Customer Details” option in the Actions drop down and click “Continue”.
This Action Allows You to update the customer details currently ascribed to the service:
Note that once a trunk has been provisioned, you are unable to change the Organization ID that is associated with the trunk. A different Organization ID will require the provisioning of a new trunk.
