
You can and should order your port as soon as the new Gamma service is in place using the following guidelines:
- Geographic IPEX Port Order if Gamma don’t have a porting agreement in page with the Range Holder and/or Losing Communications Provider.
- Mixed Operator Port Order if there is more than one range holder associated with the main telephone number.
- Manual Port Order if
- There are more than 9 associated numbers
- There are more than 6 SNDDIs (Single Number Direct Dial Ins)
- There are more than 6 DDI Ranges
- Gamma is the Range Holder and the coming is coming back to Gamma
- All other scenarios will be placed as Geographic Number Port (GNP)
Please note that if you have completed a pre order validation (POV), you can raise a GNP, manual or IPEX order directly from the completed POV request – this will be one of the actions available on POV requests which are in the ‘POV Completed’ status. This is the quickest way to raise a port order, as most of the port details will be auto-populated from the completed POV request, saving you time and effort. Of course, if you wish, you can still raise port orders in the old way as follows.
Geographic Number Port (GNP) #
Step 1
From the Gamma Portal, go to “Number Porting”, “Geographic Number Porting”, “New Geographic Port Order”.
If you don’t have this option, contact your Portal Administrator (Help and Support and Portal Administrators) or contact your Internal Account Manager.
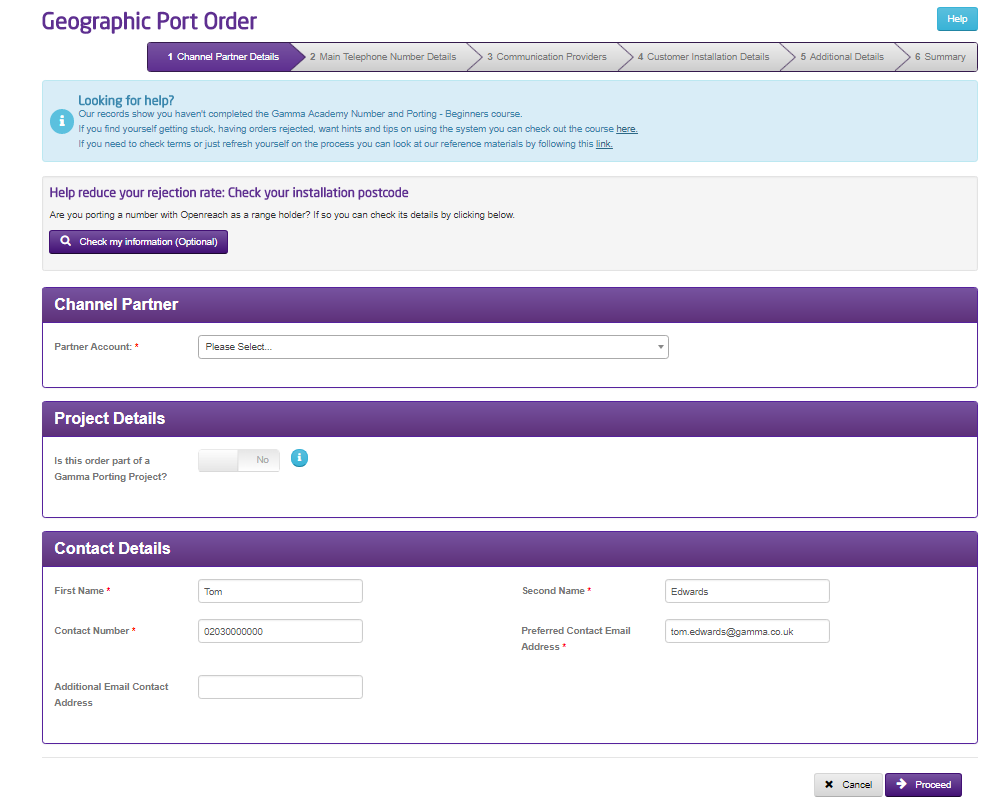
Channel Partner Details #
We now start to place the order. Make sure that you’ve got the right account selected from the drop- down menu.
This screen is where your details go (and not your end users), so put in the name of the person who is going to be managing the order for your company (this is probably going to be yourself), and the contact telephone number and email address.
Please note: When you place a port order on the portal, it will pre-populate with the contact details from your portal registration. Notifications will be sent to this email address alone. There is an option for you to add a secondary email address here.
We strongly recommend that you add another email address to the distribution list for your order notifications as this may prove to be critical to the smooth delivery of your port order.
After the first page of the GNP port has been completed you will see the option to save the port. This will allow you to save where you are up to in case you need to get any further information from your end user.
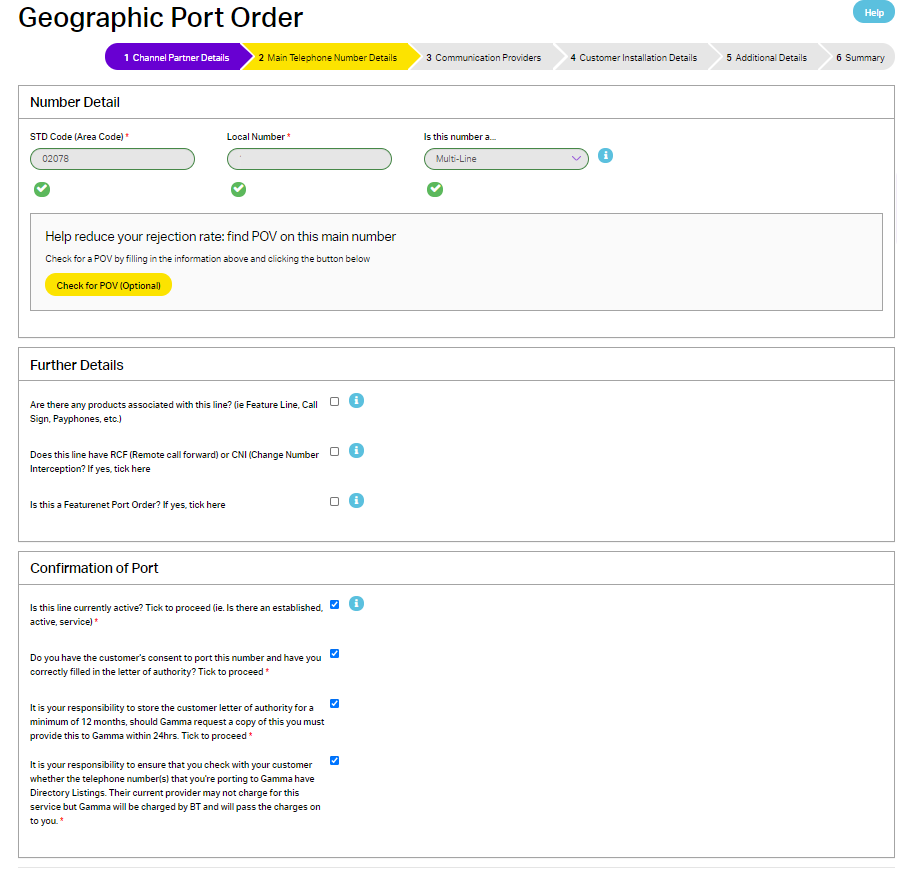
Main Telephone Number Details #
We move on to the Main Telephone Number Porting Details.
If you are porting a number where Openreach is a range holder then you can use the ‘check my information’ tool at the top of the page. By entering the CLI and the postcode this will do a check against the Openreach database and populate parts of the form for you.

Enter your area code (such as 0161, 0207, 01772). If your area code is 4 digits, then you should put the first digit of the local number at the end of the area code (so 0161 870 xxxx would become 01618 70xxxx)
You should then select if it is a Single Line port or a Multi Line port.
If you instigated this order directly from a completed POV, the reference of the completed POV request will be displayed under the number. Alternatively, if you are raising this order from the menu, you will see a button to Check for POV (Optional). If this main billing number already has a completed pre order validation (POV) request, you should hit the Check button. Once found, the POV reference will be displayed. This action associates a completed POV request with the port order, helping us to proactively challenge any rejections.
If you have any associated products with the line (such as Feature Line, Call Sign, Payphones) use these tick boxes to let us know. This is so that we can get it through to the right teams over at the losing communications provider and/or range holder and ensure that the correct timescales are applied to the Port Order.
If the line has Remote Call Forward or Change Number Inception (both of these are BT products and will appear on your customer’s bill) let us know using the tick box. We need the postcode of the local exchange for these products (though if this isn’t available, the postcode on the most recent bill will work).
Confirm that the line is active and that you have the customers consent to port this number (a letter of authority).
Once you’ve selected everything that is required, click Proceed.
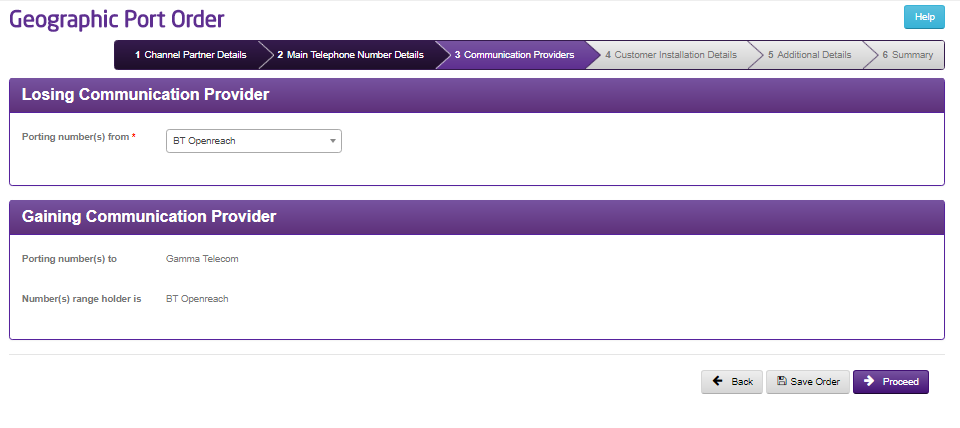
Communication Providers #
Select the communications provider that your customer is currently with (they may be being billed by a different company. If it is a WLR product such as ISDN then this will always be BT Openreach). The Porting Numbers to and Range Holder information is automatically populated.
Customer Installation Details #
Enter the customer’s full details on this screen. It is important that the details that are provided here are what the losing communications provider (their current provider) has, so it is worth mirroring the details that is on their latest bill, though make sure that the postcode is the installation postcode.
Use the “Is the customer in process of changing their address” drop down to answer Yes or No. Depending on what you answer will either load up one text box (No, so we just need one postcode) or two text boxes (Yes, we need the current post code for validation with the losing communications provider and the new one for our 999 database once the number is ported).
Use the tick box to indicate that the customer has changed the address.

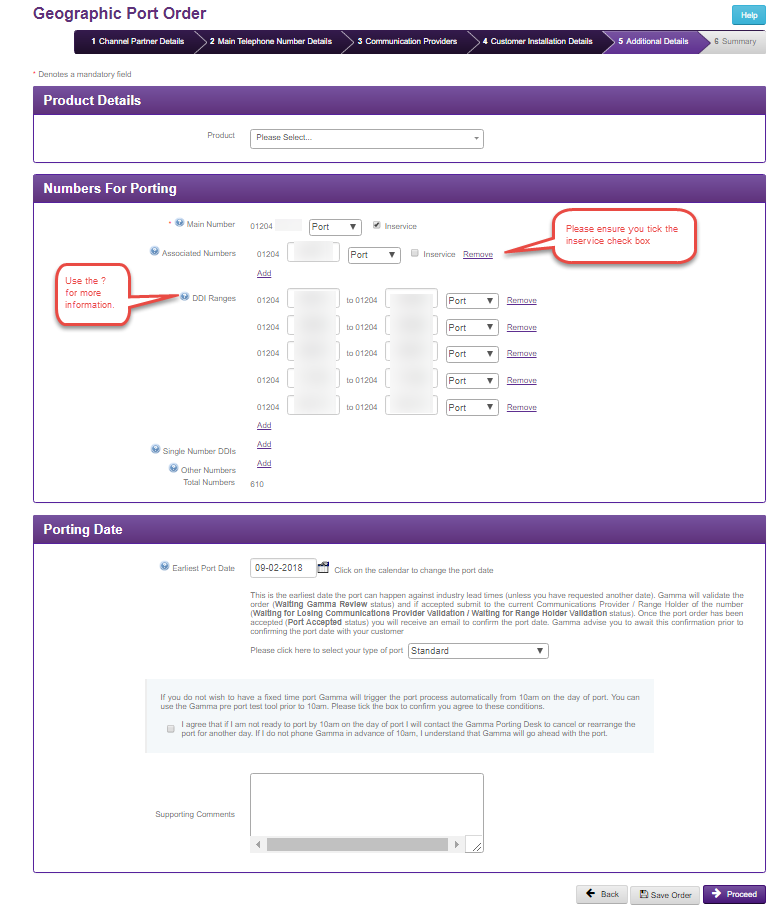
Additional Details #
In the additional details screen you select your product and enter the numbers for porting and also the porting date.
The Porting Date will calculate the industry lead times for your port order based on the information you’ve supplied and to check the availability that Gamma has for your port request. You can change this to a later date.
If your port order is a multi line then you can enter your number details. Click on the “add” button next to the corresponding number type.
If the range holder is BT, DDI Ranges must have a start number that ends with 0, an end number that ends with 9 and must be in multiples of ten. If this is not the case then BT will reject the order. Due to this, we will not allow the order to be submitted at this stage as it is not a DDI range. If you have a bill that shows different please the port order and add in supporting notes the start and end of the range and if you would like this range to port, remain or cease and the Porting Desk can add this for you.
You also have the following options available to you:
|
Port |
Port means that you want to bring this number / range to Gamma. |
|
In Service |
In Service means that you want this number live on your chosen product. If this is not selected, your number will still port to Gamma, but it will not be live and a pre-recorded message will be played to any caller. |
|
Remain |
Select this option if you want the number to remain with the losing communications provider. |
|
Cease |
Select this option if you want the number to cease with the losing communications provider. |
If you select Remain or Cease for any numbers/ranges on the order then this will change the order to a “Complex DDI” order and the lead times will change.
Set your Port Time Type. If you select out of hours you will need to enter details into “Supporting Comments” confirming when during that day you would like to port. All other Port Time Types will go straight to the Losing Communications Provider for their validation unless you enter something into Supporting Comments for the team to pick up before your order is sent off. Any order with supporting comments has an additional 5 day lead time.
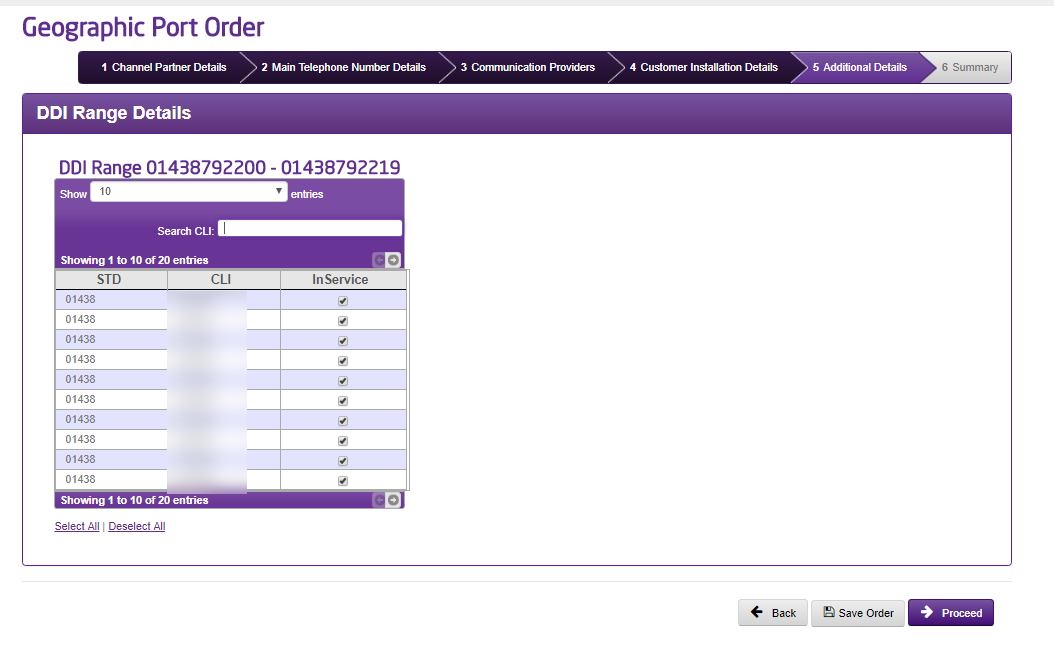
Step 6
If your order has a DDI range and you’ve set the range to port then you will be asked with numbers of the DDI Range you would like to bring In Service.
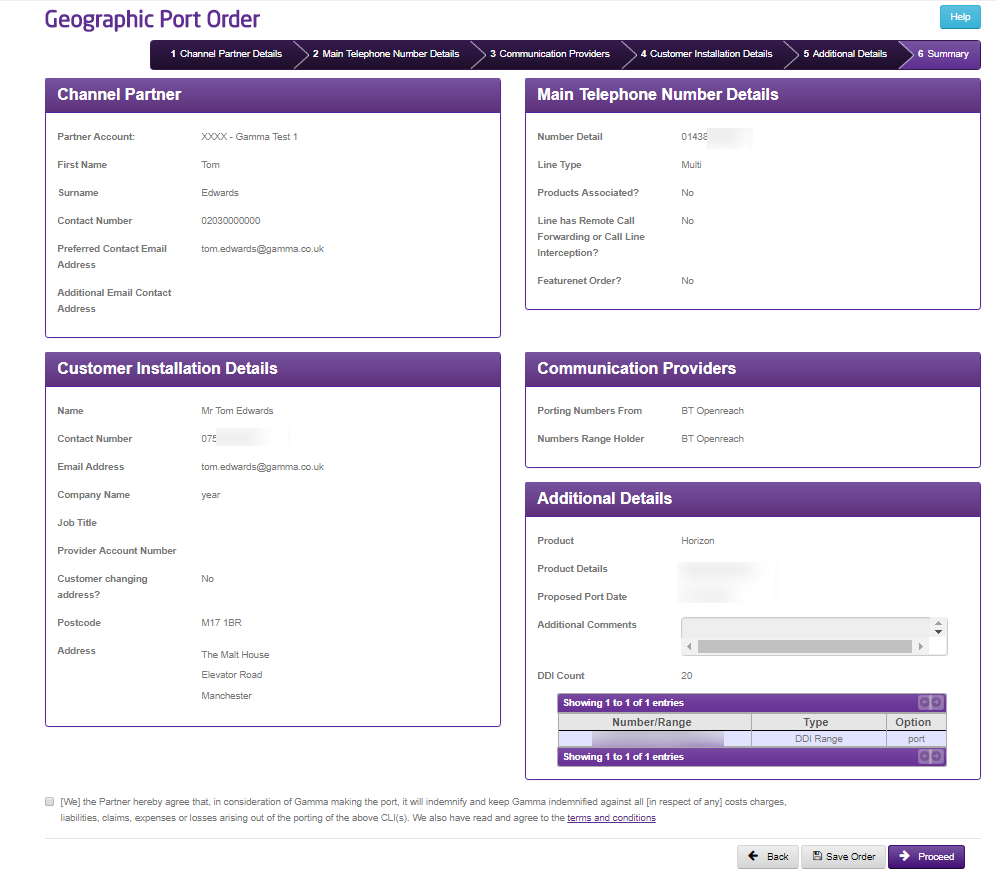
Summary #
You’re now displayed with the summary of your port order. Review this page to make sure that everything you’ve enter is right.
Once you’re ready to submit your order, click “Submit”. If there are no supporting comments on your order then this will go straight to the Losing Communications Provider, otherwise your order will be sent to the Porting Desk.
You can click “Save” here, which will save your order and put into a queue for you to manage. You can Review Your Saved Port Requests at any time.
Manual Port Order #
Manual Port Orders follow the same journey as a port placed on the Gamma Portal, though you will view the orders using the “IPEX and Manual Search” page instead of the Geographic Number Search option.
Whenever you reach certain milestones with your manual port order, we’ll email you to let you know. These milestones are:
- Once we have received your order and validated this
- If this fails validation, we will let you know why
- If this passes validation, we will confirm that we’ve sent this on to the Losing Communications Provider for acceptance.
- Once we have the Losing Communications Provider validation back
- If the order is accepted, we will confirm this and let you know when you can start your Pre Port Test Calls
- If the order is rejected, we will send the rejection details back to you.
- We will send you confirmation that the port has completed.
- You can view the status of these orders in the Gamma Portal.
- If you have completed a pre order validation on a number, you can raise a manual port order directly from the completed POV. This is the quickest way, as the details from the completed POV request will auto-populate your new manual order, leaving you with only a handful of fields to complete, thereby saving you time and effort. Of course, if you wish, you can still raise a manual port order as follows.
Step 1
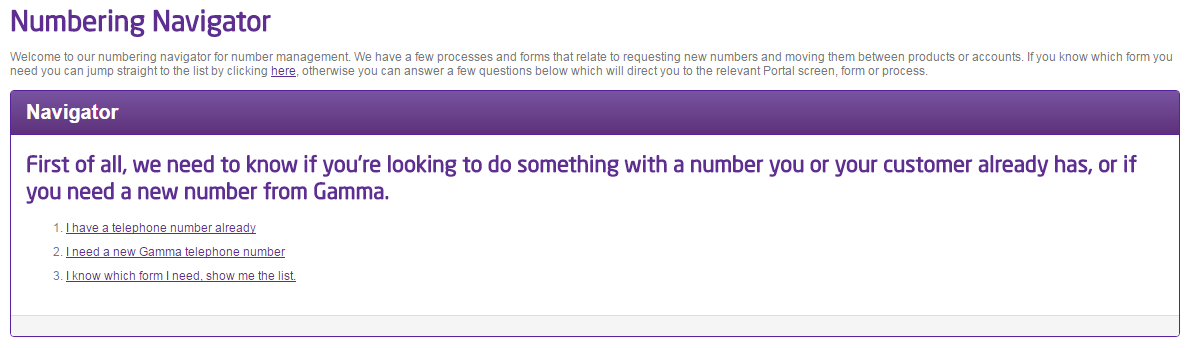
From the Gamma Portal, go to “Help & Support” and “Numbering Navigator”.
If you don’t have this option, contact your Portal Administrator (Help and Support and Portal Administrators) or contact your Internal Account Manager.
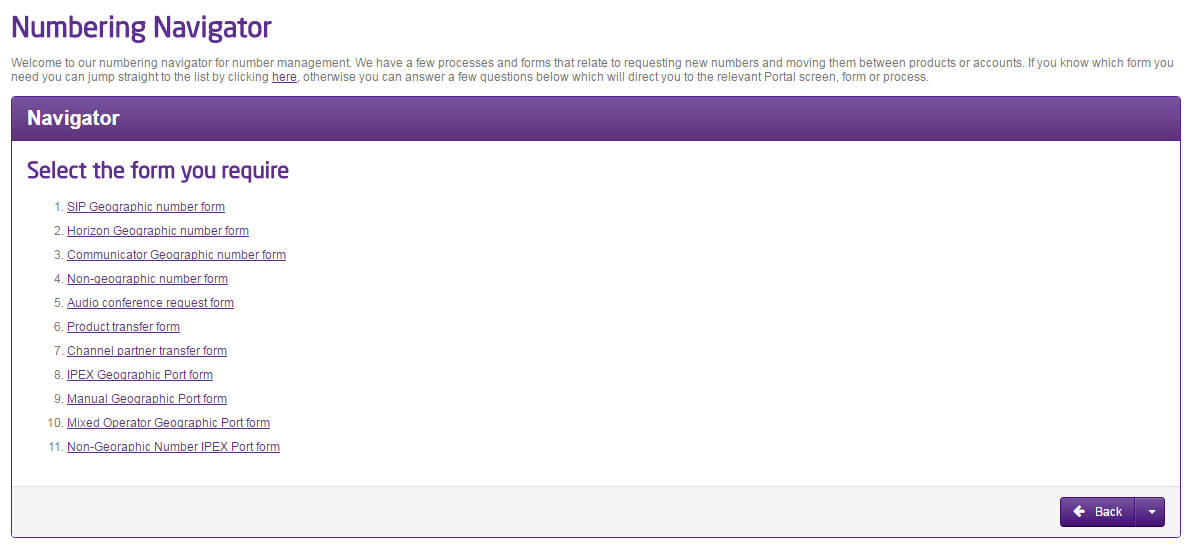
Step 2
Select “I know which form I need, show me the list”

Step 3
Select “Manual Geographic Port Form”
Step 4
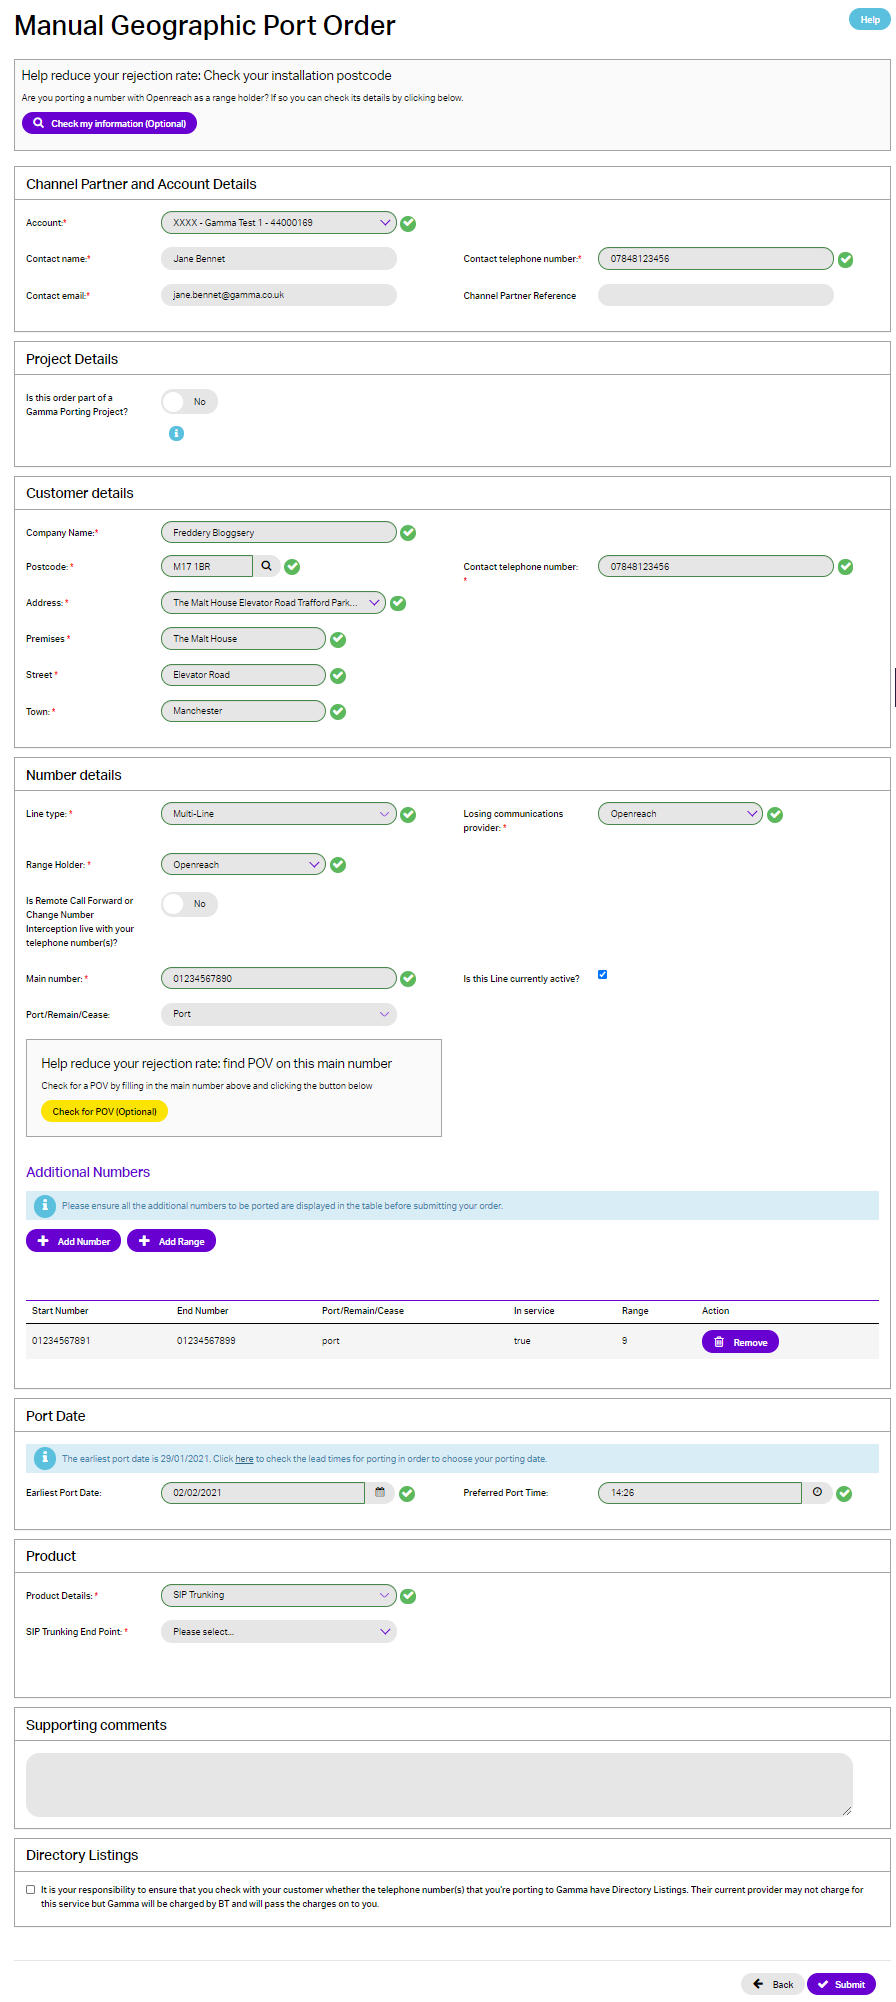
Now you start completing your order
Channel Partner Account Details #
This section is where your details go (and not your end users), so put in the name of the person who is going to be managing the order for your company (this is probably going to be yourself), and the contact telephone number and email address.
Please note: When you place a port order on the portal, it will pre-populate with the contact details from your portal registration. Notifications will be sent to this email address alone.
Customer Details #
Enter your customer details in here. This is what will be sent to the Losing Communications Provider. If the port request is for a new address, record current (old) address in this section and new address including postcode in “Partner Notes” (section 15).
Number Details #
Select whether it is a single or a multi line order.
Enter the main telephone number and then all numbers that are under the main telephone number. You must specify if you want the numbers to port, cease or remain with the losing communications provider (the end user’s current communications provider).
Any numbers that are not attached to the main telephone number that you are wanting to port should be listed here as well.
If you instigated this order directly from a completed POV, the reference of the completed POV request will be displayed under the main telephone number. Alternatively, if you are raising this order from the numbering navigator, you will see a button to Check for POV (Optional). If this main telephone number already has a completed pre order validation (POV) request, you should hit the Check button. Once found, the POV reference will be displayed. This action associates a completed POV request with the port order, helping us to proactively challenge any rejections.
Port Date #
Enter the port date that you wish for your port to happen, keeping in mind that the porting timescales that telecommunications providers must adhere for port orders
Product Details #
Select the product that you are wanting to port onto. The product must be set up and live before placing the port order.
Supporting Comments #
This field is for any supporting information you believe may help with the port (more information is better than not enough information), and for where prompted earlier on in this guide.
When you click “Submit” you will be given a reference number for your order. This can then be managed using the IPEX and Manual Search facility in the Gamma Portal.
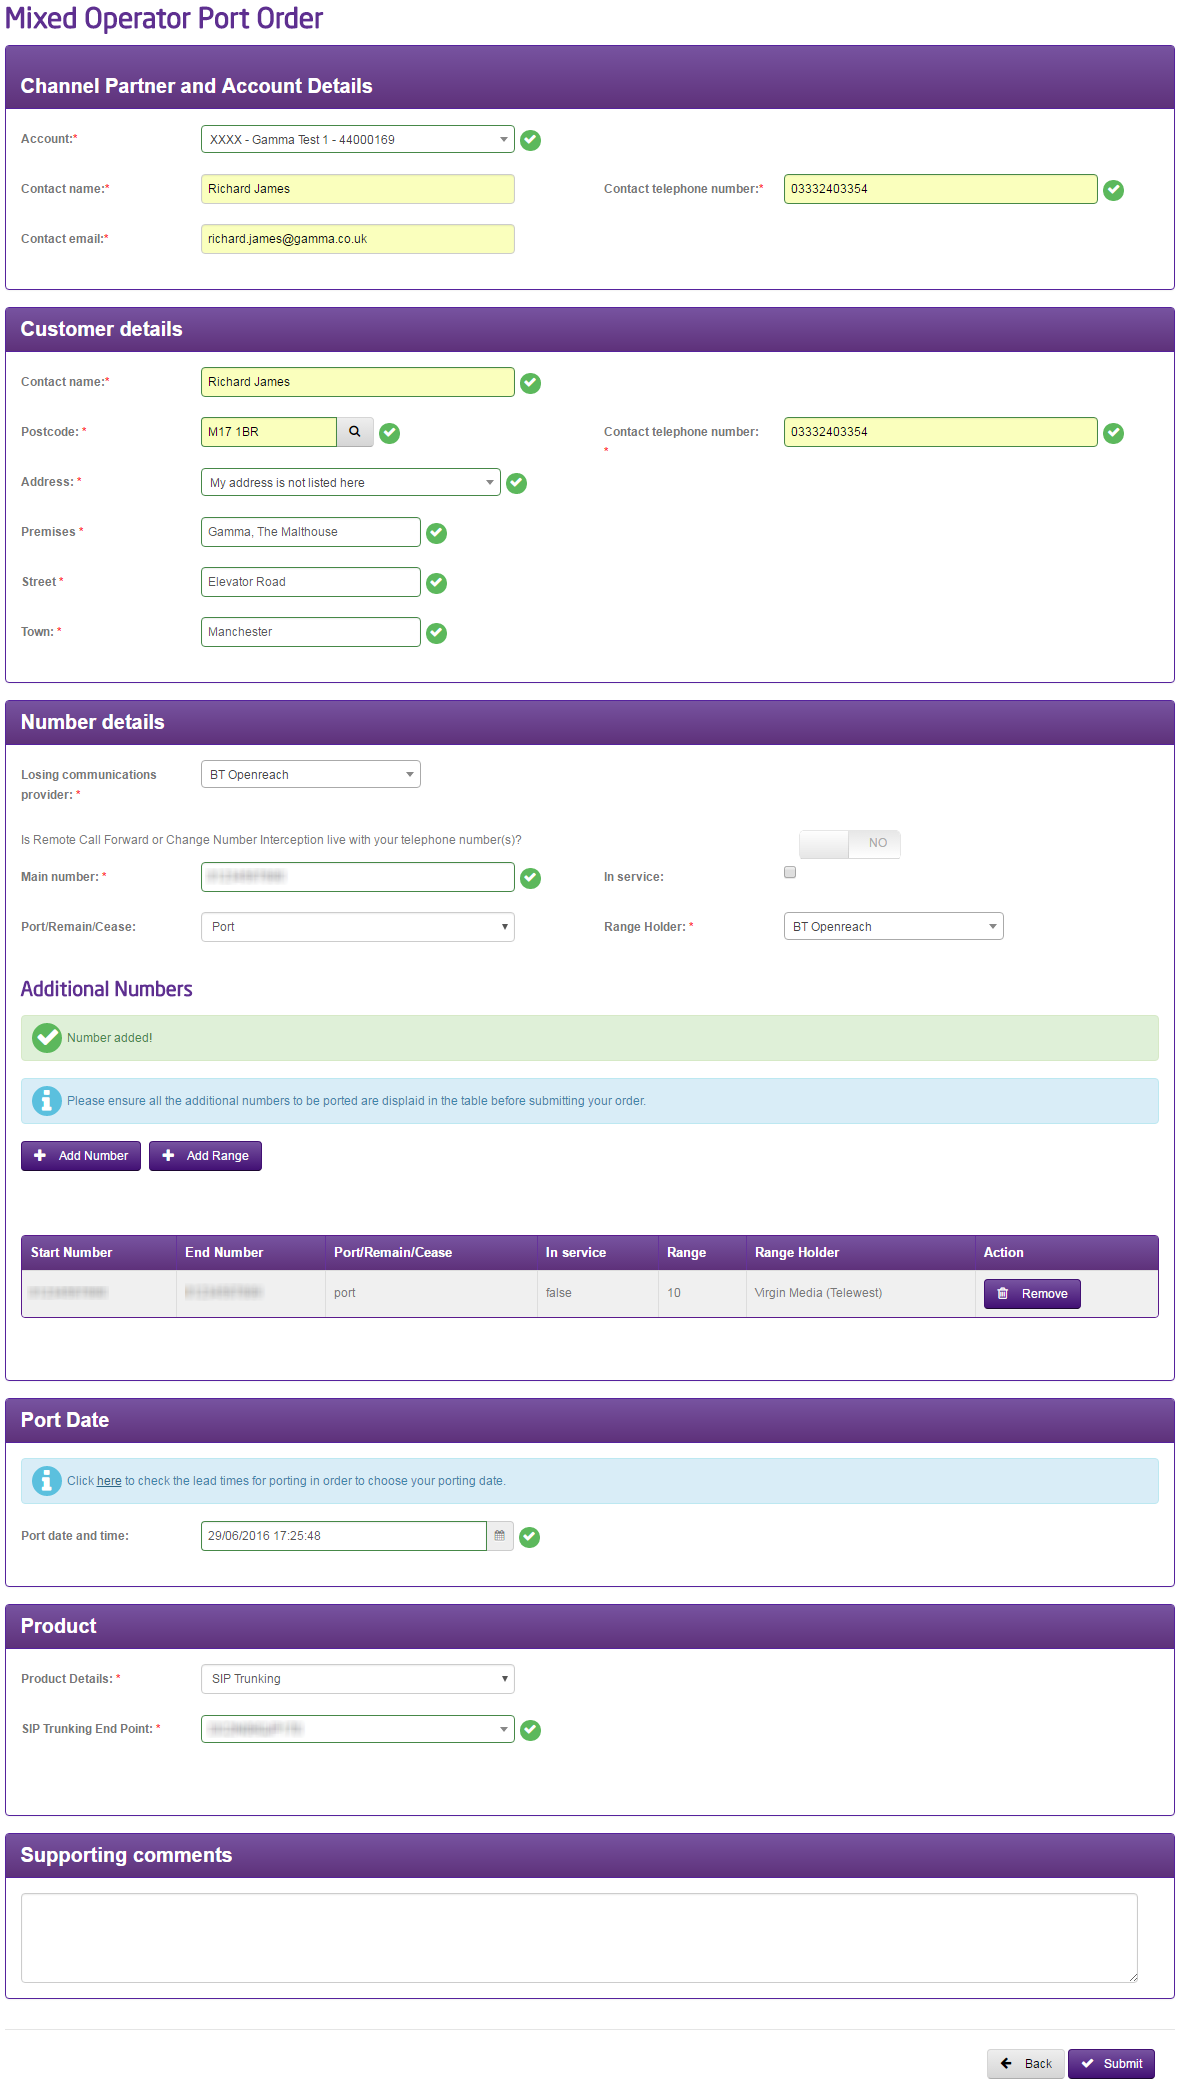
Mixed Operator Port Order #
A Mixed Operator Port is when there are two or more range holders attached to a main number, either within a DDI Range, SNDDI range or associated numbers. A main number is the number that appears on the end user’s bill, so the losing operator will always be the same. Using the Mixed Operator Port page, you can view examples and follow the process on how to submit one of these requests.
Please note: When you place a port order on the portal, it will pre-populate with the contact details from your portal registration. Notifications will be sent to this email address alone. There is an option for you to add a secondary email address here. We strongly recommend that you add another email address to the distribution list for your order notifications as this may prove to be critical to the smooth delivery of your project in the final stages.
Please note Mixed orders will always fall into the SUP category and will depend on the amount of numbers being ported – please see “Porting Timescales” section of this document for further information.
Step 1
From the Gamma Portal, go to “Help & Support” and “Numbering Navigator”.
If you don’t have this option, contact your Portal Administrator (Help and Support and Portal Administrators) or contact your Internal Account Manager.
Step 2
Select “I know which form I need, show me the list”
Step 3
Select “Mixed Operator Geographic Port Form”

Step 4
Now you start completing your order
Channel Partner Account Details #
This section is where your details go (and not your end users), so put in the name of the person who is going to be managing the order for your company (this is probably going to be yourself), and the contact telephone number and email address.
Please note: When you place a port order on the portal, it will pre-populate with the contact details from your portal registration. Notifications will be sent to this email address alone.
Customer Details #
Enter your customer details in here. This is what will be sent to the Losing Communications Provider. If the port request is for a new address, record current (old) address in this section and new address including postcode in “Partner Notes” (section 15).
Number Details #
Select whether it is a single or a multi line order.
Enter the main telephone number and then all numbers that are under the main telephone number. You must specify if you want the numbers to port, cease or remain with the losing communications provider (the end user’s current communications provider). For each number you add to this order you will need to select the range holder. If the range holder is the same on them all you need to either pace a Manual Port Order or a Geographic Number Port (GNP) Order.
Any numbers that are not attached to the main telephone number that you are wanting to port should be listed here as well.
Port Date #
Enter the port date that you wish for your port to happen, keeping in mind that the porting timescales that telecommunications providers must adhere for port orders
Product Details #
Select the product that you want to port onto. The product must be set up and live before placing the port order.
Supporting Comments #
This field is for any supporting information you believe may help with the port (more information is better than not enough information), and for where prompted earlier on in this guide.
When you click “Submit” you will be given a reference number for your order. This can then be managed using the IPEX and Manual Search facility in the Gamma Portal.
Geographic IPEX Port Order #
If we do not have a Porting Agreement in place with a provider, it may still be possible to port numbers to Gamma using IPEX. IPEX is a BT interconnect, and BT port the numbers onto the interconnect and send the traffic through to Gamma so that you can use a Gamma product as your customers telephony solution.
To check that you’re placing the order to port from a Communications Provider and not a Reseller then please see the Ofcom CUPID (Communications Provider Identity) document which is available on the Ofcom Numbering Site. If the Communications Provider is listed here then the IPEX order will be accepted, otherwise it is a reseller and you will need to contact them to ask who the communications provider is.
If you have completed a pre order validation on a number, you can raise an IPEX port order directly from the completed POV. This is the quickest way, as the details from the completed POV request will auto-populate your new IPEX order, leaving you with only a handful of fields to complete, thereby saving you time and effort. Of course, if you wish, you can still raise an IPEX port order as follows.
Step 1
From the Gamma Portal, go to “Help & Support” and “Numbering Navigator”.
If you don’t have this option, contact your Portal Administrator (Help and Support and Portal Administrators) or contact your Internal Account Manager.
Step 2
Select “I know which form I need, show me the list”

Step 3
Select “IPEX Geographic Port Form”

Step 4
Now you start completing your order
Channel Partner Account Details #
This section is where your details go (and not your end users), so put in the name of the person who is going to be managing the order for your company (this is probably going to be yourself), and the contact telephone number and email address.
Please note: When you place a port order on the portal, it will pre-populate with the contact details from your portal registration. Notifications will be sent to this email address alone.
Customer Details #
Enter your customer details in here. This is what will be sent to the Losing Communications Provider. If the port request is for a new address, record current (old) address in this section and new address including postcode in “Partner Notes” (section 15).
Number Details #
Select whether it is a single or a multi line order.
Enter the main telephone number and then all numbers that are under the main telephone number. You must specify if you want the numbers to port, cease or remain with the losing communications provider (the end user’s current communications provider).
Any numbers that are not attached to the main telephone number that you are wanting to port should be listed here as well.
If you instigated this order directly from a completed POV, the reference of the completed POV request will be displayed under the main telephone number. Alternatively, if you are raising this order from the numbering navigator, you will see a button to Check for POV (Optional). If this main telephone number already has a completed pre order validation (POV) request, you should hit the Check button. Once found, the POV reference will be displayed. This action associates a completed POV with the port order, helping us to proactively challenge any rejections.
Port Date #
Enter the port date that you wish for your port to happen, keeping in mind that the porting timescales that telecommunications providers must adhere to for port orders. Please be advised that port dates for IPEX cannot be guaranteed and are completed on a best endeavours basis. Also please note that IPEX ports are not usually able to be completed during evenings or over a weekend as standard (please contact portingjeopardy@gamma.co.uk if you require details on IPEX out of hours service).
Product Details #
Select the product that you are wanting to port onto. The product must be set up and live before placing the port order.
Supporting Comments #
This field is for any supporting information you believe may help with the port (more information is better than not enough information), and for where prompted earlier on in this guide.
When you click “Submit” you will be given a reference number for your order. This can then be managed using the IPEX and Manual Search facility in the Gamma Portal.
Losing Communications Provider / Range Holder Validation #
We will always send your port order off to the Losing Communications Provider first for validation. We should have an order either accepted or rejected within the following timescales:
- Single Line – 24 hours (Monday – Saturday)
- Multi Line – 48 hours (Monday – Friday)
If your order is a subsequent port and its accepted we then forward this on to the Range Holder for their validation checks. We should have the order accepted or rejected once we’ve sent to them within the following timescales:
- Single Line – 24 hours (Monday – Saturday)
- Multi Line – 48 hours (Monday – Friday)
If we have not received an answer to your order within these timescales we call this an “Unacknowledged Order”. We send a daily report chasing orders that are outside of SLA to Communication Providers we have outstanding orders with. We proactively chase these orders daily.
Accepted Orders #
If your order is a Provide order, then you will only get one acceptance for an order. If the order is Subsequent then we need to get it accepted from the Losing Communications Provider AND the Range Holder. Once a port order is fully accepted you have your confirmed port date. You can change this date if you want using our Date Change process.
You will receive an email when your order is in an accepted state advising when you can complete pre port test calls. For all product except Horizon this will be soon after the order is accepted. For Horizon, this will be from 12noon the day before port.
Rejected orders and Representing the orders #
A rejection can come from the Losing Communications Provider or Range Holder only for reasons on the actual order (and not to “save” a customer or because of debt reasons). If a port is rejected you can edit and resubmit your order (“Represent” order). If you do this there are some tight timescales associated in getting the order back to the Losing Communications Provider and/or Range Holder. These are:
- 24 hours (Monday – Saturday) from losing communications provider rejection for Single Line Orders
- 48 hours (Monday – Friday) from losing communications provider rejection for Multi Line Orders
If you do not resubmit the order within these timescales, then the order will cancel down and you will need to restart the order.
Resubmit an order – GNP #
If you need to edit and resubmit an order you should follow these steps:
Step 1
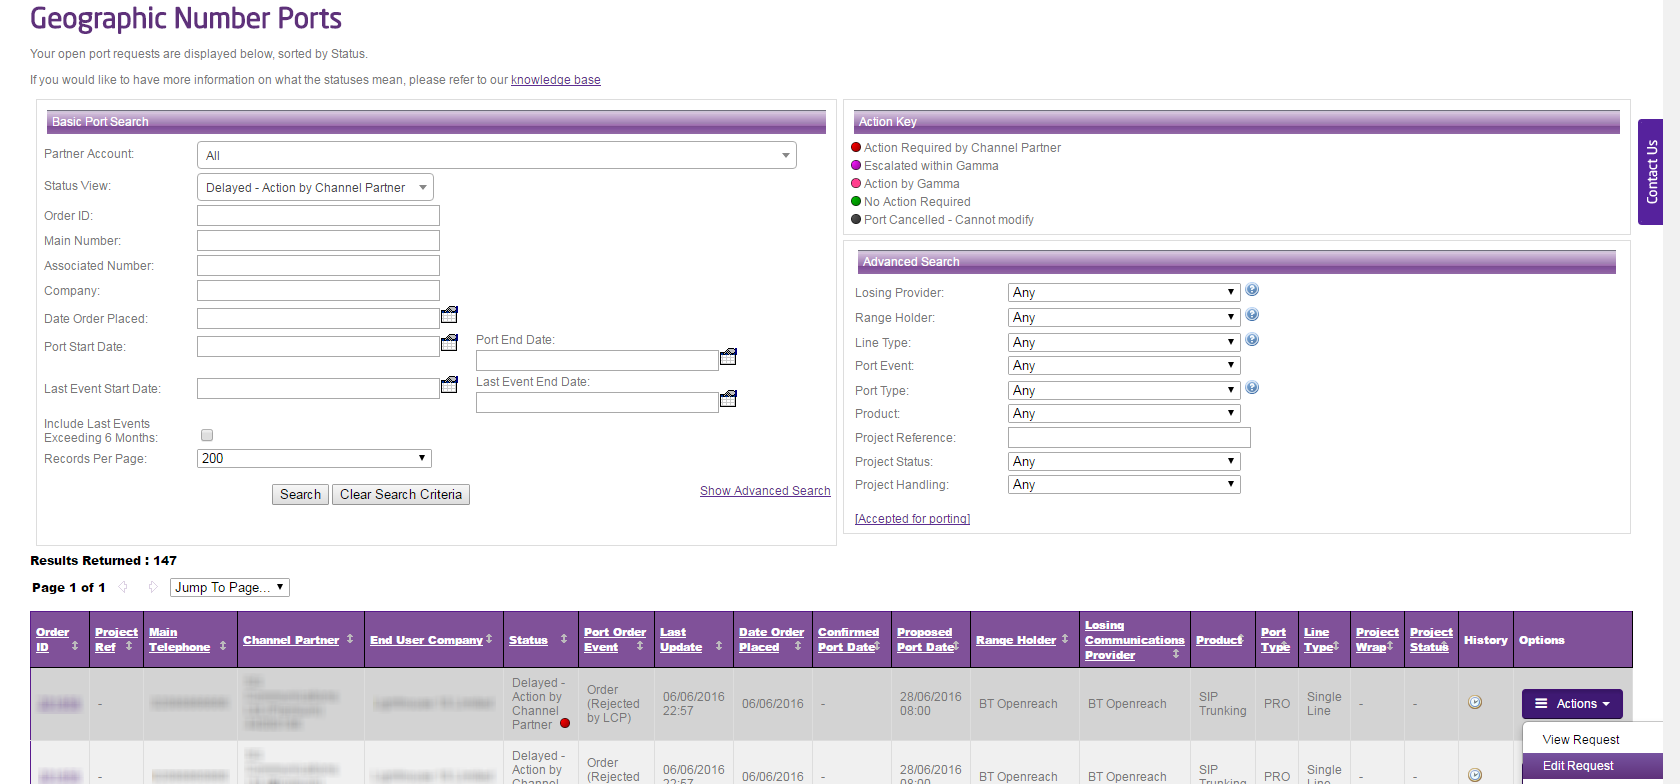
From the Gamma Portal, go to “Number Porting”, “Geographic Number Porting”, “Geographic Port Order Search”.
If you don’t have this option, contact your Portal Administrator (Help and Support and Portal Administrators) or contact your Internal Account Manager.
Step 2
Search for your port order and then using the Actions dropdown click “Edit Request”
Step 3
You are now presented with the Order My Geographic Number Port screens again. Edit the relevant details as documented on the email and then submit the order again.
IPEX Orders #
Once you’ve placed an IPEX order on our Numbering Navigator our Porting Desk completes to checks to make sure that the Losing Communications Provider is a communications providers and not a reseller and that the Range Holder is correct. If this is correct, we place the order with BT Wholesale to port onto our IPEX Interconnect.
An IPEX port order should be treated the same as any other geographic port order.
Update 13/02/2018 – We have now added in two new features for NGN IPEX orders these are as follows.
We now have the option for SIP as the termination point for the NGN IPEX port order.
When adding numbers on the NGN IPEX order form you could only do these one at a time. We have now added a bulk option to allow you to add up to 100 numbers.
IPEX Scenarios #
When we’re porting numbers onto our BT IPEX (short for IP Exchange) account we get information back regarding “scenarios”. These scenarios are order types that are deemed by BT IPEX. Below is a table which details these scenarios and what can/can’t be done.
|
Scenario Reference |
Description |
Next Steps |
|
1 |
This is a BT telephone number (where BT is the Range Holder) is to be ported from the BT Public Switched Telephone Network (PSTN) or VoIP (Voice over Internet Protocol) to IP Exchange. |
Number can be ported |
|
2 |
This is where a BT telephone number (so BT are the Range Holder) has been exported to another communications provider (a LCP) and is to be ported to IPEX |
Number can be ported |
|
3 |
This is where the range holder is not BT and the RH is also the losing communications provider and the number is to be ported to IPEX. |
Number can be ported |
|
4 |
This is where the range holder is not BT but the number is already on BT’s PSTN and the number is to be ported to IPEX. |
Number can be ported |
|
5 |
This is where the range holder and losing communications provider are different and not BT, but the number is due to port to IPEX. |
Number can be ported |
|
6 |
This is where numbers in a block (DDI range) have more than one range holder (Mixed Operator) and the numbers are to be ported to IPEX. |
Number can be ported |
|
7 |
The number is already hosted on BT IPEX with another service provider. |
Number cannot be ported |