Skip to content
  • Academy KB Home Redesign
  • Broadband Home
  • CCaaS
  • Channel Partner Support
  • Circle Loop Home
  • Collaborate
  • Connectivity
  • Courses
  • Documentation
  • Ethernet
  • FibreXchange
  • FUSION IoT
  • Gamma AI Concierge
  • Gamma Plus
  • Gamma SIP for Cloud Connect
  • Gamma SIP Global Communications Enablement
  • Gamma SIP Trunks for Genesys Cloud
  • Hannah – Homepage WIP
  • Home
  • Horizon
  • Horizon Contact
  • Horizon Forms
  • Horizon Service Description Home
  • Horizon with Webex
  • Inbound
  • iPECS
  • Knowledge Base Intro
  • Knowledgebase Directory
  • LoginPress
  • Microsoft
  • Microsoft Teams Direct Routing Home
  • Microsoft Teams Operator Connect
  • Mobile
  • Multiple KB
  • My Courses
  • No Access
  • No active page
  • Numbering and Porting
  • Phoneline+
  • Product Homepage
  • Quick Download Button
  • Release Notes
  • Release Notes
  • SIP Home
  • Test
  • UCaaS
  • User Account
  • Voice
  • Voice Enablement
  • Webex for Gamma
  • Webex for Gamma Release Notes
  • Gamma Academy Knowledge Base
Gamma Academy Knowledge Base
  • Cloud Calling and Collaboration
    • Webex for Gamma
    • Horizon with Webex
    • Horizon
    • Phoneline+
    • Operator Connect
    • Direct Routing
    • Inbound
    • Akixi CX Analytics
    • Red Cactus
  • Connectivity and Networking
    • Numbering and Porting
    • Broadband
    • FibreXchange
    • Ethernet
    • SIP Trunking
    • Gamma FUSION IoT
  • CX
    • Horizon Contact
    • AI Concierge
  • Mobile Services
    • Gamma Mobile
  • CyberSecurity
    • SafeWeb
  • Partner & Portal Support
Gamma Academy Knowledge Base

Provisioning and In-Life Changes

  • Before Ordering Mobile
    • Mobile Short Codes
  • eSIM Functionality
    • Viewing eSIM stock whilst provisioning
    • Viewing SIM Type and Service Provider Name (SPN)
  • Configuring and Ordering Mobile
    • Quick Start Guide to Provisioning Mobile
    • Ordering Sims and Mobile Numbers
    • Mobile – Add Company
    • Mobile Provisioning Process (Including Ports)
    • Mobile – Activating a Service
    • Mobile Data and MMS Settings (Including APNs)
  • In-Life Mobile Configuration
    • Mobile Managing Companies
    • Mobile – Manage Phone Service
    • Porting a Number Onto an Active Gamma Mobile Connection
    • SIM Swap to the Enhanced Gamma Mobile Service
    • Mobile Roaming
    • Block Outgoing Calls
  • Configuring and Ordering Manage My Mobiles
    • Configure Manage My Mobiles Portal
    • Manage My Mobiles – New Company Provision
    • Manage My Mobiles – Allocating Numbers
    • Manage My Mobiles – Existing Company Provision
    • Manage My Mobiles – Tracking Your Order/Actions
  • In-Life Configuration - Manage My Mobiles
    • Manage My Mobiles Portal
    • Manage My Mobiles – Manage a Person
    • Manage My Mobiles – Groups
    • Manage My Mobiles – Branding
    • Manage My Mobiles – Audit Log
    • Manage My Mobiles – Call Forwarding Options
    • Manage My Mobiles – Statistics
    • Manage My Mobiles – Alert Types
    • Cease Manage My Mobiles

Features

  • Mobile Inactive Number Search
  • Mobile Usage Control Management
  • Gamma Roaming Countries and Networks

Technical Support

  • Guides for Problems with Mobile
  • Lost and Stolen Phone Help
  • Mobile Known Behaviours
  • Gamma Mobile FAQs
  • Mobile Glossary
  • Handset Support
    • Handset Support iOS
    • Using Nokia Lumia with Gamma SIM
    • Using MMS on Windows 8 Devices

Service Description

  • Gamma Mobile Service Descriptions

Mobile SLAs

  • Mobile SLAs
  • Home
  • Home
  • Gamma Mobile
  • Provisioning and In-Life Changes
  • Configuring and Ordering Manage My Mobiles
  • Manage My Mobiles – New Company Provision
View Categories

Manage My Mobiles – New Company Provision

The following process will walk you through how to set up a new Company and how to also set up the Manage My Mobiles portal for your customer.

We have a support video on the Academy that will show you step by step on how to set up Manage My Mobiles, this video is found in the Mobile Provisioning course. We would recommend that you complete the Mobile Beginner course and watch the previous Mobile Provisioning Beginner videos prior to watching this one.

This support guide will talk you through step by step on how to provision this website for your customer, for a new mobile company and also and existing one too. We will also cover what the key differences are between the Manager and Reporter users within Manage My Mobiles.

Please Note: Manage My Mobiles will only work if the users are on the new Gamma tariffs
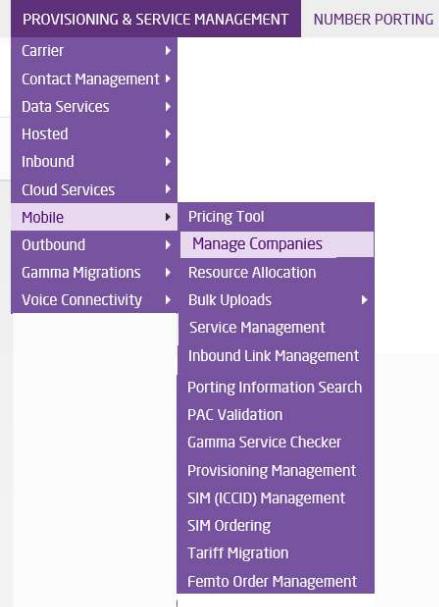
Step 1

First you will need to go to the Provisioning and service management tab then go to mobile then select Manage Companies.
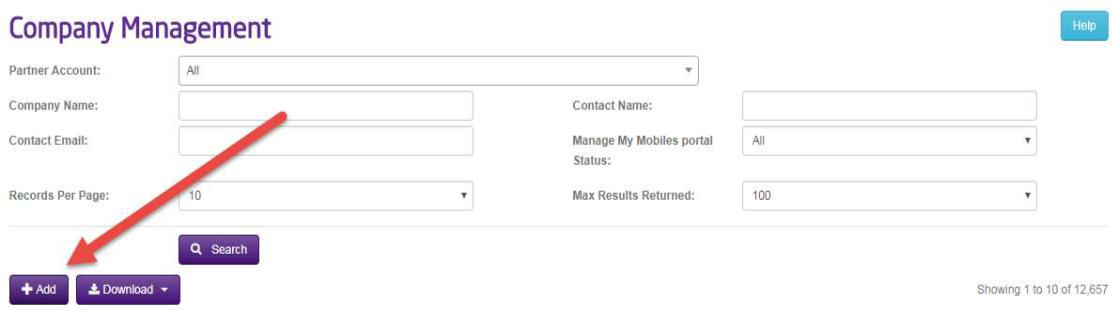
Step 2

Now select the + Add button
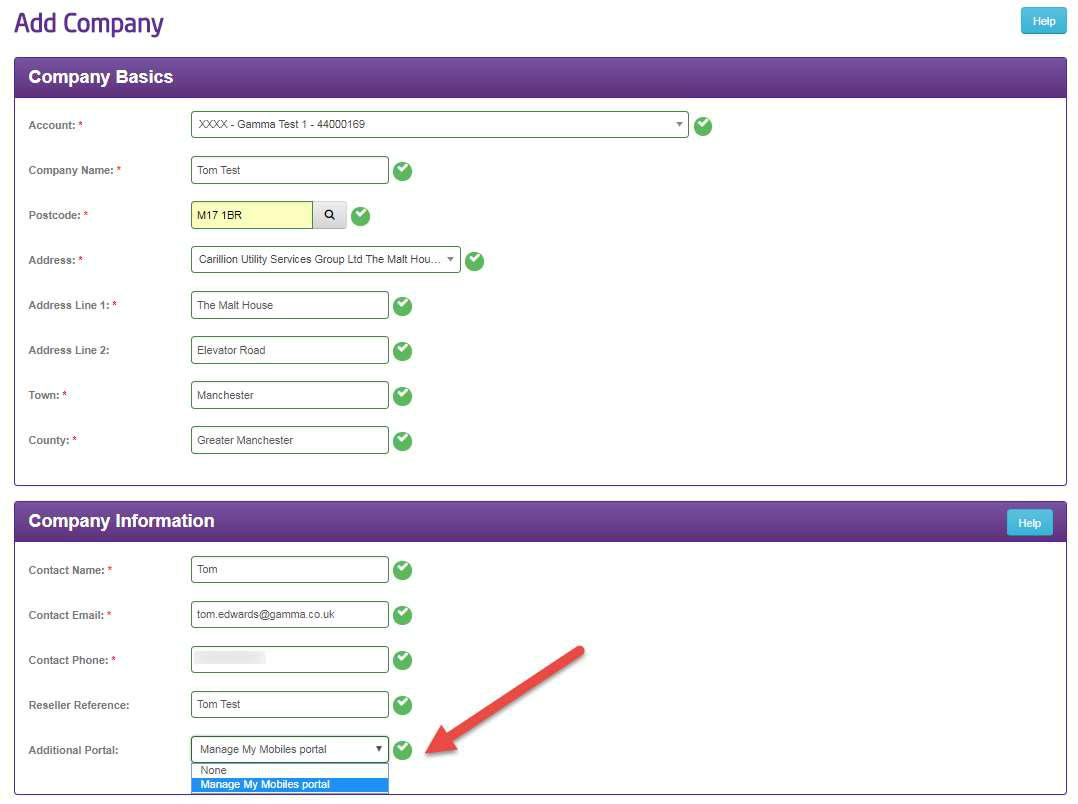
Step 3

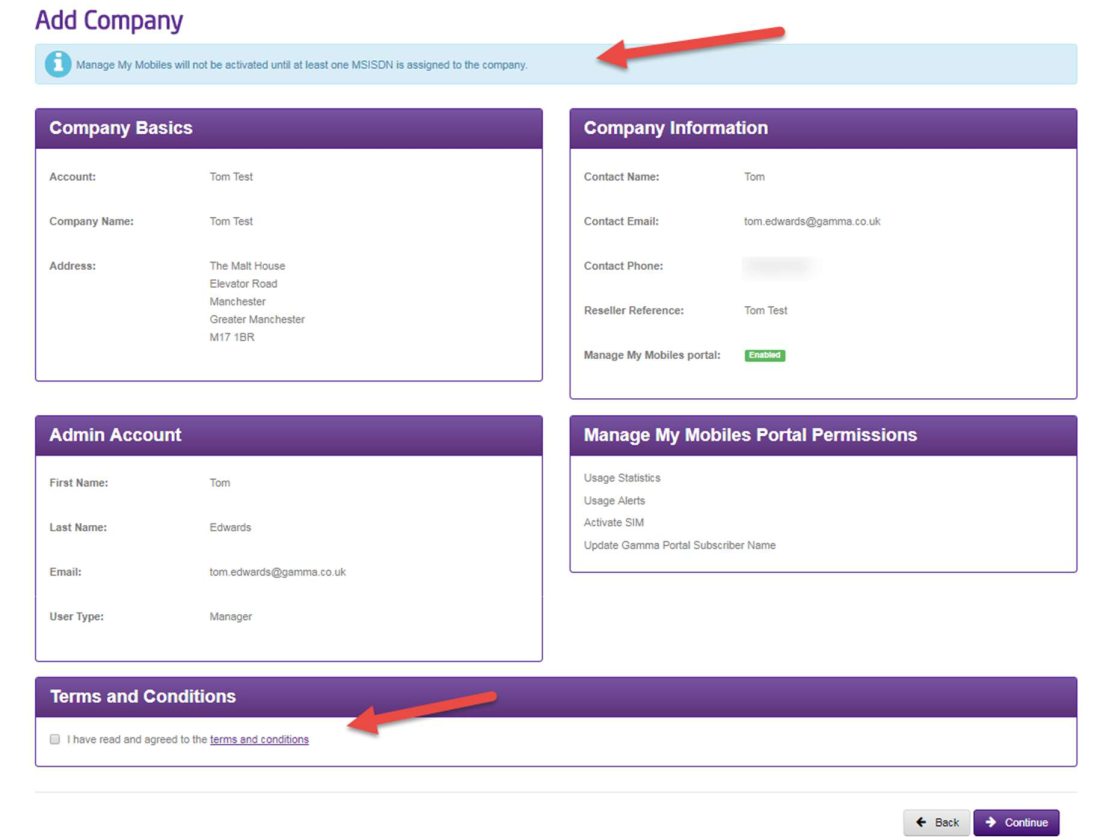
Now fill in the boxes displayed with the required information. Please note to add the Manage My Mobiles portal you will need to select this at the bottom of the page.
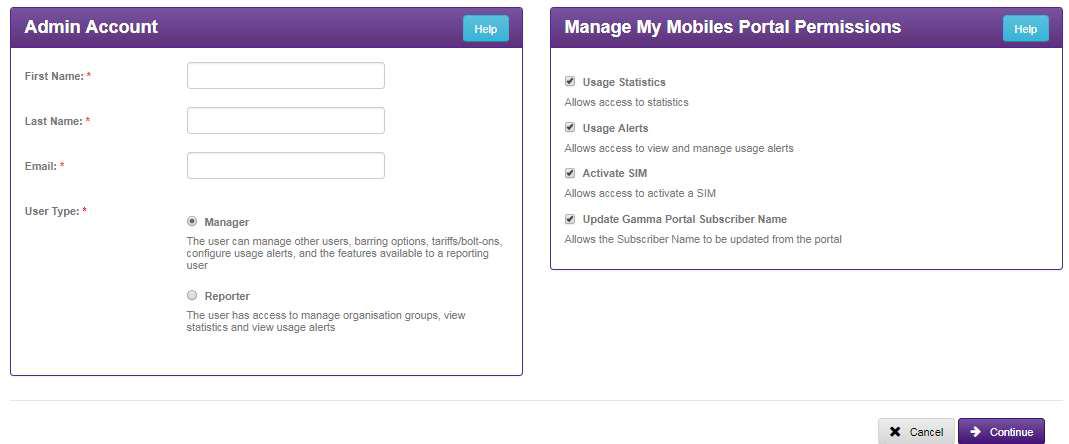
Step 4

After selecting the Mange My Mobiles portal you will be presented with two further boxes as shown below.

The Admin Account details are to be the details of the end user of the portal, they will be sent an email once the setup has been completed which they will need to use to create their account. Please select the relevant access you require them to have, if you toggle from Manager to Reporter you will see in the permissions box what these user types have the ability to control in the Manage My Mobiles portal.

Step 5

Please note that the Manage My Mobiles portal will not be activated until at least one Mobile number is assigned to the company. Please check all the details on this page and read the terms and conditions before clicking continue.

Step 6

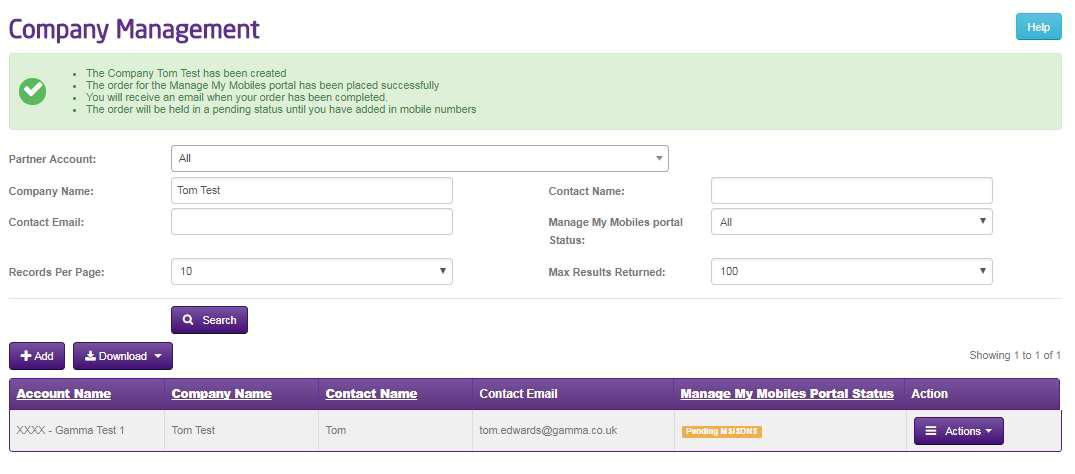
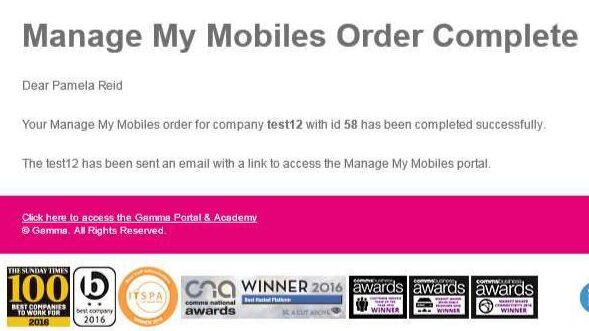
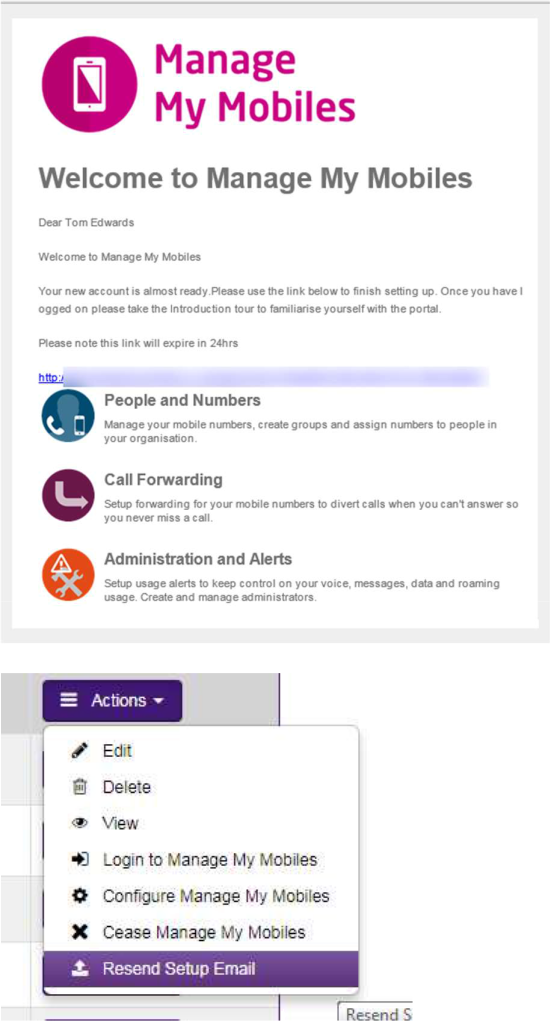
You will now see that a company has been successfully set up and that the company is now pending mobile numbers. Once the order for the Manage my mobiles account has been completed you will see the below confirmation email.

Confirmation Email

Step 7

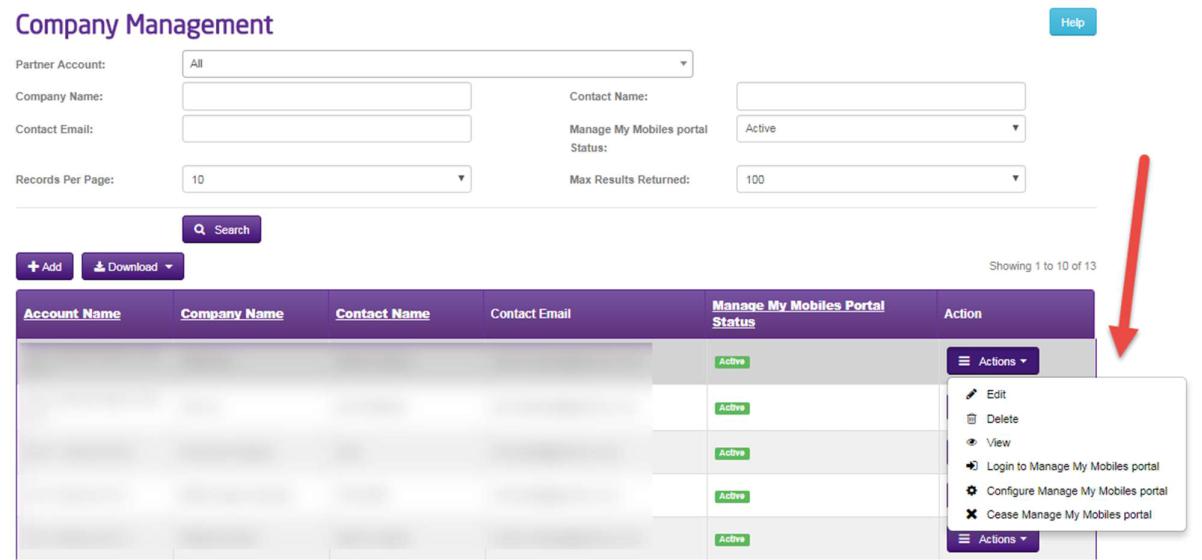
Once the company has numbers assigned to it, your customer will get the registration email and you will have some new options on the actions tab within company management. From here you will be able to log into you customers Manage My mobiles portal

Email your customer will receive, to resend this use the actions tab on the relevant company and click resend.

Step 8

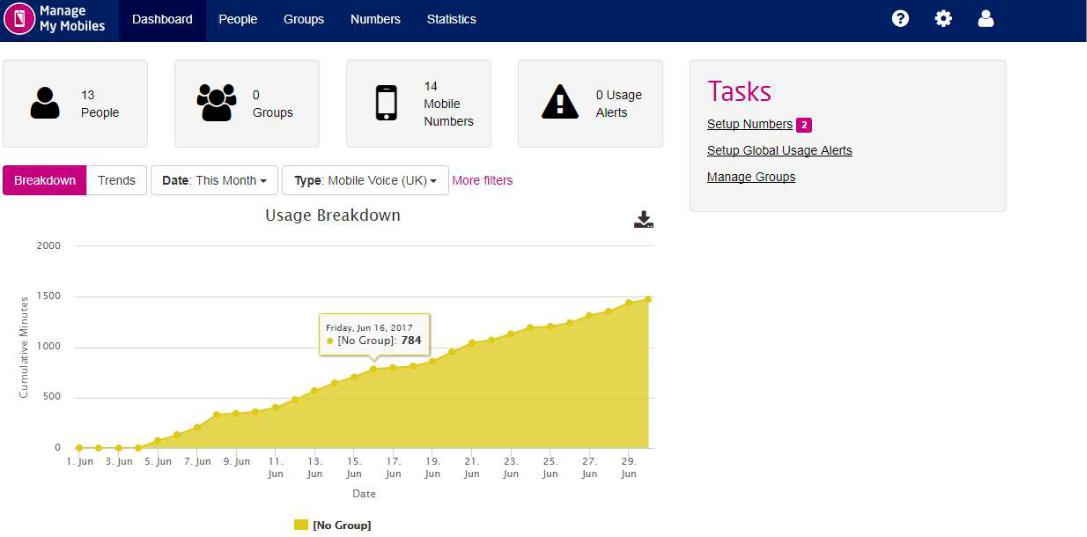
If you click to login to the Manage My Mobiles Portal you will be directed to a new window in your browser and you will taken to the Manage My Mobiles landing page. Please note you may not see data populated in the graph when you first login as this will need to build after users have been added.

Step 9

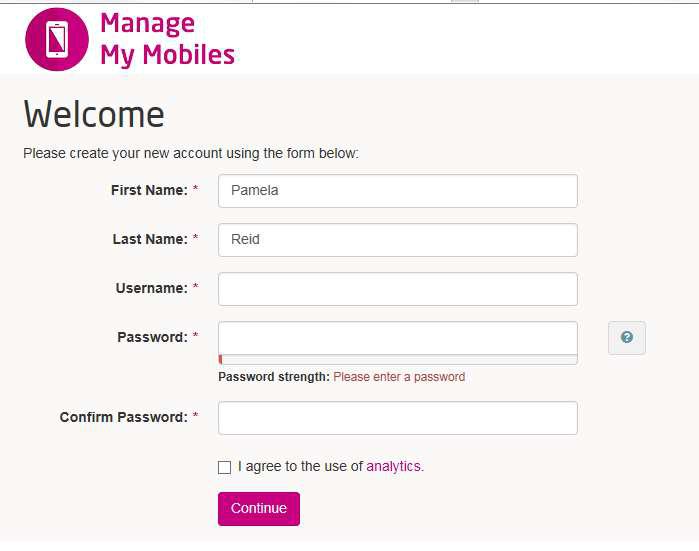
On clicking the link on the invite email your end user will be directed to the sign up page (shown below). On this page, the admin must enter a username and create a password. The password should include one lowercase letter, one uppercase letter, one number, one special character and be at least 8 characters in length. On this page the user must also use the tick box to agree to the use of analytics, then click continue.

Step 10

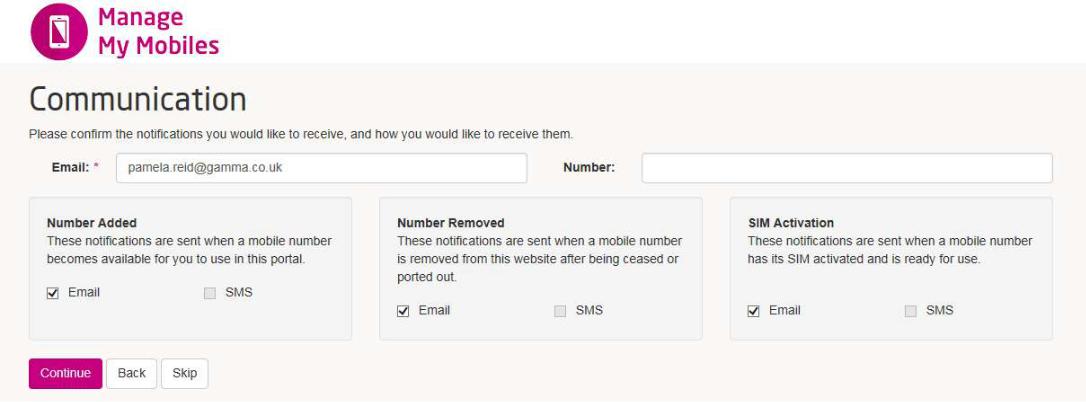
The next page you will be taken to is the Communications page. On this page you must update and confirm what notifications you would like to receive and how you would like to receive them. Once

the choices have been selected and the relevant information entered, click continue. Alternatively you can skip this option and update these details later. Similarly, should you need to make a change on the previous page, click “back”.

Once you have entered all of your details at your request, click continue and you will be taken to the Setup Complete page.

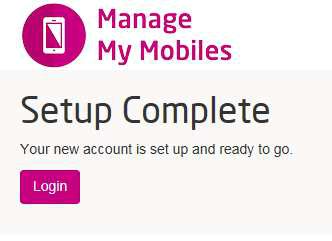
From this page you can click the button to login to your Manage My Mobiles Portal.

Updated on 16/01/2024
Configure Manage My Mobiles PortalManage My Mobiles – Allocating Numbers

Copyright © 2026 -  Gamma Telecom Ltd

Gamma API
We use cookies to measure performance and make improvements to this service. This includes page views, device/browser, location, and page interactions. We do not collect any information you upload to this site. By agreeing, you consent for your data to be used for this purpose.