IVR Welcome Message #
IVR Welcome message Access Restrictions:
Customer This control is part of the Auto attendant capability so customer must have subscribed to Contact Pro to access it.
IVR Description #
The IVR Welcome message control can be used to build interactive call handling where the calls are to be routed according to options selected by the caller. An example, might be where a company has different teams answering enquires on billing, product support and new sales.
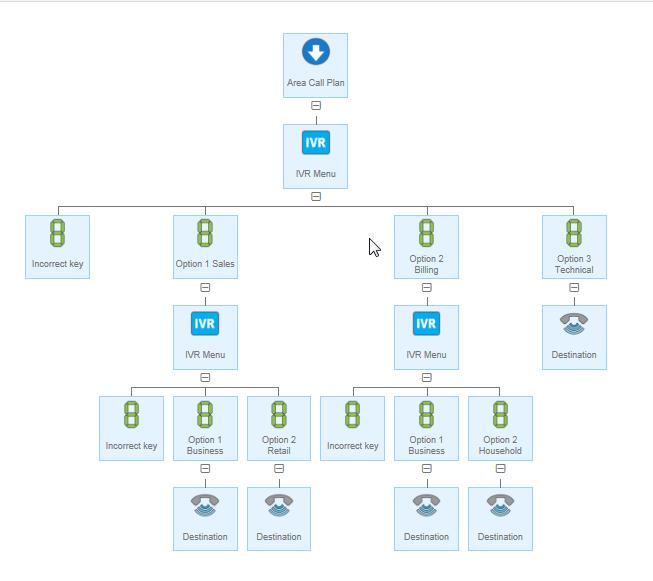
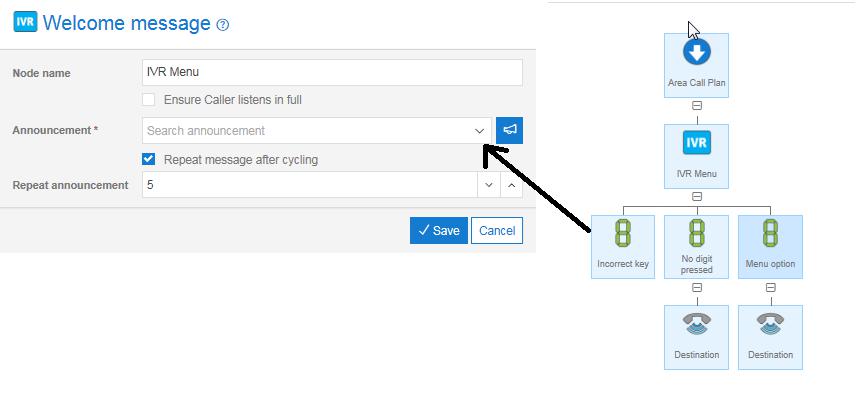
The only valid child nodes for an IVR Welcome message controls are Menu Options. To build up a complex IVR hierarchy you can make IVR Welcome message controls the children of Menu Option controls as in the example below.
IVR Tip #
Don’t forget to program the Incorrect key and No Digit Pressed for callers that select an invalid option or fail to select a valid option at all.
There is a generic (System default) “You have selected an incorrect key” announcement already uploaded to the platform which can be used. Following the Incorrect Key announcement, the IVR announcement will then be replayed to the caller.
The No Digit Pressed node is optional. It can be used to ensure a business does not disconnect callers where they fail to select an option, or for some reason it is not being recognised by the platform. You would then configure, essentially, a default route for these callers (customer service etc.). The option can also be used where you want to announce for the caller instead of pressing a key, please hold to be connected to the … “switchboard, reception etc.
It should be noted that the afore mentioned “hold” time (where this option is selected) has a duration of approx. 3 seconds, and only triggers after the IVR announcement has repeated according the IVR configuration settings. It would be recommended where this option is used, you do not select the “Repeat Announcement” option.
IVR Rules #
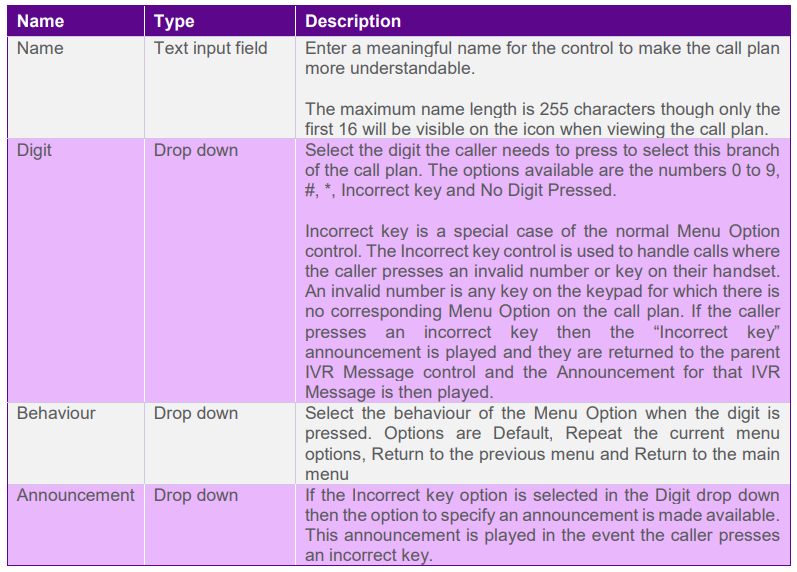
The only child controls you can add to an IVR Welcome message are Digit controls/menu options; there are no other valid children of this control.
The IVR Welcome message must have at least one child Digit defined and one Digit (Invalid key) action defined.
IVR Welcome messages can be nested to build up multiple layers but the parent node will be a Digit control rather than another IVR Welcome message.
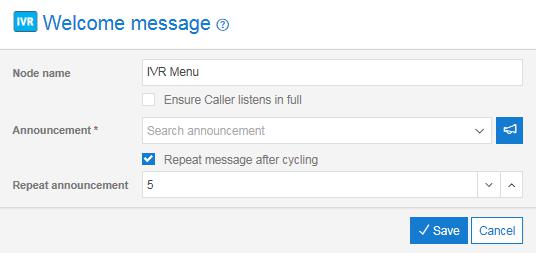
You must select a pre-recorded announcement within the IVR properties or the call plan will fail to validate.
You cannot add any sibling controls alongside an IVR Welcome message control.
The Incorrect Key is mandatory when an IVR is configured.
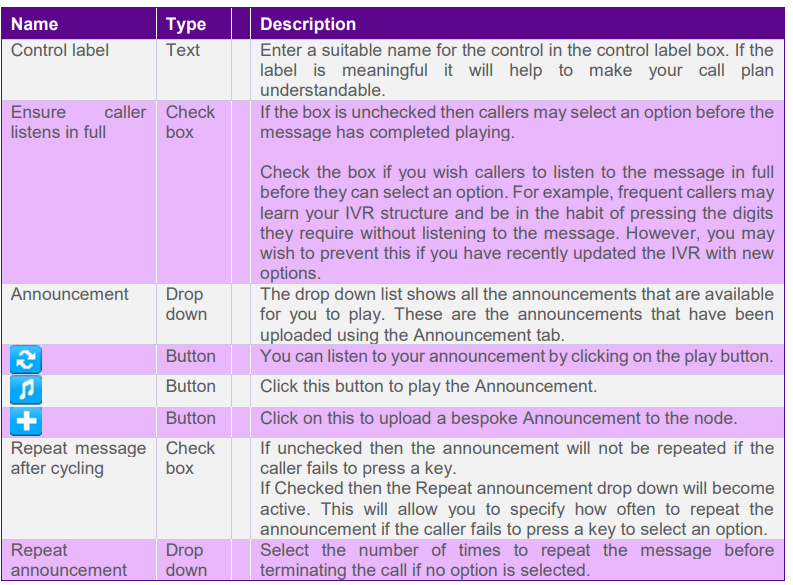
IVR Input Fields and Buttons #
How to Build an IVR #
Building an advanced call plan that incorporates Interactive Voice Response (IVR) and Call queue functions for the first time can be a daunting prospect so some advice on how to go about this is provided below.
Step 1: Understand your calls
Doing some up front analysis on incoming calls to understand why people are calling you will help when it comes to planning out the structure of your call handling IVR. Some questions you should consider include:
- Why do callers call in the first place? (I.e. what are the common reasons?)
- What is the relative frequency of calls for each of these reasons?
Answering the above questions should enable you to construct some call options for the IVR and think about how to phrase the Announcements.
Step 2: Understand your company capabilities and requirements
By giving some consideration to how your company is structured you can identify the key features you need to incorporate in to your call plan. To help with this you should consider the following questions:
Who answers these calls? Are they all in one functional area or are they in several departments or several geographic locations? – This may lead to using Distribution controls.
What are the target numbers that will receive the calls? These will be required for input to the Destination controls.
How should calls be handled at busy times? Should they divert to voicemail or overflow to another number? – Consider use of Divert controls, Breakout controls, Voicemail to email controls.
Are there differences in the way calls are handled by geographic area? – If so you may want to use area controls.
Are there defined operating and out of hours call handling scenarios? –Consider Date, Day and time controls as well as Voicemail to email.
Is there a need for ad-hoc service announcements that get played to callers at busy times (e.g. “We are experiencing difficulties with our online service, if your call is related to this we are working on it and service will be resumed at the earliest opportunity”.)? – If so an Announcement control can be placed at the head of a queue.
Step 3: Design the call plan
When building a complex call plan it is worthwhile drawing the plan out on paper first. This draft can be annotated with information that is needed when building the call plan, e.g. the destination numbers, the key presses on an IVR, names of announcements etc.
Tips:
Remember to define the Default actions
Don’t have more than 4 or 5 options on an IVR at any one level as people stop listening and can’t remember the options.
Try not to have too many layers of IVR, again callers get bored and frustrated after about the 3rd layer. Most practical applications shouldn’t need more than this.
Put the most commonly chosen options first. (Consideration should be given to stability here, if there are menu options that are likely to change frequently you may want to put these last as this avoids changing the more stable options. An example would be where there are options driven by a marketing campaign alongside stable customer service options on the same number.)
Step 4: Record and upload announcements
If announcements are required for a call plan then these must be recorded and uploaded to the Myinbound application before they can be used in the IVR and Announce controls within the call plan.
Tips:
If using call queues then remember to include in the announcement a statement advising callers what their breakout action is (if there is one)
Step 5: Build your call plan
If the steps above have been completed then it should be a simple matter to input the design into Myinbound using the Point my number facilities.
Step 6: Test your call plan
If you have a complex call plan then it is prudent to consider how you will test it out. There can be many inadvertent errors introduced during the build of the plan, e.g. spelling mistakes in email addresses, mis-typed telephone numbers entered for destinations, incorrect announcements selected.
The options available for carrying out testing of call plans will vary depending on the circumstances and needs of individual companies. For example, it might be possible to activate the plan at a quiet time so that it can be checked. However, in general, it is recommend that customer purchase a ‘spare’ Inbound number which can be used for the purpose of testing complex call plans. This will allow operation of the call plan to be fully tested before being activated on the live number.
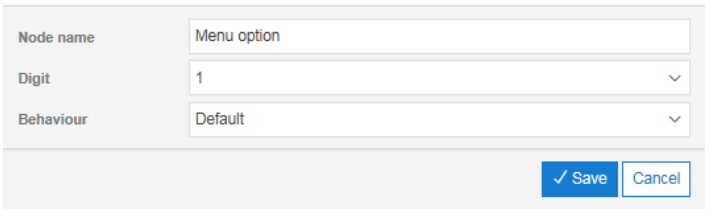
Menu Option #
Menu Option Access Restrictions: #

Menu Option Description #
Use Menu Option controls to build up an IVR. Each Menu Option represents a caller option as defined in the welcome page.
Menu Option Tip #
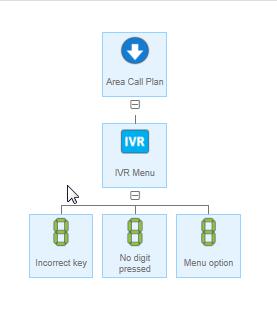
Remember calls do not terminate on a Menu Option control; you will need to add additional controls to complete the routing, e.g. a Destination. The simple call plan below shows an auto-attendant set up to terminate to a destination number if the caller presses digit 1, advises a caller that they have used an incorrect key but terminates with an announcement if no key is pressed.
Menu Option Rules #
A Menu Option can only be added as the child of an IVR Welcome message control.
Each Menu Option must be unique within a sibling group. That is, you cannot have two Menu Option controls set to the same digit with the same IVR Welcome message parent.
A Menu Option control with the Incorrect key value selected in the properties must always be present to cater for callers selecting options that are not defined or pressing invalid keys on their handset.
Menu Option Input Fields and Buttons #