
This guide will take you through the diagnostic checks you can make prior to contacting the service desk.
Tools #
Searching Methods #
Within the Gamma portal there are multiple ways of searching to find the circuit you need, you can do this by either using the Gamma search or the Service Management page.
Gamma Search #
Step 1
Go to the landing page on the Gamma Portal and look for the widget named “Gamma Search”
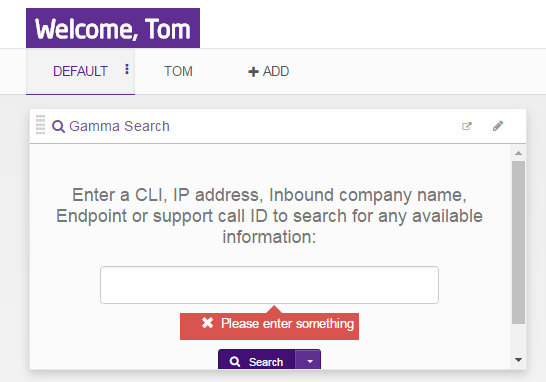
Step 2
Now you can enter your search criteria as stated in in the Gamma Search “Enter a CLI, IP address, inbound company name, Endpoint or support call ID to search for any available information”
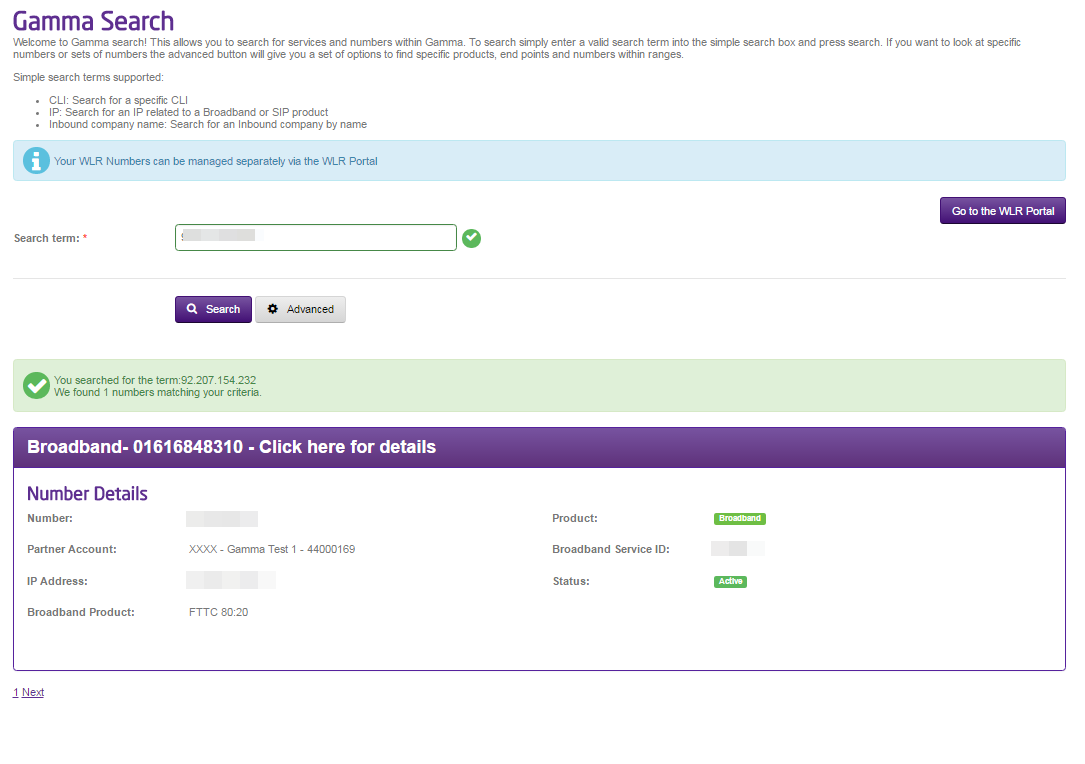
Step 3
After you have searched you will be taken to another page that will show you the results, note there is also an advanced search that will give you some more options if you want to narrow down your search.
Broadband Service Management #
Step 1
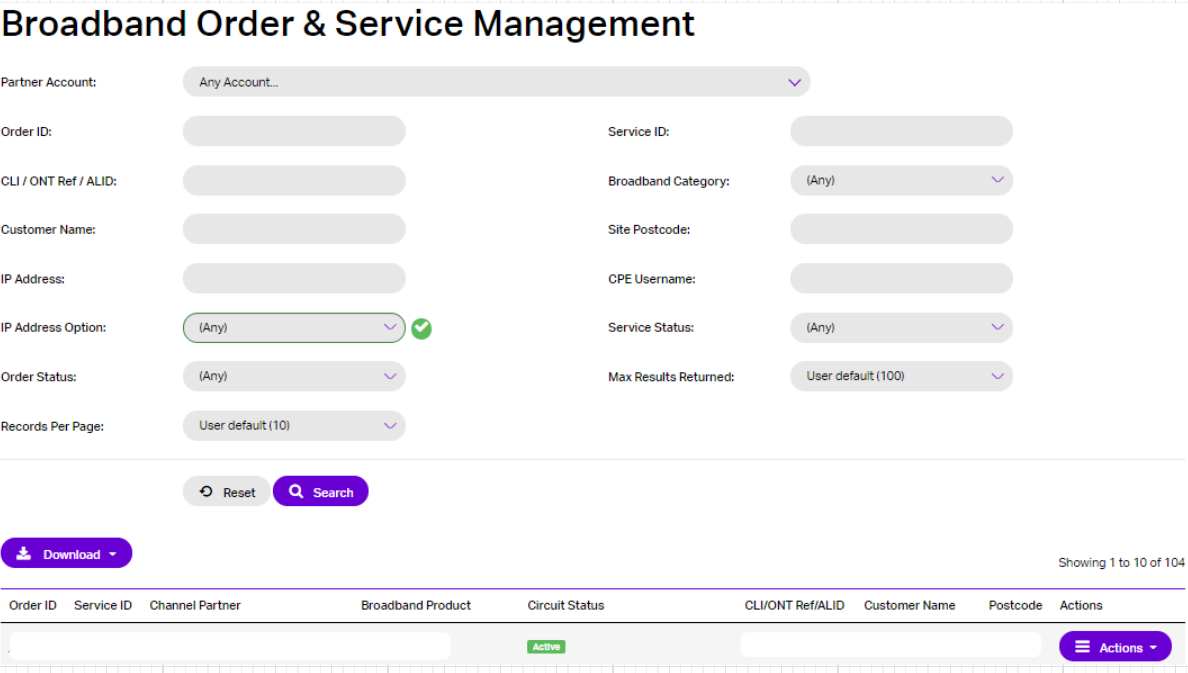
Go to Provisioning & Management> Data Services> Broadband> Service Management
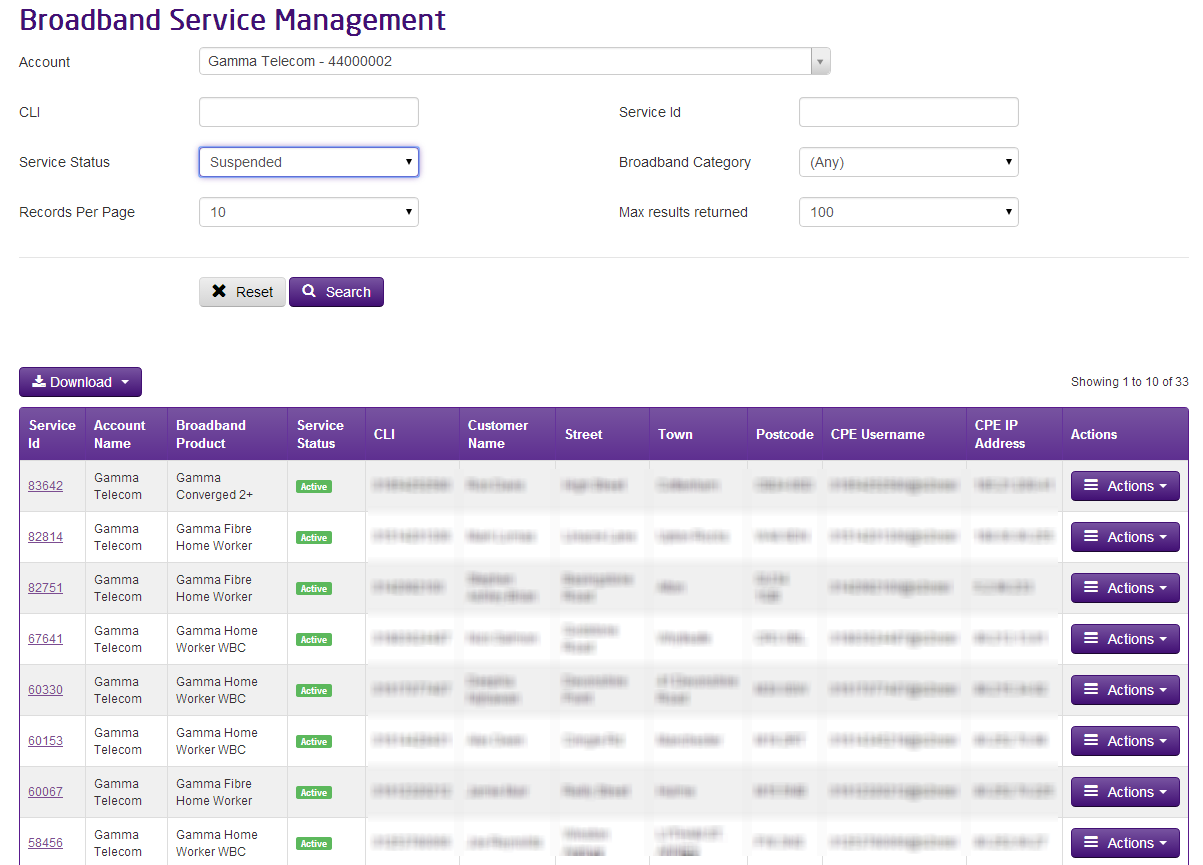
Within this search table you won’t need to enter a partner account but please note that this may result in the search taking slightly longer, you can use any of the fields to search for a circuit based on what information you have, on the below screen shot I we have searched just using the IP Address and the result has shown.
From here you will be able to use the Actions tab to perform a number of related tasks for this circuit.
Session Status #
The most basic tool that is available, and one that is used as a part of 1st line triage, is the Session Status tool. You can view the current session status of a customer, whether online or offline.
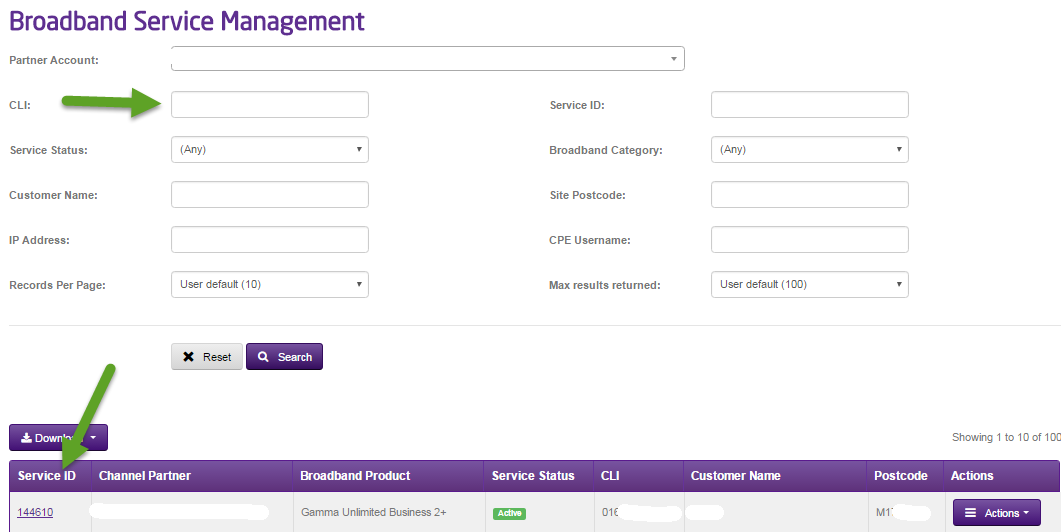
Step 1
In the Gamma Portal go to Provisioning > Broadband > Service Management. Find the customer in question using the filters provided and then click on the Service ID link:

Step 2
The below screen is seen. In this case the user is clearly offline, there is no PPP session established with our servers.
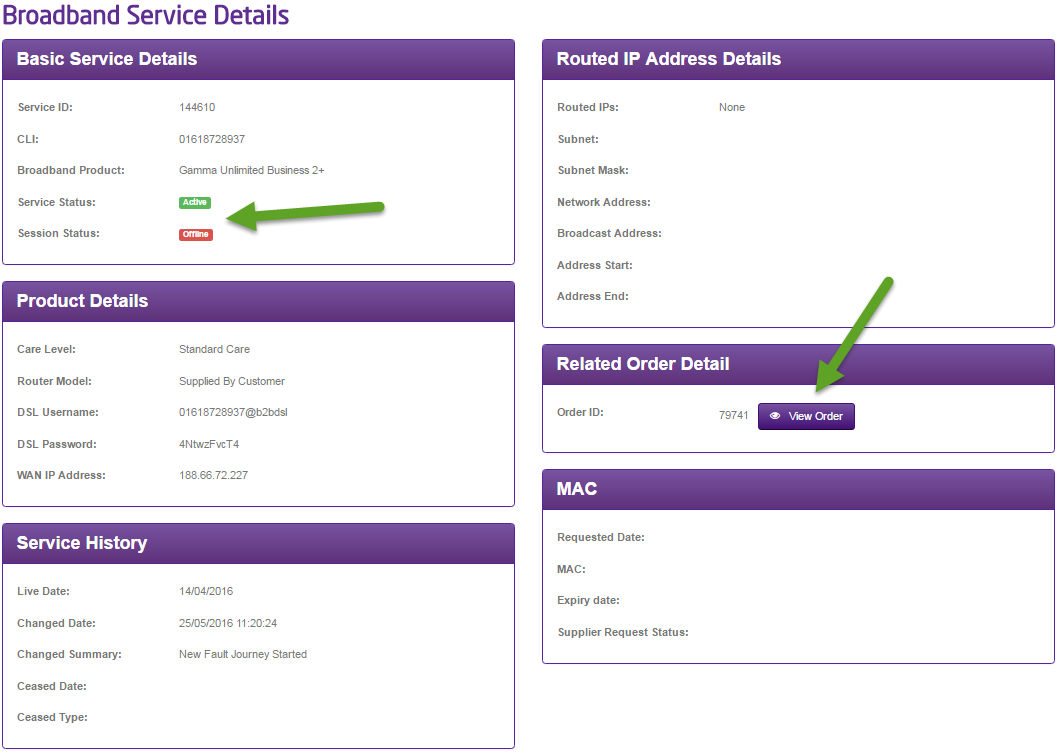
Step 3
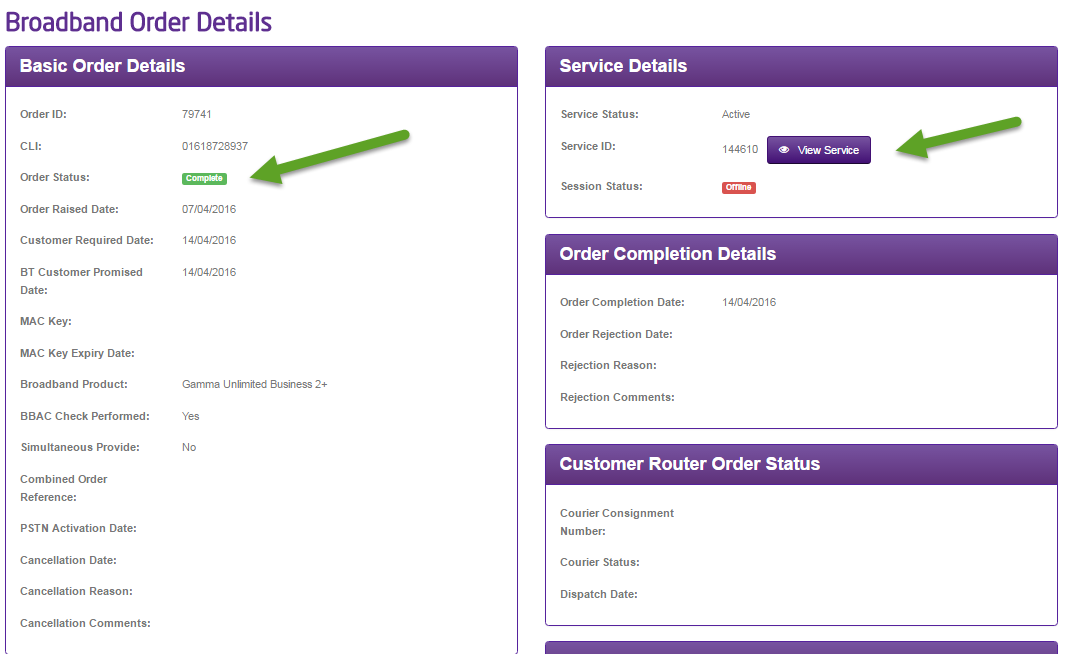
This may be because the order has not completed. Click on the ‘View Order’ button where you will be able to see the order status of this circuit. You can click the View Service button to return to the previous page.
Fault Diagnostic Tool and RADIUS Reports #
This tool allows you to run key diagnostic tests for each of your users. It also provides information on support calls and service requests against a user’s broadband and PSTN line (if it is with Gamma). Integrated into this tool are a set of RADIUS reports which you can run for diagnostic purposes.
By automatically running several operations and queries (simultaneously and at speed), providing a set of high-level results returned and displayed in a simple and clear format, this tool helps you quickly identify where a customer reported problem may lie. The tool not only gives you the visibility of all the key RADIUS information you need, but more importantly, with a single click of the mouse it does the same amount of work that a support operative could need up to 3-4 minutes to complete. Where you need to drill down for more information, the tool allows you do this as well. It also shows if there are any support cases open, or cases that have been open in the last 30 days, against not only the DSL service, but also the underlying (Gamma) PSTN line.
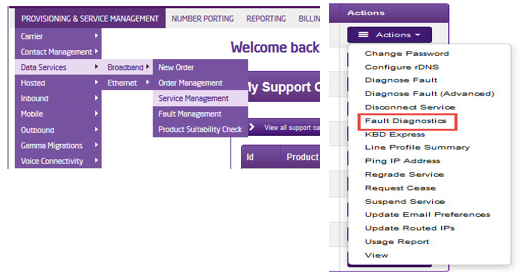
To operate the tool, go to the main portal menu tab ‘Broadband’ >> ‘Broadband Service Management’. Now find the subscriber you wish to diagnose. Click on the ‘Fault Diagnostics’ link at the bottom right of the screen and this will trigger a series of processes / tests the results of which are then displayed on the screen.

You need to understand the meaning of the following icons to work with the tool.
![]() – Test passed.
– Test passed.
![]() – Test failed.
– Test failed.
![]() – Service status warning.
– Service status warning.
![]() – provides helpful information about the test that has been run.
– provides helpful information about the test that has been run.
Once you have used this tool a few times you will be able to quickly scan the page, and using the icons, know how to pin-point a potential issue quickly.
Ping Test #
Ping is a network administration utility used to test the ‘reachability’ of an endpoint and to measure the round-trip time for messages sent from an originating host to an end point. Ping operates by sending Internet Control Message Protocol (ICMP) echo request packets to the target end point and waiting for an ICMP response. In the process it measures the time from transmission to reception (round-trip time) and records any packet loss. The results of the test are provided in a statistical summary of the response packets received, including the minimum, maximum, and the mean round-trip times.
A Ping Test is an excellent tool to determine if there are certain issues with a subscriber’s service. It can be used to show if the subscriber’s line is reachable and can also be used to indicate potential quality issues such as latency and packet loss. It is not a definitive test, but it should be used in conjunction with the other tools provided.
Please note- For Ping Tests to work the end-point router must be enabled for ICMP*
*If a router is configured in natted then IMCP will be enabled, if it is configured in routed then IMCP will be disabled by default.
The first ping is typically much longer than the subsequent 3, as the first packet in a ping requires an ARP request/response as well.
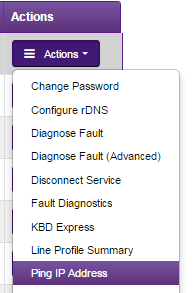
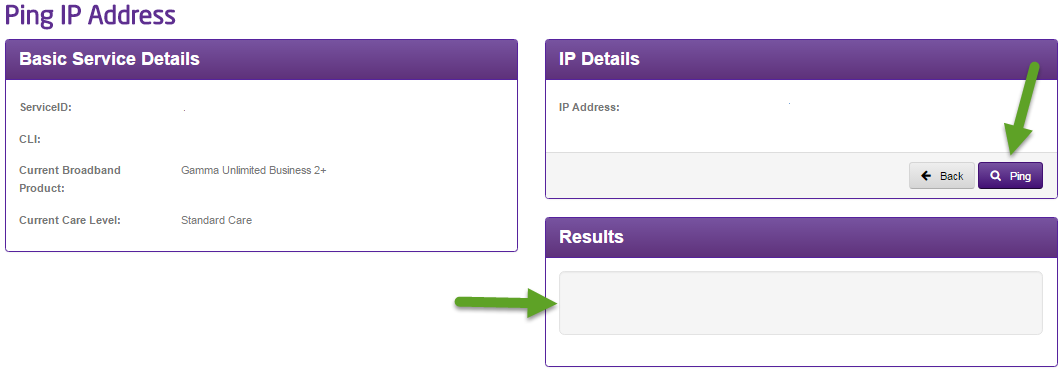
To operate, please go to the main menu tab ‘Data Services’ >> ‘Broadband’ >> ‘Broadband Service Management’. You are then required to find the subscriber you wish to test against. Then click on the ‘Ping Test’ link at the bottom right of the screen. You will be taken to the screen below:
When you get to this page if you click the ping button then the results will show in the results box below.
First line Checks #
Before you contact the support desk please ensure that you have completed the below checks for the relevant fault.
**Please note that these tests only apply to ADSL & VDSL and do not apply to SOGEA and FTTP as there is no voice component of the line to carry these tests out on. Skip these tests SOGEA & FTTP circuits.
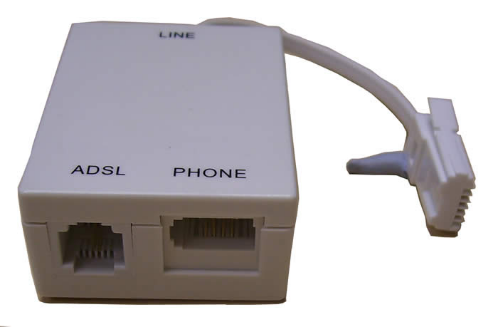
Preliminary WLR Tests #
Check the physical phone line. To do this:
- Plug a telephone into the test socket, lift the receiver and listen for any audible noise
- Dial 17070 and press option 2, this will carry out a quiet line test
- Make a phone call and ensure the quality of the call is good
- If you own the line, carry out a WLR line test
No Dial Tone #
- Is the router powered up?
- Are the router and associated cables connected correctly?
- Does rebooting the router resolve the problem?
- Is the underlying telephone line working ok? (see Preliminary WLR tests above)
- Plug in a phone and check that dial tone is present, and that there is no audible noise. (see Preliminary WLR tests above)
- Is the sync light on the router (CD Light)?
- Is the PPP light on the router?

- Confirm if the customer has ever had a working service, if yes when was the fault first experienced? And has anything recently changed on site? i.e. new cabling, other electrical equipment?
- Is the router connected in the master socket? Has the internal wringing been eliminated?
- Does removing all other equipment from the line like analogue phones and fax machines solve the issue? *
Please note: Gamma strongly recommends that equipment like fax, PDQs & alarms are kept on a separate WLR line from broadband. These products and any others that use high frequency tones will interfere with the connection and cause speed and connectivity issues.
Drop Calls #
- Is the problem experience constantly or only at certain times of the day?
- Does the router lose sync when the calls are dropped? If so, how long for and how does the user get sync back?
- Is the underlying telephone line is working OK? Plug in a phone – is dial tone present and no audible noise? (see Preliminary WLR tests above)
- Is the router filtered properly? Does changing the filter help?
- Is the router connected directly to the master socket? Has local wiring been eliminated?
- Has all other equipment been removed from the PSTN line (phone and fax machines)?
- Are there any sources of electrical or mechanical interference near the router?
Poor Call Quality #
- Describe the symptoms exactly and at which end experienced: crackling or popping; distorted voice; intermittent silence; inaudible voice; echo on the line
- Is the problem experience constantly or only at certain times of the day?
- Is the underlying telephone line is working OK? Plug in a phone – is dial tone present and no audible noise? (see Preliminary WLR tests above)
- Is the router filtered properly? Does changing the filter help?
- Is the router connected directly to the master socket? Has local wiring been eliminated?
- Has all other equipment been removed from the PSTN line (phone and fax machines)?
- Are there any sources of electrical or mechanical interference near the router?
- The following guides are to be used after the first line checks have been completed, by using the contents table at the top of the page you will be able to select – Back to the top
Broadband Traffic Priority Policy #
What is Traffic Priority #
Gamma provides a high-quality broadband product for the business market. We aim to secure the highest quality of service for business-critical applications during core business hours. Our network identifies and will offer a priority service for business-critical traffic:
| Activity/Application | Peak Priority Status: Mon-Fri 08:00-18:00 | Off-Peak Priority Status |
|---|---|---|
Assured Services | Level 3 | Level 3 |
Business Services: VPN Off-site Backup Database Surveillance Software Markets Presentation Trading Remote Access (inc Terminal Services, SSH etc.) | Level 3 | Level 3 |
Internet Browsing | Level 2 | Level 3 |
Software updates | Level 2 | Level 3 |
Audio Streaming (Excludes VoIP) | Level 1 | Level 3 |
Video Streaming | Level 1 | Level 3 |
Music & Video downloads, P2P etc | Level 1 | Level 3 |
Priority Level settings: #
Level 3: Business Critical Products & Services. These services are essential for business operations and continuity, and as such are time sensitive, therefore will always take preference over non time-sensitive or non-business critical services.
Level 2: Managed Products & Services. These are services which are not as time sensitive as those in level 3 but will take priority over services which are not critical for the operation or continuity of core business.
Level 1: Non-business critical traffic. These services are not classed as business critical or time sensitive.
Why and how do we do it? #
By identifying the different types of traffic in our network we can ensure that both business critical and time sensitive products and services take priority over other traffic. This is done so that we can provide our customers with a premium class of business connectivity during core business hours.
When is our Traffic Priority Service deployed? #
Our traffic priority service will be in use during core business hours – Monday to Friday 08:00 to 18:00. Outside of these times there will be no restrictions.
Shareband #
Gamma provide a wires only broadband product and we manage our traffic accordingly to prioritise business and time critical applications. Shareband deploys 3rd party bespoke CPE and proprietary technology to enhance performance, typically by aggregating two or more ISPs. We cannot be held responsible or support changes and issues with 3rd Party solutions.
Intermittent Connection #
Intermittent connections can be caused by several factors – most commonly these are caused by local equipment, however the fault can lie within BTs network.
Step 1
From the Gamma Portal, go to “Provisioning and Service Management”, “Data Services”, “Broadband” and then select “Service Management”. Select the relevant account, and search for the affected line using the one of the available search options available. Once you’ve found the line, using the Actions menu select “Fault Diagnostics”.

Step 2
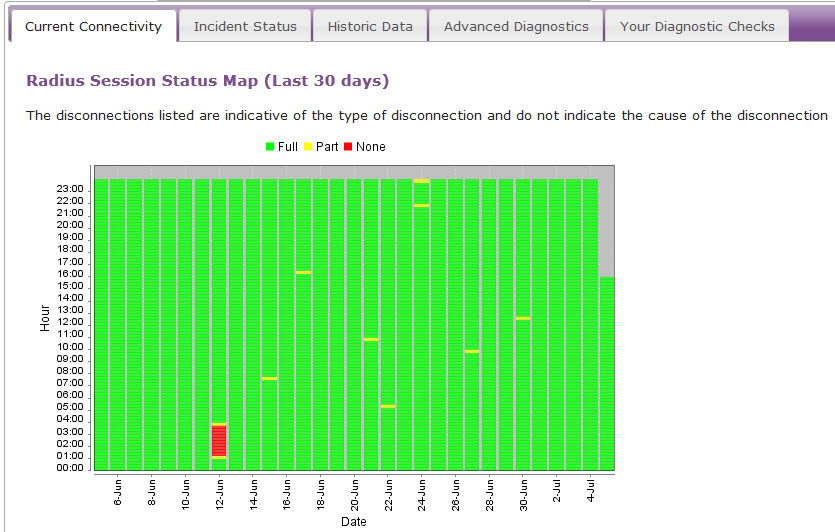
The “Radius Session Map” will be the first screen displayed. If the relevant 15 minute segments are green, this indicates that the line is not dropping connection and therefore the fault lies locally within the customer’s network. Please check local equipment such as servers and switches etc.
If the relevant 15 minute segment is yellow or red, this shows that there could be an intermittent fault and you should progress to the below diagnostics.
If the relevant 15 minute segment is red, this show that there could be a fault with the line and you should progress to Step 4.

Step 3
Look for patterns with the yellow and red segments. You’re looking for regular drops at the same time of day, or if the connection is dropping every ‘x’ number of hours. Do these drops tally up with:
Any local changes (roadworks etc)
Does something get switched on/turned off when the drops occur?
Does the customer have anything electrical local to the router which may be affecting the connectivity such as buzzing power sockets or is the router sat on top of a server etc?
If any of the above are relevant try moving the router as far away from the source as possible to rule out radio frequency interference. Please refer to the REIN and SHINE article which outlines devices that could be the cause of the intermittent connectivity please click here if not, please progress to Step 4.
Step 4 (Only Applicable for ADSL)
Now check the xDSL stats, found under the “Current Connectivity Tab”. Scroll all the way to the bottom of the page to see these stats.
We need to ensure that there are no HEC Errors or Errored Seconds. Upstream errors usually indicate a fault with the customer’s equipment (run through Step 6-10). Downstream errors could still be problems with the customer’s equipment or with the BT line. It is worth doing some equipment checks before raising a fault.

Step 5
Check the physical phone line.
****Please note that this tests only apply to ADSL & VDSL and do not apply to SOGEA and FTTP as there is no voice component of the line to carry these tests out on. Skip these tests SOGEA & FTTP circuits**
To check the physical phone:
Plug a telephone into the test socket, lift the receiver and listen for any audible noise
Dial 17070 and press option 2, this will carry out a quiet line test
Make a phone call and ensure the quality of the call is good
If all of these checks are OK, proceed to Step 6.
If you hear noise or the line test fails, you should raise a fault with the line provider before further diagnosing any broadband issues.
Step 6
Power off the router for 30 seconds, then power back on. This can be done by removing the power supply.
You should then monitor your connection for any improvements. To refresh the data, click the “Refresh Supplier Data” at the bottom of the screen. If the service has stabilised the issue has been resolved.
If you are still experiencing an intermittent connection, please proceed to Step 7.
Step 7
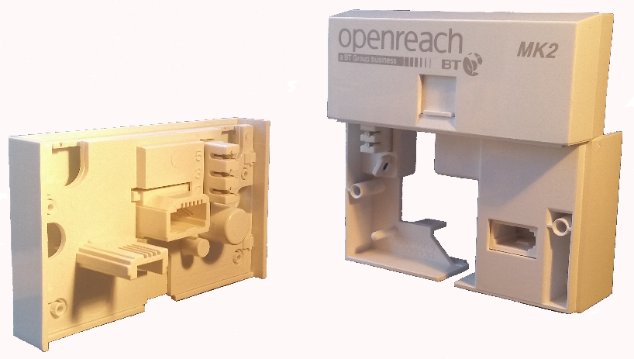
Connect your broadband to the NTE5 test socket and monitor. You should remove the faceplate of your socket and connect your broadband to the socket as shown. This will bypass any internal wiring issues. You should then monitor your connection for any improvements.
If the service has stabilised the issue has been resolved and the problem lies with internal wiring, not the broadband.
If you are still experiencing an intermittent connection please proceed to Step 8.
If you are removing the faceplate of an SSFP for FTTC, you will need to add an external filter as the filter is normally inside the faceplate.

Step 8
Change the filter.
Gamma routers come with 2 x micro filters, you should switch to the second or use a different one. If the service has stabilised the issue has been resolved and the problem lies with a faulty micro filter.
If you are still experiencing an intermittent connection please proceed to Step 9.

Step 9
Try an alternate router on the connection.
If you have an alternate router, test this on the connection. If this is not possible, proceed to Step 10.
You should then monitor your connection for any improvements. If the service has stabilised and the issue has been resolved, then the fault looks likely to be a router fault.
If you are still experiencing an intermittent connection, please proceed to Step 10.
Step 10
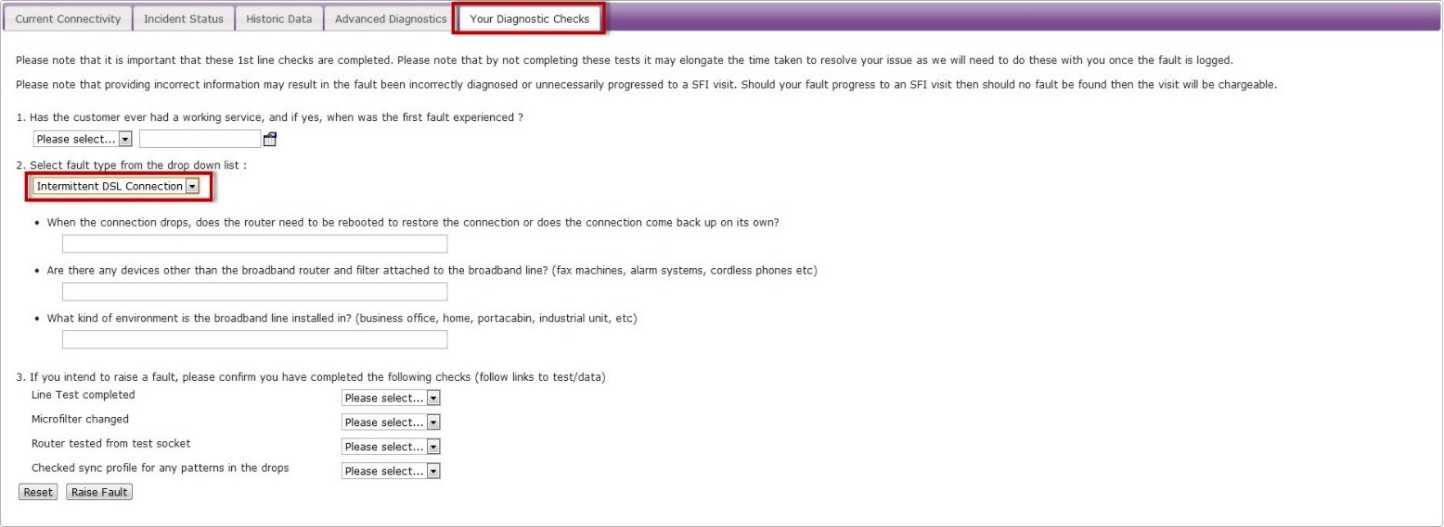
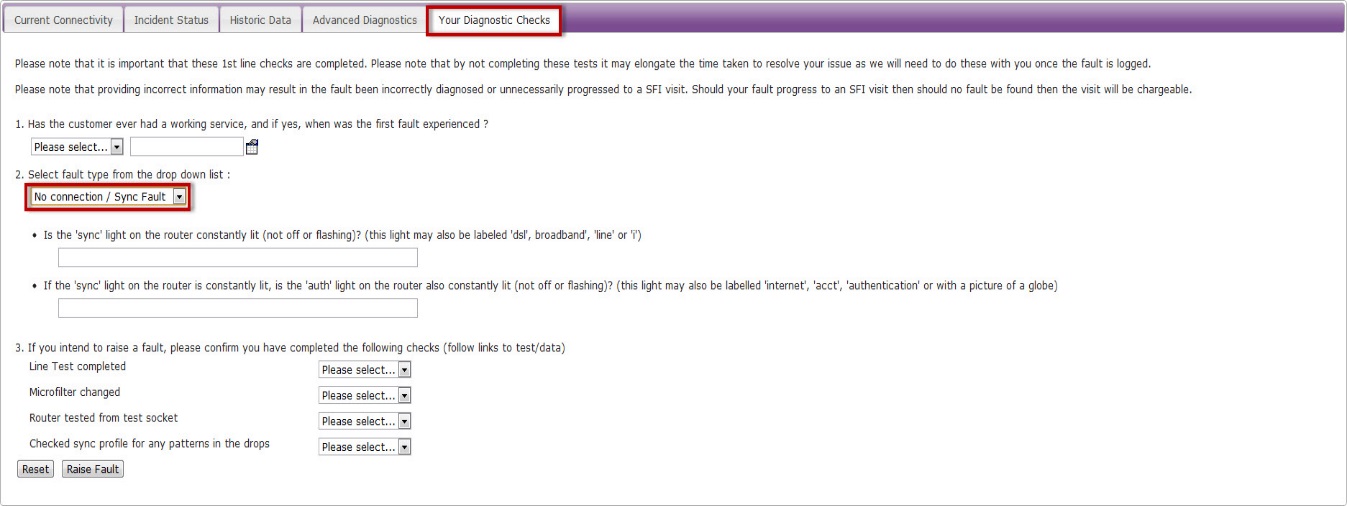
If none of these checks have worked, you’ll need to raise a fault on the Advance Diagnostics page.
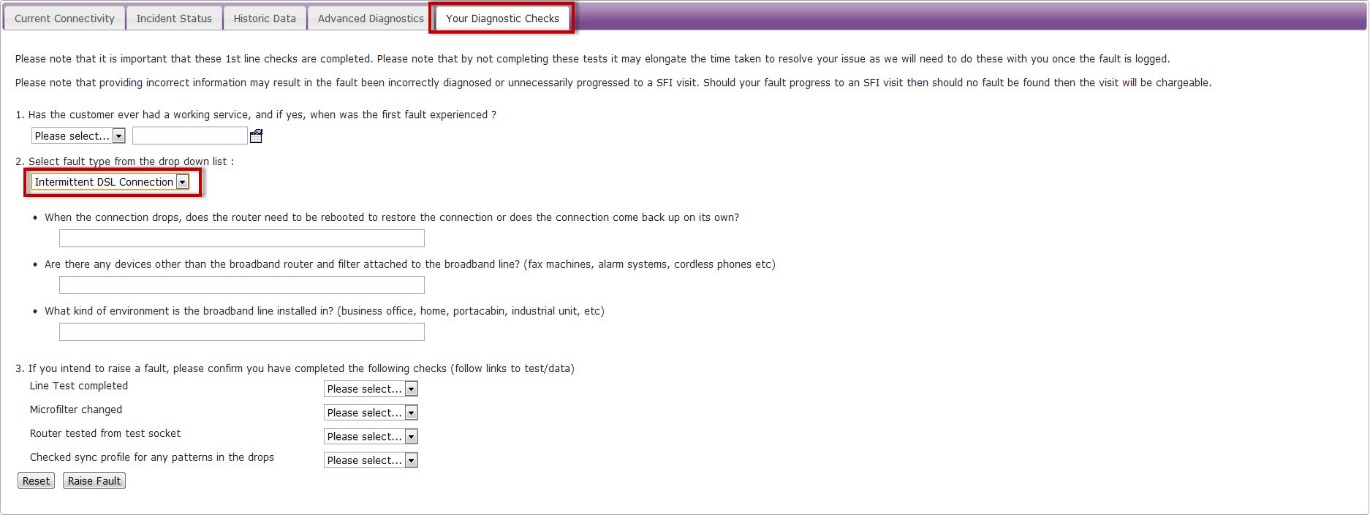
Select the “Your Diagnostic Checks” tab and follow the drop-down menus.
Slow Speed Faults #
Sometimes what appears to be a slow connection issue may be an intermittent connection; where the router is constantly dropping. In these instances please follow the Intermittent Connection diagnostics.
Step 1
From the Gamma Portal, go to “Provisioning and Service Management”, “Data Services”, “Broadband” and then select “Service Management”. Select the relevant account, and search for the affected line using the one of the available search options available. Once you’ve found the line, using the Actions menu select “Fault Diagnostics”.

Step 2
The “Radius Session Map” will be the first screen displayed.
If the connection is stable (green segments) then continue to Step 3.
If you are seeing drops (red segments) throughout this period, then please follow the Intermittent Connection diagnostics.

Step 3 (Only Applicable for ADSL)
Now check the xDSL stats, found under the “Current Connectivity Tab”. Scroll all the way to the bottom of the page to see these stats.
We need to ensure that there are no HEC Errors or Errored Seconds. Upstream errors usually indicate a fault with the customer’s equipment (run through steps 7-13). Downstream errors could still be problems with the customer’s equipment or with the BT line. It is worth doing some equipment checks before raising a fault.

Step 4
Check the Historic Data tab and check the sync speed max/min/average results and compare with the xDSL status. These will indicate if the sync speed is fluctuating. If the sync speed is fluctuating, go to Step 5.
Step 5
Run speed tests to identify if the connection is facing throughput issues. Please run the test on the following speedtest.btwholesale.com and speedtest.gammatelecom.com*
* speedtest.gammatelecom.com/ethernettest (to be used for FTTC)
The full test needs to be run via the further diagnostics option entering the CLI. If this is not fully completed then we are unable to raise a speed fault on the line with our supplier.
Step 6
Check the physical phone line.
**Please note that this test only applies to ADSL & VDSL and do not apply to SOGEA and FTTP as there is no voice component of the line to carry these tests out on. Skip these tests SOGEA & FTTP circuits.
To check the phoneline:
- Plug a telephone into the test socket, lift the receiver and listen for any audible noise
- Dial 17070 and press option 2, this will carry out a quiet line test
- Make a phone call and ensure the quality of the call is good
- If you own the line, carry out a WLR line test
If all of these checks are OK, proceed to Step 7.
- If you hear noise or the line test fails, you should raise a fault with the line provider before further diagnosing any broadband issues
Step 7
Power off the router for 30 seconds, then power back on. This can be done by removing the power supply.
You should then monitor your connection for any improvements. To refresh the data, click the “Refresh Supplier Data” at the bottom of the screen. If the service has stabilised the issue has been resolved.
If you are still experiencing slow speed please proceed to Step 8.


Step 8
Connect your broadband to the NTE5 test socket and monitor. You should remove the faceplate of your socket and connect your broadband to the socket as shown. This will bypass any internal wiring issues. You should then monitor your connection for any improvements.
If the service has stabilised the issue has been resolved and the problem lies with internal wiring, not the broadband.
If you are still experiencing slow speed please proceed to Step 9.

Step 9
Change the filter, Gamma routers come with 2 x micro filters, you should switch to the second or use a different one.
If the service has stabilised the issue has been resolved and the problem lies with a faulty micro filter.
If you are still experiencing slow speed please proceed to Step 10.

Step 10
Try an alternate router on the connection. If you have an alternate router, test this on the connection. If this is not possible, proceed to Step 12.
You should then monitor your connection for any improvements. If the service has stabilised the issue has been resolved and the problem lies with a faulty router.
If you are still experiencing an intermittent connection please proceed to Step 11.
Step 11
If none of these checks have worked, you’ll need to raise a fault on the Advance Diagnostics page.
Select the “Your Diagnostic Checks” tab and follow the drop down menus.
No Web Pages #
If you are unable to load up any web pages, you may still have a connection to your Broadband. Follow the below steps to help with identifying the fault.
Step 1
From the Gamma Portal, go to “Provisioning and Service Management”, “Data Services”, “Broadband” and then select “Service Management”. Select the relevant account, and search for the affected line using the CLI. Once you’ve pressed search, using the Actions menu select “Fault Diagnostics”.

Step 2
If the Radius Session Map is showing red in the affected 15 minute segment, please go refer to the No Authentication trouble-shooter.
If the Radius Session Map is showing green in the affected 15 minute segments, this is likely to be a local issue.

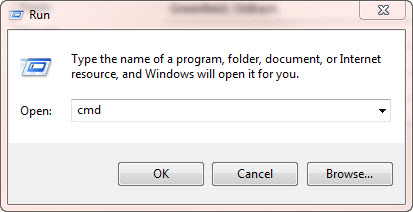
Step 3
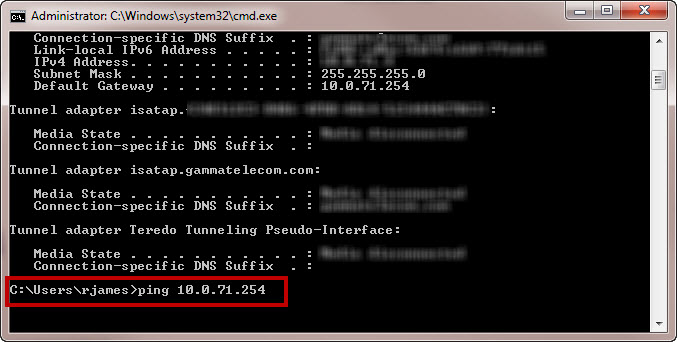
We need to do some tests on the local equipment now. Go to “Start” on your PC and then “Run”. Within the text box of the “Run” facility, type in “cmd” and press “OK”. This can also be achieved by going to Start > All Programs > Accessories > Command Prompt
Step 4
Type in “ipconfig” and press enter.

Step 5
Look for the Default Gateway address and make a note of this.
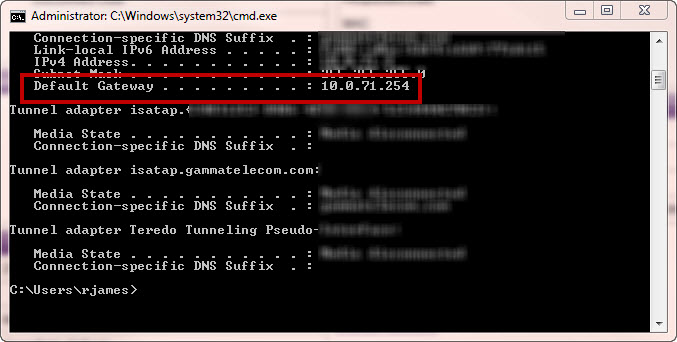
Step 6
Type in “ping” followed by a space, then the Default Gateway address and press enter.
Step 7
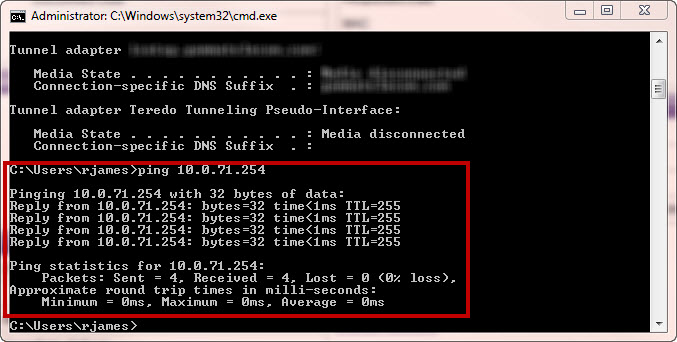
If you get replies from the ping (like in the screen shot across), this means that you can connect to the router and you should proceed to Step 9.
If you get no results from the router (which look like the screen shot in Step 10), this means that you have no connection to the router and would need to contact your IT Administrator.
Step 8
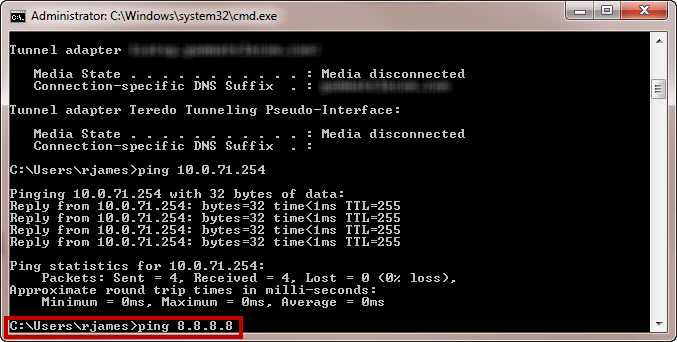
If you get a reply from the router ping, you would need to ping a live web address. We recommend sending a ping to Google’s address.
To do this, type in “ping 8.8.8.8” and press enter.
Step 9
If you are unable to get a reply from the Google DNS ping (example in the screen shot across), this would suggest that it is a local issue (router/firewall) and you would need to speak to your IT Administrator regarding this.
If you have got a ping result back from Google (which looks like the screen shot in Step 9), you have access to the Internet and need to do some more tests. Please see Step 10.

Step 10
We now need to ping a web address, again we recommend google. In the command prompt, type in “ping google.co.uk”.
If you get no results back, this would suggest a DNS error. You would need to try adding DNS manually on the router or the customers PC, or speak to your IT Administrator about this.
If you have got results back, then you should be OK to view web pages. If you are still unable to view web pages, then this could be a Browser error or a proxy may be enabled, and again you’d need to speak to your IT Administrator.

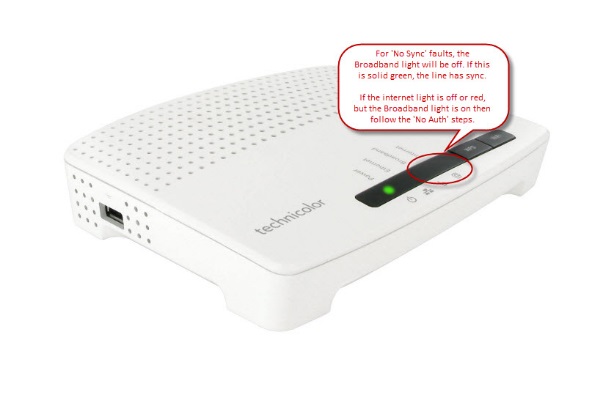
No Sync Fault #
No Sync faults can be identified by checking the lights on the customer’s router. Generally the Broadband/DSL light should be solid, if this is not the case then the line doesn’t have sync. Please see below for a screenshot of the router lights.


Step 1
From the Gamma Portal, go to “Provisioning and Service Management”, “Data Services”, “Broadband” and then select “Service Management”. Select the relevant account, and search for the affected line using the one of the available search options available. Once you’ve found the line, using the Actions menu select “Fault Diagnostics”.
Step 2
Check the Radius Session Map to see if there has been any connection in the 15 minute segment that is affected. A red segment means that there is no service.
If the segment is green, the router and the service is showing online the connection is active therefore please follow no web pages diagnostics by clicking here.
If the segment is red, continue to Step 3.

Step 3
Check xDSL Status Check. If the customer is facing a no sync fault there will be no results shown here. Go to Step 4,If they do have sync (so xDSL status check shows zeros in the results). Ensure that the sync light on the router is not lit. If this is not lit please follow the below diagnostics to Step 4
If they do have sync and the router shows this also, they are facing a no authentication fault please use the no authentication diagnostics by clicking here.
Step 4
Check the physical phone line.
**Please note that these tests only apply to ADSL & VDSL and do not apply to SOGEA and FTTP as there is no voice component of the line to carry these tests out on. Skip these tests SOGEA & FTTP circuits.
To check the physical phoneline:
- Plug a telephone into the test socket, lift the receiver and listen for any audible noise
- Dial 17070 and press option 2, this will carry out a quiet line test
- Make a phone call and ensure the quality of the call is good
- If you own the line, carry out a WLR line test
If all of these checks are OK, proceed to Step 5.
If you hear noise or the line test fails, you should raise a fault with the line provider before further diagnosing any broadband issues.
Step 5
Power off the router for 30 seconds, then power back on. This can be done removing the power supply.
You should then monitor your connection to see if the router obtains a connection. If the service has obtained a connection the issue has been resolved.
If you are still experiencing no sync connection, please proceed to Step 6.


Step 6
Connect your router to the NTE5 test socket and monitor. You should remove the faceplate of your socket and connect your router to the socket as shown. This will bypass any internal wiring issues. You should then monitor your connection for any improvements.
If the service has obtained a connection the issue has been resolved, then the problem lies with the internal wiring, not the broadband.
If you are still experiencing no sync connection please proceed to Step 7.

Step 7
Change the filter, Gamma routers come with 2 x filters, you should switch to the second or use a different one.
If the service has obtained a connection the issue has been resolved and the problem lies with a faulty filter.
If you are still experiencing no sync connection please proceed to Step 8
Step 8
Try an alternate router on the connection, If you have an alternate router, test this on the connection. If this is not possible, proceed to Step 10.
You should then monitor your connection for any improvements. If the service has obtained a connection the issue has been resolved, then the problem lies with a faulty router.
If you are still experiencing no sync connection, please proceed to Step 9.
Step 9
If none of these checks have worked, you’ll need to raise a fault on the Advance Diagnostics page.
Select the “Your Diagnostic Checks” tab and follow the drop down menus.
No Authentication Fault #
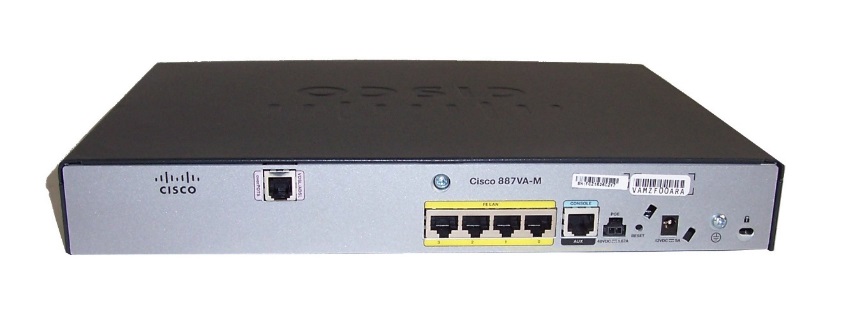
No Auth faults can generally be identified by checking the lights on the customer’s router. Please see below for a screenshot of Gamma supplied router for assured and notes as to which lights you should see present.

Step 1
From the Gamma Portal, go to “Provisioning and Service Management”, “Data Services”, “Broadband” and then select “Service Management”. Select the relevant account, and search for the affected line using the one of the available search options available. Once you’ve found the line, using the Actions menu select “Fault Diagnostics”.

Step 2
Check the Radius Session Map to see if there has been any connection in the 15 minute segment that is affected. A red segment means that there is no service and you should continue to Step 3.
If the segment is green, go to the No Web Pages section of the technical support guide by clicking here, and start from Step 3.

Step 3 (Only Applicable for ADSL)
Scroll to the bottom of the page and look at the xDSL Status Check and ensure that the follow fields are above zero (it doesn’t matter what the value is):
- Loop Loss
- SNR Margin
- Cell Count
- Speed

**Please note this step only applies to ADSL.
Step 4
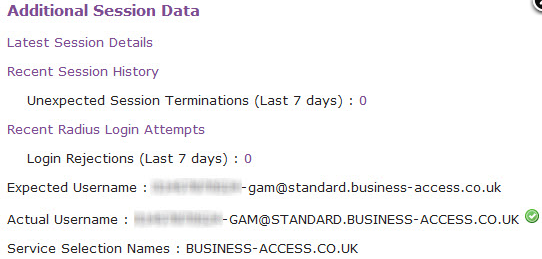
Click the “Recent Radius Login Attempts” hyperlink under the “Additional Session Data” to see if there are any error messages in this (such as password reject etc).
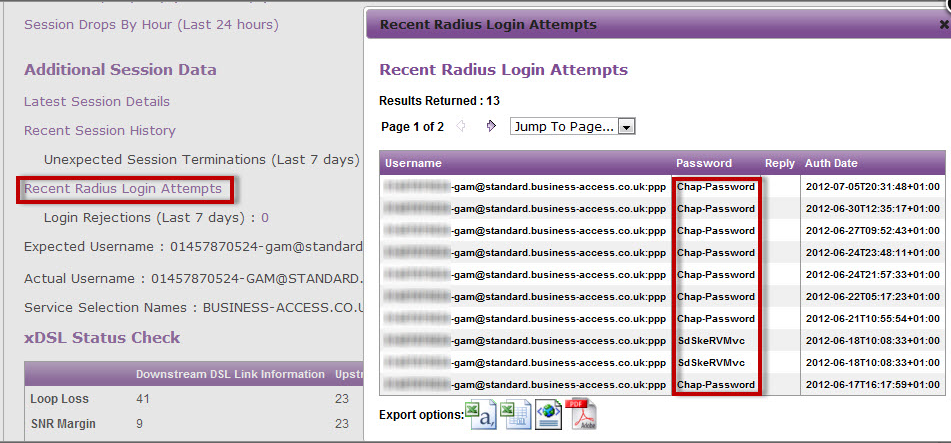
Step 5
Check to see that the Expected Username and Actual Username in the “Additional Session Data” section match.
Step 6
Check the physical phone line.
**Please note that these tests only apply to ADSL & VDSL and do not apply to SOGEA and FTTP as there is no voice component of the line to carry these tests out on. Skip these tests SOGEA & FTTP circuits.
To check the physical phoneline:
- Plug a telephone into the test socket, lift the receiver and listen for any audible noise
- Dial 17070 and press option 2, this will carry out a quiet line test
- Make a phone call and ensure the quality of the call is good
- If you own the line, carry out a WLR line test
If all of these checks are OK, proceed to Step 7.
If you hear noise or the line test fails, you should raise a fault with the line provider before further diagnosing any broadband issues.
Step 7
Power off the router for 30 seconds, then power back on. This can be done by removing the power supply. You should then monitor your connection to see if the router obtains a connection. If the service has obtained a connection the issue has been resolved.
If you are still experiencing no sync connection, please proceed to Step 8.


Step 8
Connect your broadband to the NTE5 test socket, you should remove the faceplate of your socket and connect your filter directly into the socket as shown. If the service has come back online, the issue has been resolved and the problem lies with internal wiring, not the broadband.
If you are still experiencing no authentication, please proceed to Step 9.
Step 9
Change the micro filter, Gamma routers come with 2 x micro filters, you should switch to the second or if this is already used, purchase a new micro filter. If the service has come back online the issue has been resolved and the problem lies with a faulty micro filter.
If you are still experiencing no authentication, please proceed to Step 10.

Step 10
Try an alternate router on the connection, if you have an alternate router, test this on the connection. If this is not possible, proceed to Step 11.
If the service has obtained a connectivity the issue has been resolved and the problem lies with a faulty router. If the service still fails, please proceed to Step 12.
Step 11
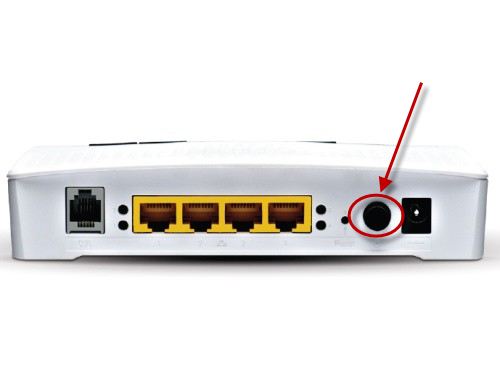
Carry out a factory reset on the router.
This can be done by holding the reset button (as pictured) until the lights on the front change.
You will need to reconfigure the router after this, the settings can be found in the description box where you opened this guide from.
If the service has come back online the issue has been resolved and the problem lay with the router.

Step 12
If none of these checks have worked, you’ll need to raise a fault on the Advance Diagnostics page.
Select the “Your Diagnostic Checks” tab and follow the drop down menus.

Enabling port mirroring on Technicolor TG588/DGA122 #
Please note the DGA122 is being phased out and replaced by the DGA122 – please speak to the Service Desk for details on this process. See the Gamma Portal – digital Customer Service Plan for contact details.
Sometimes it’s useful to be able to monitor traffic on an Ethernet port of the TG582n (e.g. the attached device is a VoIP phone and one can’t run Wireshark on it).
Many of the Technicolor routers (including the TG582N) have the useful facility to take the traffic flowing on one Ethernet port and monitor it on another Ethernet port. The CLI commands needed are:
Step 1
Declare the port to send the monitor traffic to. In this example, it will be sent to port 2:
:eth switch mirror capture port=2
Step 2
Now declare which traffic on which port to monitor. In this example, we’ll monitor inbound and outbound traffic on port 4:
:eth switch mirror ingress port=4 state=enabled
:eth switch mirror egress port=4 state=enabled
Step 3
It is still possible to use the capture port (port 2 in the above example) as a normal Ethernet port, just that Wireshark (or similar) will see both normal traffic and the monitor traffic – so get your capture/display filters sorted out.
It doesn’t seem possible to discover the current settings of the monitor, so when finished it might be best to issue:
:eth switch mirror ingress port=4 state=disabled
:eth switch mirror egress port=4 state=disabled
For information on how to switch off SIP ALG on a Technicolor Router using telnet please see the corresponding section in this document
Switch off SIP ALG on a Technicolor Router using Telnet #
This guide is going to tell you how to use Telnet (a text based protocol that allows you to connect to a remote device over the Internet) through command prompt, though there are programs such as Secure CRT that you can use for this.
Step 1
On your PC go to “Start” and select “Run” and ype in “cmd” and click “OK”.
Step 2
When command prompt loads up type in “Telnet IP address of your router ” and hit enter. This will then load up the Telnet console.
 Check under “System Maintenance – Management that the telnet port is enabled and what the port number is on your router.
If you are doing it on the internal network this will be your Default Gateway in IP Config, if it is externally, you’ll need to ask your customer to go to Google and type in “Whats my IP”. More information can be found at About.com.
Step 3
Enter your administrators log in when asked for “Account” and then the password is the password of the router.
Step 4
Type in the following commands:
connection unbind application=SIP port=5060
saveall
Switch off SIP ALG in the GUI #
From the router’s homepage, click on “WAN Services”
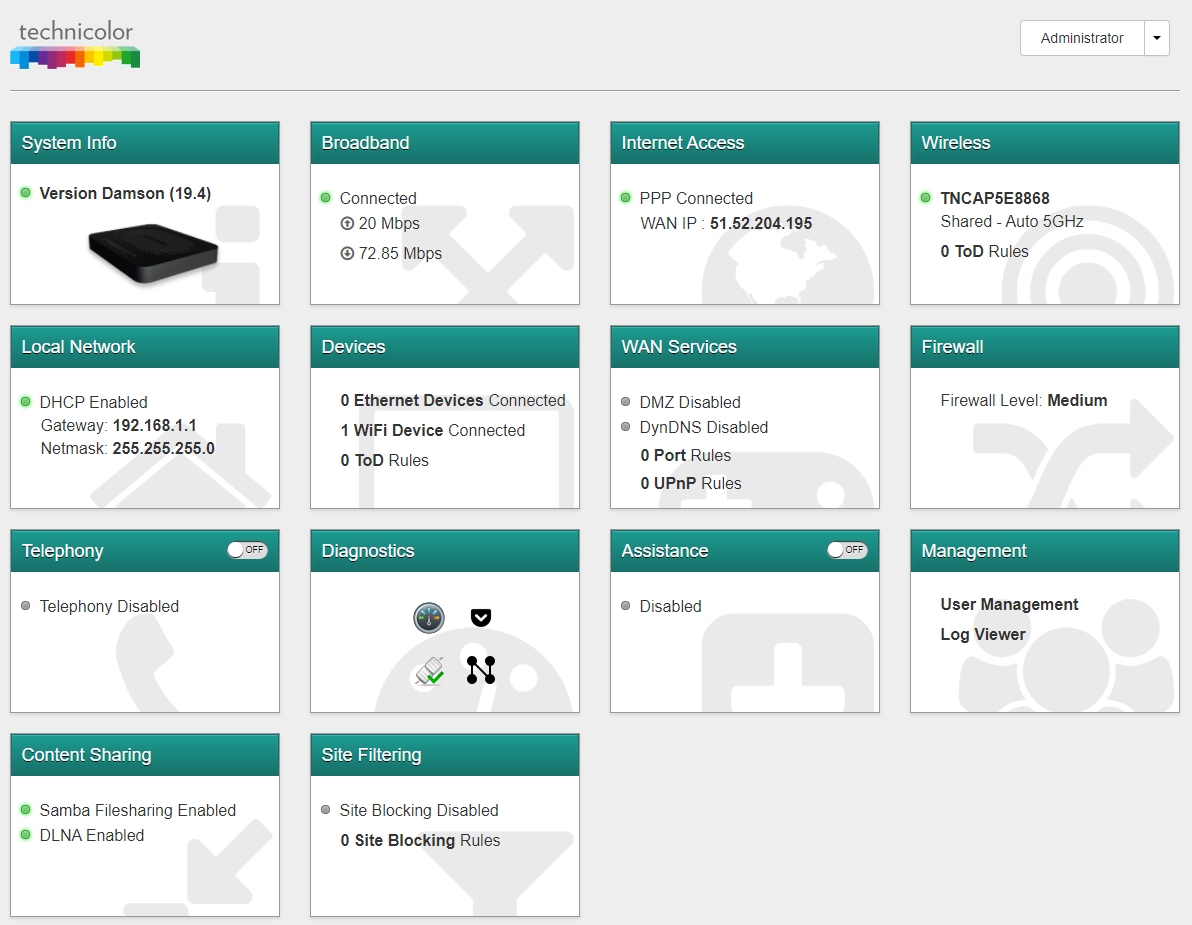
From here, click on “Settings” and scroll down to “NAT Helpers (ALG’s)”
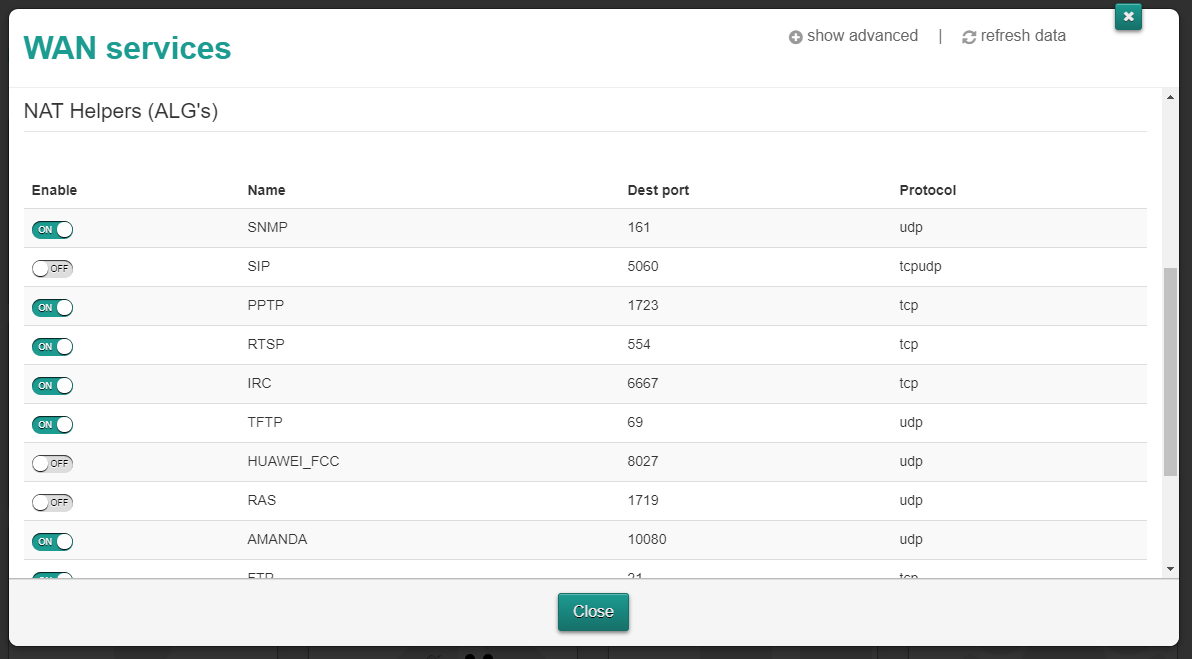
SIP ALG can be easily enabled or disabled here depending on your set up.
Broadband Fault Diagnostic Tool #
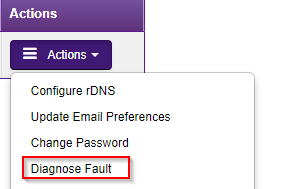
In order to access the diagnostic tool on the Gamma portal, navigate to your Broadband service by following this menu structure; Provisioning & service management >> Data Services >> Broadband >> Order and Service Management, From here you will need to select the actions tab and the “Diagnose Fault” option.
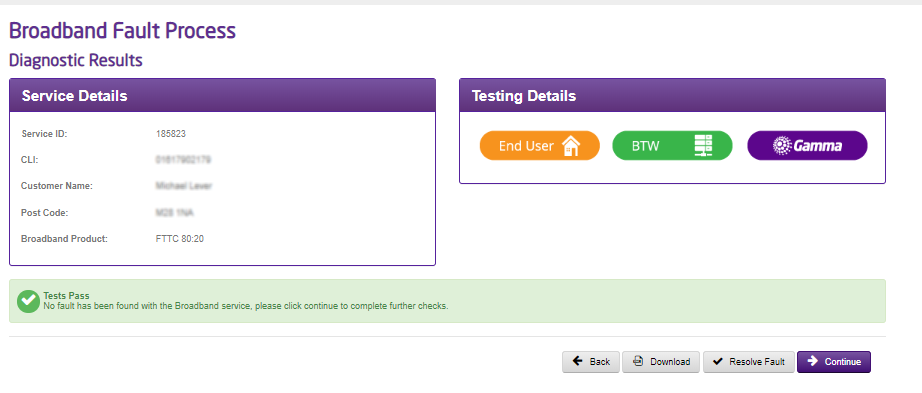
Broadband Health Check #
The Broadband health check is what you will see as your first page in the Gamma portal diagnostic journey, as you can see in the screenshot below, you will be presented with some basic service details, a testing details panel which contains a colour co-ordinated image (this image changes throughout the journey, this is addressed later on in this document) and the health check itself which consists of 5 sections; Synchronisation, Authentication, Stability, Performance and Speed.

Synchronisation #
Synchronisation refers to the signal sent between the router and the equipment within the local telephone exchange. This is commonly denoted on routers by a light labelled either DSL, CD or Broadband. The synchronisation, or sync speed will vary depending on the length of the line from the local telephone exchange to the router, and the quality of the copper that the signal travels over. The sync speed will determine the maximum throughput speed available.
Should the sync show as amber or red, this suggests that there is a fault with the service. This fault could be with the equipment in the exchange, on the line between the exchange and the router, with the router itself, or with the internal wiring or additional equipment at your customer’s premises, for example, a microfilter or the cables.

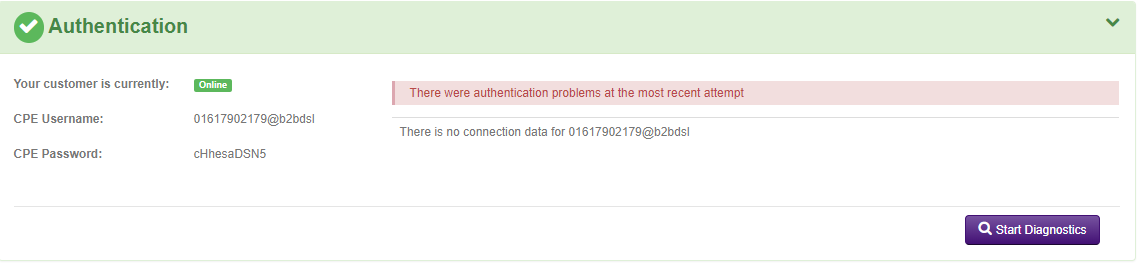
Authentication #
Authentication refers to whether the credentials (username and password) entered are authorised to access the services on the line. The credentials entered are checked against those held on the Radius server. Provided there is a match, access to the services is granted.
This panel will show whether your customer’s router is correctly authenticating to Gamma. The actual username and password that should be programmed into the router is shown, along with the last requests that were made to access the services, and whether they were successful or not.
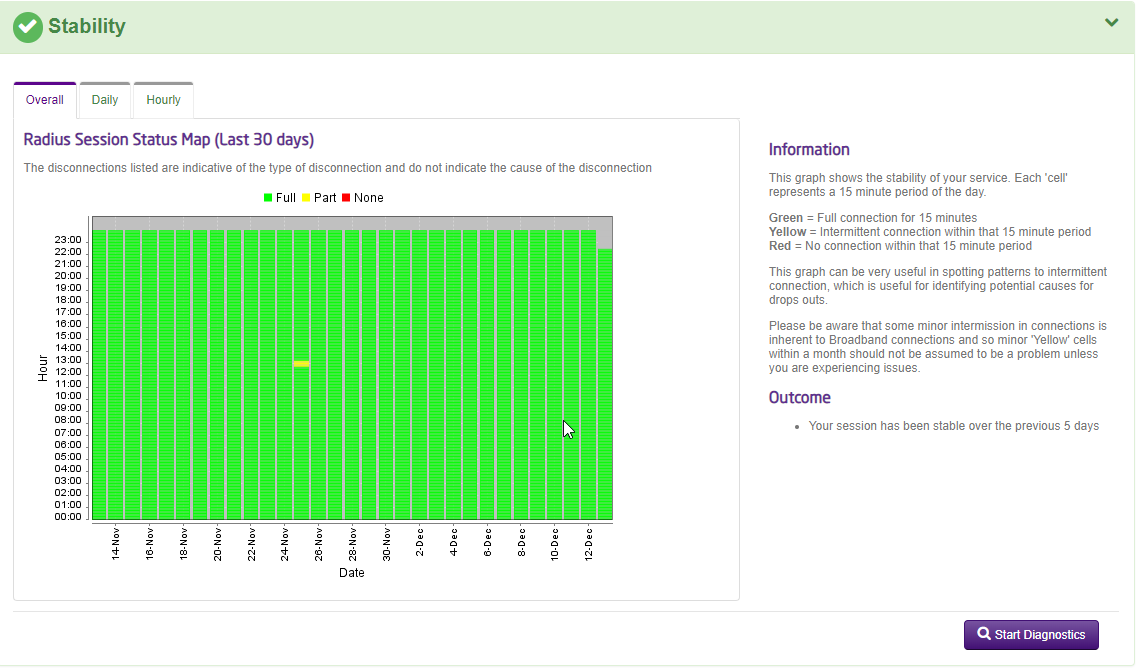
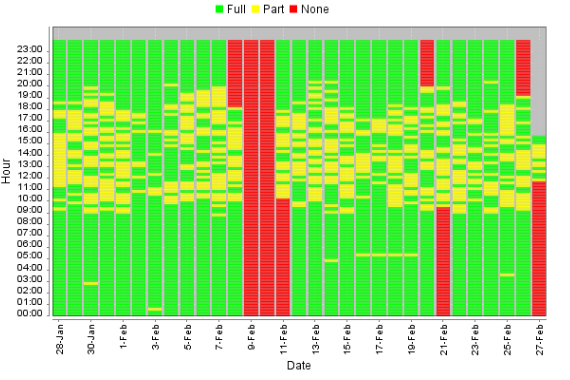
Stability #
Stability refers to how stable the connection is perceived to be. The more times that a connection drops out, the more unstable the connection appears.
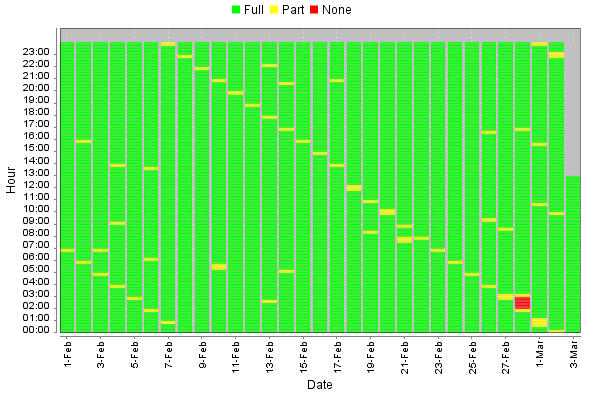
The graph shows hourly/daily/monthly drops in your customer’s connection based on the last 30 days’ worth of data. This can be very useful in spotting patterns, particularly when an intermittent issue is reported. Commonly, alarms or PDQ machines operating over a broadband line can cause intermittent issues, however, you may also be able to spot a customer switching their router off on an evening or over the weekend, which to the Dynamic Line Management (DLM) on the line will look like a stability problem. Other faults may manifest themselves as intermittent connections, such as drops in wireless or slow speed. This graph can help you narrow these types of issue down as only disconnections from the Broadband network will show on here.
The graph shows data in 15 minute segments based on a RAG (Red, Amber, Green status), the colours will indicate the following:
Red – This means the connection has had no session during that 15 minute segment
Amber – The connection has had one or more drops during the 15 minute segment
Green – This means the connection has been fully live for the 15 minute segment
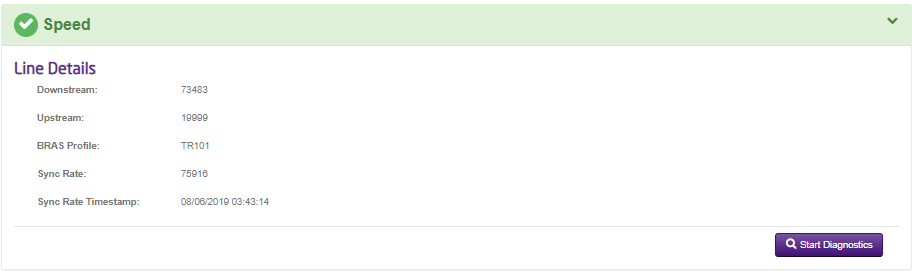
Speed #
This tab can simply be used to run a speed test on your customers line. When you initially open the tool, this tab will be grey indicating that the test has not actually be run yet – in order to run the speed test simply click on the tab and the test will begin automatically (please be aware this can take up to 30 seconds to produce results for you).
Performance #
This panel allows you as a user to monitor your service with us and get a view of its performance over a specified time period. We will have the data from your service since the day it was activated with us and you will be able to filter by a specified time range of your choice, as well as being able to specify the ‘duration’ length you would like the graph to cover. When reviewing this tab you will be able to identify any performance issues on your customers line by reviewing the statistics on RTT (Round trip-time) and packet loss.
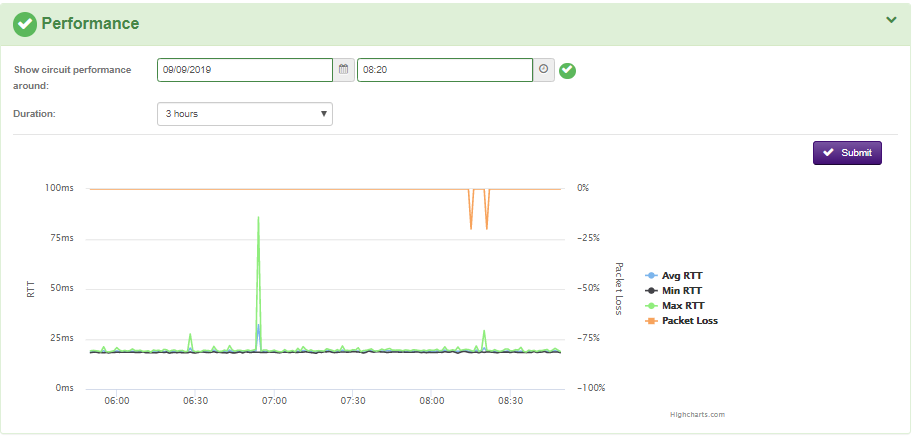
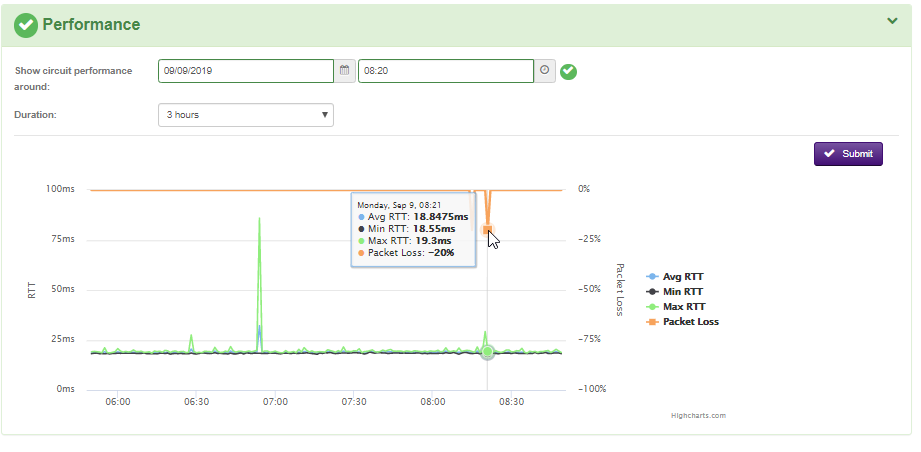
As you can see in the screenshot above, the different indicators on the graph are colour co-ordinated so you can easily distinguish between the information. For specific figures, you can simply hover your mouse over the area of the graph you are looking at and specific information will be displayed, for example in the screenshot below the user has been able to identify 20% packet loss on the line at this specific point.
End User Checks #
If you have reviewed all the available information on the health check and you feel there isn’t anything else you can do there, the next step of the diagnostics journey is to run through some of the end user checks. For any fault you raise into Gamma, we will always recommend that you have completed all of the first line checks which are listed in this page.
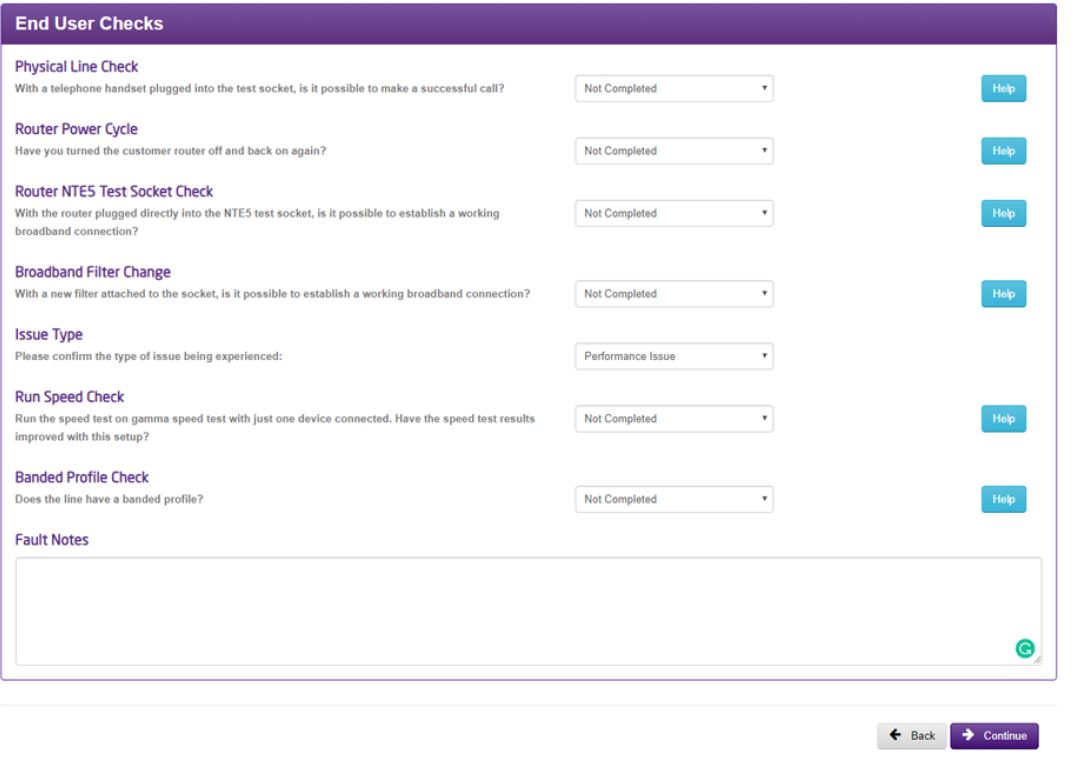
You will notice in the testing details panel at the top of the poge that the end user image will turn Green or Amber at certain points, this is purely a visual representation of the responses you have put into our end user check questions in the journey. Essentially if the image is showing as Amber, this means you have entered that all the end user checks have not been conducted, the reason we mark it amber is that we suggest you do so (meaning for beginner users, it’s a clear representation that there is possibly more they can do before raising the fault into us).
Supplier Diagnostics #
Once you have been through the health check/End user checks and acted accordingly, the next step is just to answer a few basic questions and confirm whether or not you would like to run an intrusive line (KBD) test.
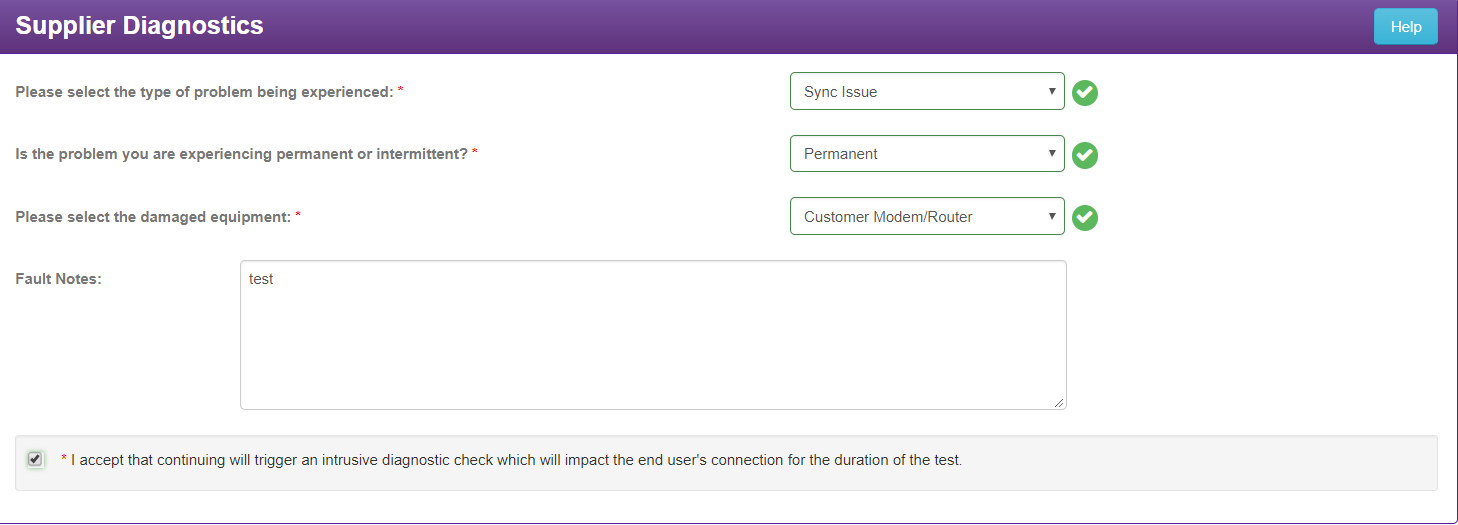
Once you are done here, you can hit the continue button and then a KBD check will be run in the background for you (this can take a couple of minutes to process).
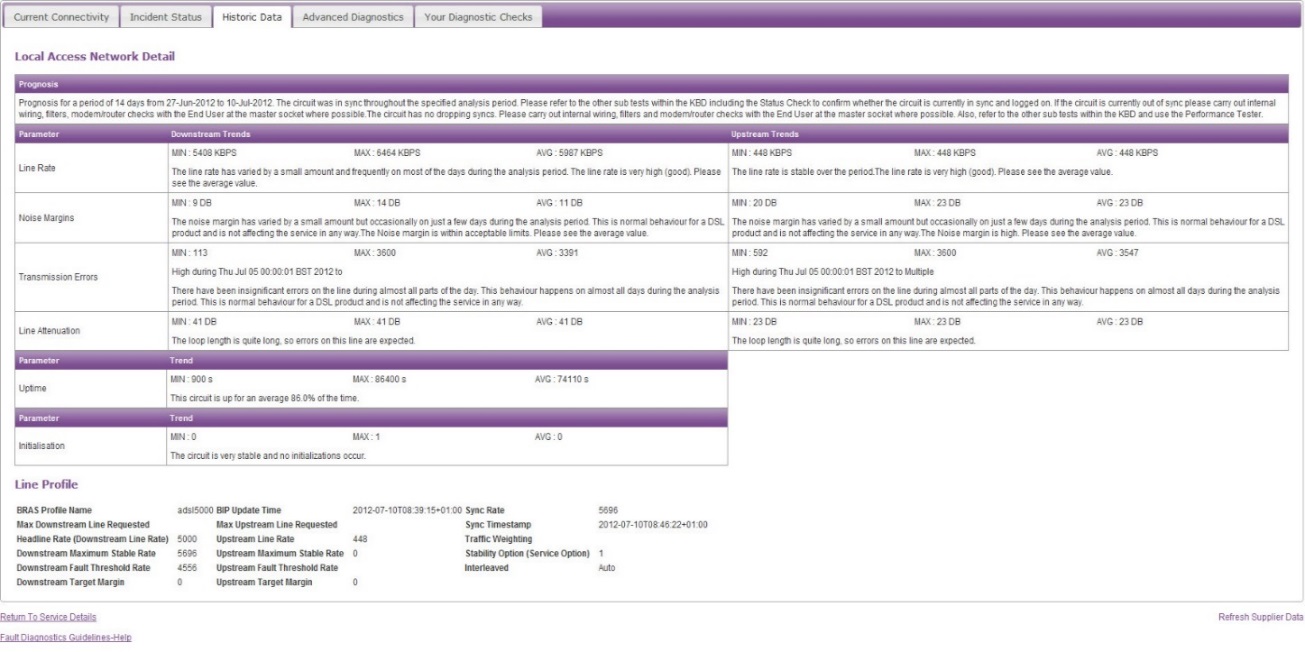
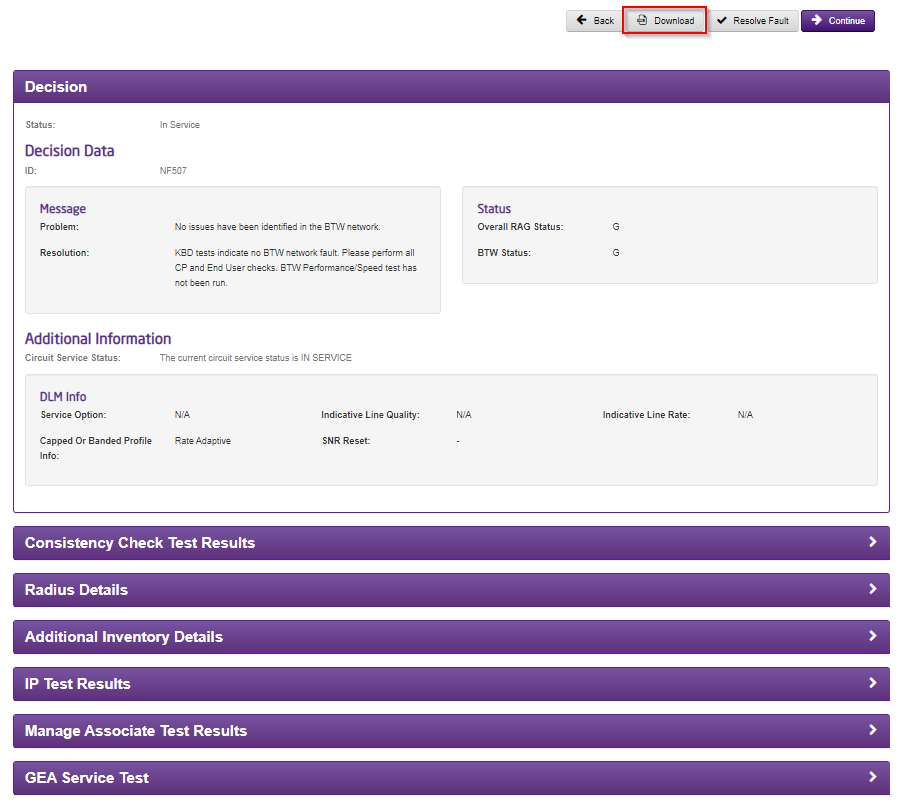
KBD results page #
Once this page has loaded you will be presented with all the information you can consume from a KBD check. When Gamma run diagnostics within BT’s systems we use a KBD check to complete diagnostics and identify any obvious issues within the customers/BTs network before deciding on whether an engineer is required (so now as a user you have access to the same tool we would use internally). It is worth noting at this point that unless a KBD check has been run, BT will not allow any fault to be raised directly to them. Please also be aware that for copper based services, the KBD check is intrusive and service affecting meaning you will see your service drop for approximately 5 minutes, however this is not impacting for fibre services.
As you can see in the screenshot below, when we run a KBD check, BT will provide us with a RAG based response which will show you as a user if there is an issue on BT’s network, this response will be easily visible on the ‘BTW’ image in the testing details panel as shown in the screenshot below.
On this page, you will also be able to see a full breakdown of the KBD results which have been returned from the check and you will also be given the ability to download the file itself for your own personal use.
Please see below a list of some of the various values you will see returned in a KBD check for both fibre and copper circuits, with information on how to interpret them:
Fibre Results #
Decision | |
Consistent Check Test Results | Your sync speed should match the with profile, or BRASMSAN, speed. This is useful for performance issues. If this is a “Pass” then it is OK, though any mismatches could cause drops in connection and speed issues. |
Radius Details | This checks for successful log in’s, including the login ID. It also shows any rejections with the user name and password (authentication/PPP details). This also shows you the dates and times of when a user was logged in and how long the session has been live for, as well as how much data the connection has received and sent. |
Additional Inventory Details |
|
IP Test Results | This shows you how many packets are being sent and received on the connection, as well as any packet drops. |
Manage Associate Test Results | This checks the BT Wholesale network for any potential issues, such as outages. If there is an issue this will display a message from BT Wholesale. |
Copper Results #
Decision | |
Status Check Results | This shows the line stats, such as Loop Loss, SNR Margin, Errored Seconds, HEC Errors, Cell Count, maximum stable rate, fault threshold rate, mean time between retrains and mean time between errors. |
Copper Line Test Results | This lets you know if the line is OK and within limits. This will show you if an appointment is required and also lets you know the distance between the exchange and the NTE. |
Consistency Check Test Results | Your sync speed should match the with the profile, or BRASMSAN, speed. This is useful for performance issues. If this is a “Pass” then it is OK, though any mismatches could cause drops in connection and speed issues. |
Access Profile Results | This shows you the change of the profile of the line by the DLM over a period of time. |
Radius Details | This checks for successful log in’s, including the login ID. It also shows any rejections with the user name and password (authentication/PPP details). This also shows you the dates and times of when a user was logged in and how long the session has been live for, as well as how much data the connection has received and sent. |
Additional Inventory Details | |
IP Test Results | This shows you how many packets are being sent and received on the connection, as well as any packet drops. |
Manager Associate Test Results | This checks the BT Wholesale network for any potential issues, such as outages. If there is an issue this will display a message from BT Wholesale. |
DP Neighbouring Data | If available this will give you some information on similar lines near your customer’s. Does not always return information and will never display information that you can use to identify the line. |
Access Details | This shows you an analysis of the lines performance over the last 14 days. |
Fault Submission #
Once you reviewed the results of the KBD check, if you have not been able to diagnose/identify the cause of the issue and resolve it yourself, you are presented with the fault submission page, this page is where you can request to raise a fault into Gamma. On here you will be asked to enter some basic information such as contact details from your perspective as well as a site contact, in case it is needed further down the line (for engineer appointments etc.).
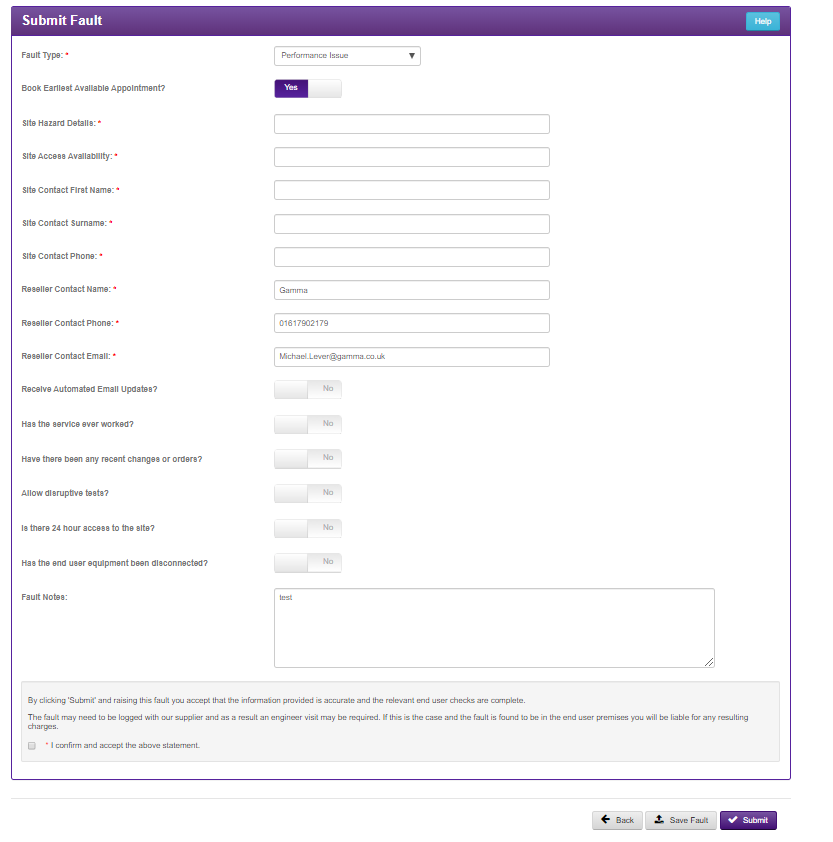
Once you have hit submit, you will be presented with a support call reference which you can use to view your fault on the Gamma portal through the View my support call function.
REIN and SHINE #
What is REIN & SHINE? #
Repetitive Electrical Impulse Noise (REIN) and Single Isolated Impulse Noise (SHINE) is interference found on an ADSL connection and is caused by electrical impulses from such electrical items as a faulty power supply which can result in line errors, slow speed and even disconnections. Usually, power sources and an ADSL connection can co-inside happily. SHINE happens in a burst (i.e. when a device is switched off), whereas REIN is constant throughout a devices usage.
Whilst all electrical equipment will generate some “noise”, it should comply with the Electromagnetic Compatibility (EMC) directives, thus avoiding disturbance by radio and telecommunications equipment, though some equipment may be old, foreign or faulty.
How do I look for a REIN or SHINE fault? #
Diagnosing REIN or SHINE faults can be complicated. It is the End User who would diagnose these faults and it is simply a process of elimination. You should get an AM/MW radio and set it to 612KHz. If you place the radio next to your modem/router, you’ll hear the ADSL signal. If you then place the radio next to another power source, such as an LCD monitor, you’ll hear a distinct sound and such fade out as you move it away. By using the radio, you may be able to see where the noise is coming from, and switch off that power source and then retest your ADSL connection.
Not all noise you may hear will affect your ADSL connection, this is just to help you find the potential cause.
If you are unable to find the cause within the site of the ADSL connection, it could be further afield, such as a neighbours equipment, or something along the route of the ADSL connection from the exchange, such as roadworks or a faulty streetlight. If the source is external, then you should call into the service desk who will then be able to assist you further.
Typical REIN and SHINE Causes #
- Faulty Power Adapters
- Christmas tree lights
- Thermostats (central heating etc)
- Railway cables
- Electric fences / motors
- Street lighting
- Laptops / TVs / Set top boxes for Sky, Virgin, Freeview etc.
- Roadworks
- Florescent lights
Please see below for some example pictures for RIEN & SHINE
RIEN –
SHINE–
How can I help fix a REIN problem? #
If you suspect that you have a REIN fault, you still need to do standard fault diagnostics. BT Openreach will only escalate a suspect REIN fault to their specialist REIN engineers once standard fault finding (including their normal engineers) have run tests and tried to avoid REIN.
It’s also important to note that once the initial engineer is satisfied that everything has been done to avoid REIN and whatever is causing the fault is not on BTs network is when the REIN engineer will be assigned. Therefore this is not subject to a normal BT service level agreement and the BT REIN engineer maybe take a couple of weeks to attend the site. You may also be charged for this visit as the REIN is likely caused by an appliance or configuration at your site.
You can see if the problem is attributed to REIN yourself, and sometimes even track it down. You should make a log of the dates and times the internet goes down (you’ll be able to see this using our Fault Diagnostics tool). If there is a pattern, such as the internet goes down between 9am and 5pm the interference must be by an electrical appliance that is active within that time frame. Try unplugging different electric items near the telephone line or the router from the mains supply and see if this resolves the issue. Remember when doing this it could take up to 2 minutes before you see if it works.
If the cause of REIN is offsite then REIN engineers can ask the owner of the kit to turn it off but the owner is not obliged to do so.
Fibre to the Premises #
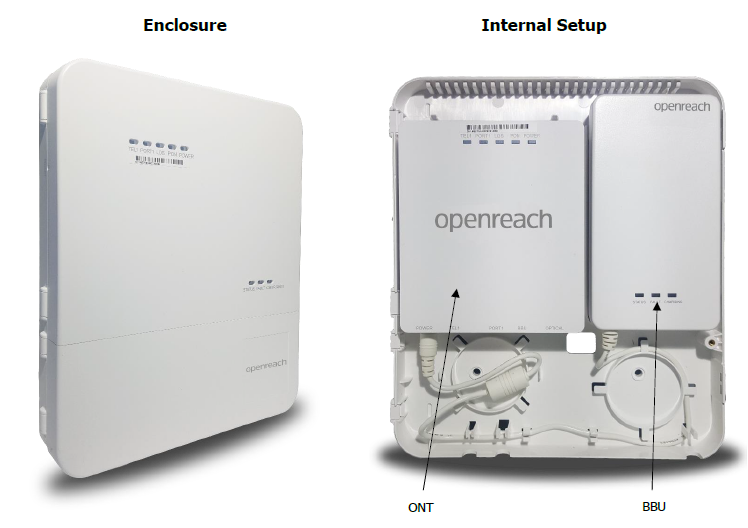
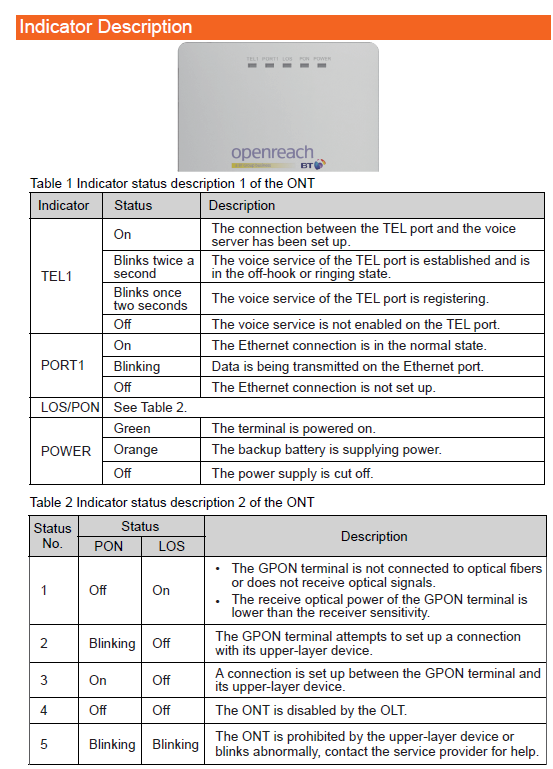
With the introduction of FTTP, Openreach now use ONT (Optical Network Termination) boxes. The ONT is the device that is used to terminate the fibre cable into the property, then connecting into the users CPE. Moving forwards, Openreach will install a version of the ONT that contains one data port and one voice port. This is after they disregarded the original models that came with 4 data ports and two voice ports. These legacy ONT devices will still be seen in some cases from their original installation.
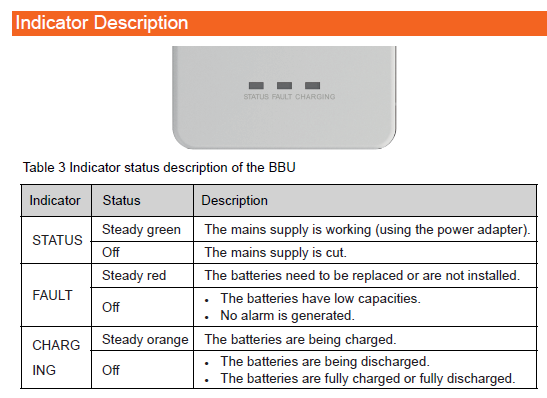
The below diagram shows the external casing of the ONT followed by an internal view showing the ONT along with the Battery Back Up.
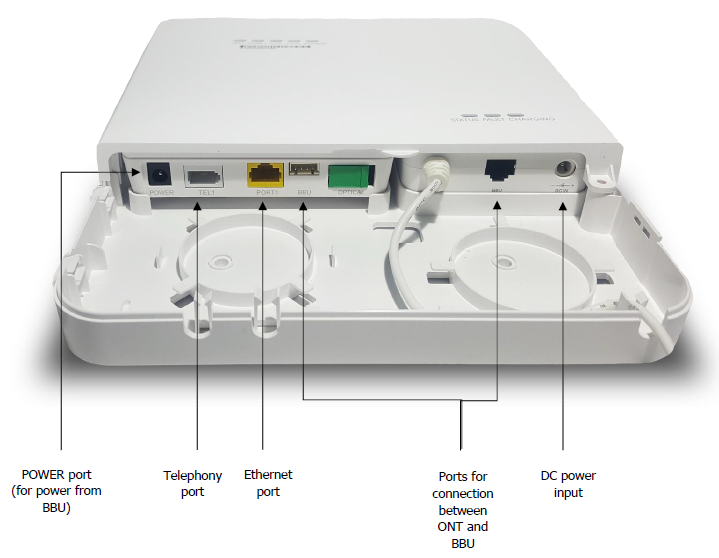
The below diagram shows the ports of both the ONT and the BBU.
Below is a diagram to physically show how the ONT fits into these new circuit types
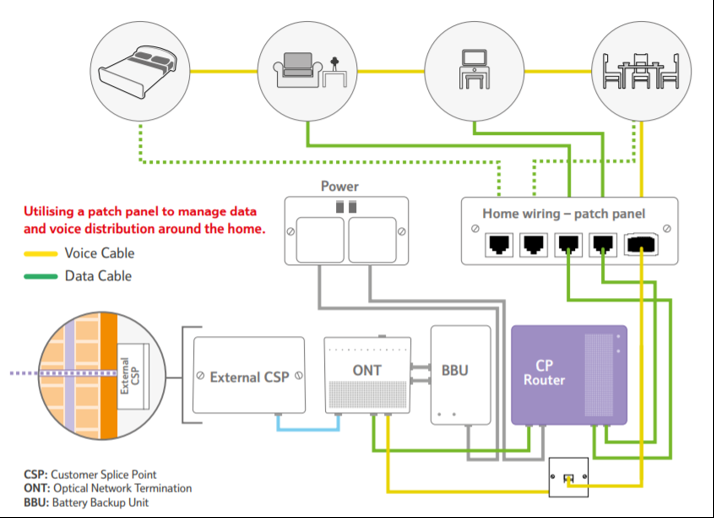
Note – The ONT in the diagram shows the standard 1+1 (1 Data + 1 Voice) ports that Openreach will be using. Please be aware that some legacy 4+2 ONTs will still be in use.
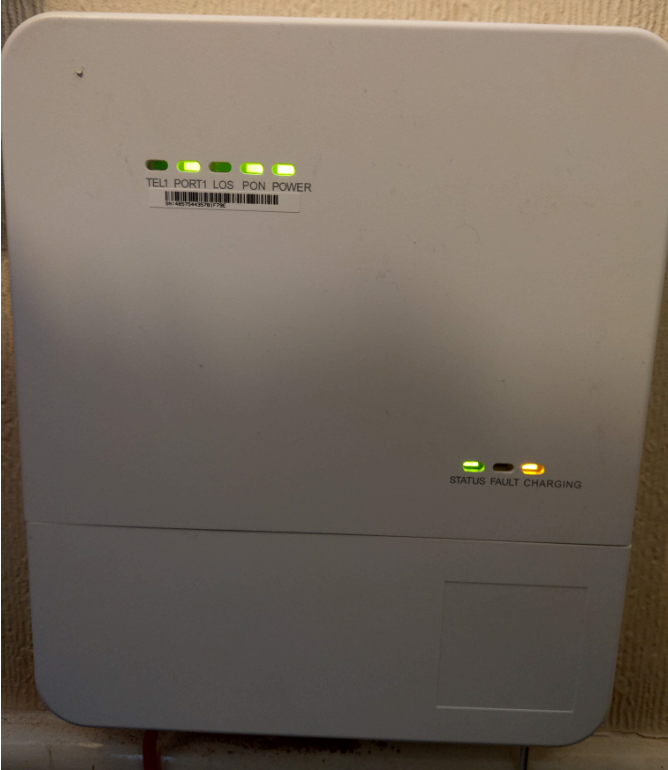
Although the ONT is owned and maintained by Openreach, you can find below some information on diagnosing faults with the device to either confirm or rule it out of your checks if an issue is present with your FTTP circuit.
DSL and IP Throughput Rates #
WBC #
| DSL Rate | Throughput |
|---|---|
0 to 288kbps | 50kbps to 250kbps |
288kbps to 576kbps | 100kbps to 500kbps |
576kbps to 1152kbps | 200kbps to 1000kbps |
1152kbps to 2272kbps | 400kbps to 2000kbps |
2272kbps to 8128kbps | 1000kbps to 7150kbps |
8128kbps to 24384kbps | 2000kbps to 21000kbps |
WBC Premium Variants #
ADSL Sync speed | Throughput |
0 to 288kbps | 100kbps to 250kbps |
288kbps to 576kbps | 100kbps to 500kbps |
576kbps to 1152kbps | 400kbps to 1000kbps |
1152kbps to 2272kbps | 800kbps to 2000kbps |
2272kbps to 8128kbps | 1200kbps to 7150kbps |
8128kbps to 24384kbps | 4000kbps to 21000kbps |
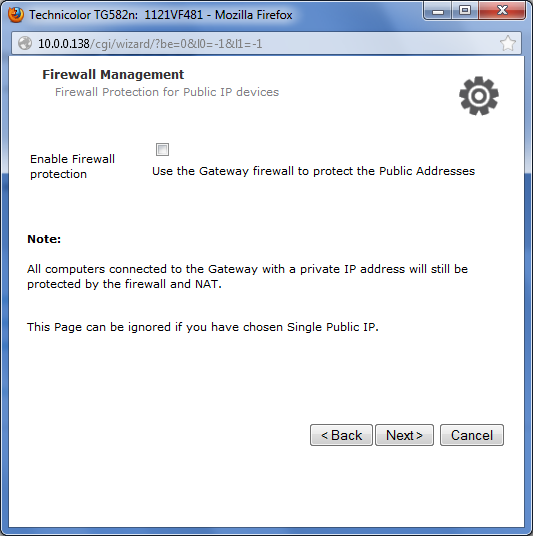
Configure a routed IP on your router #
Routed IP addresses are not provided as standard as they are only required in certain circumstances.
For more information on IP addressing please click here.
Step 1
Open your browser and access the routers web interface.
If your router is supplied by Gamma, you can follow these steps:
- Enter 192.168.1.1 to the address bar
- Input the admin logon details
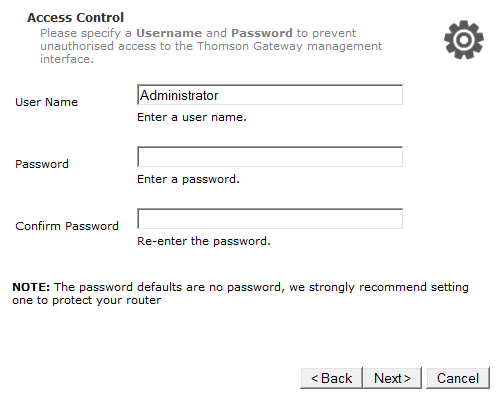
- Default username = Administrator
- Default password = XXXXXXXX-Admin or GREF-Admin
Step 2
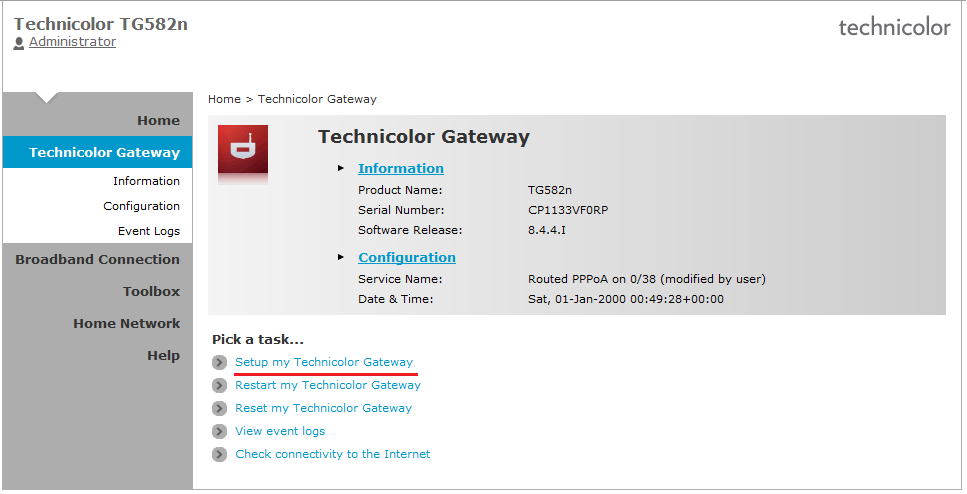
Click on ‘Setup my Technicolor Gateway’, then click ‘Next’
Step 3
For ADSL connections: Select ‘ADSL (Expert)’ and click ‘Next’.
For FTTC/SoGea/FTTP connections: Select ‘Eth WAN (Expert)’ and click ‘Next’.

Step 4
Enter the username / password for the broadband circuit (available on Broadband Service Management via the Gamma Portal).
Step 5
Leave the WAN – VLAN parameters as they are defined in the text boxes and click “Next”.

Step 6
Again leave these text boxes with the data that is already in them on the UpStream QoS screen.
Step 7
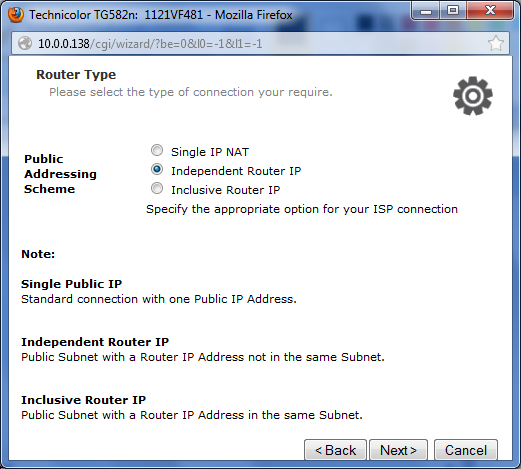
Select ‘Independent Router IP’.
Step 8
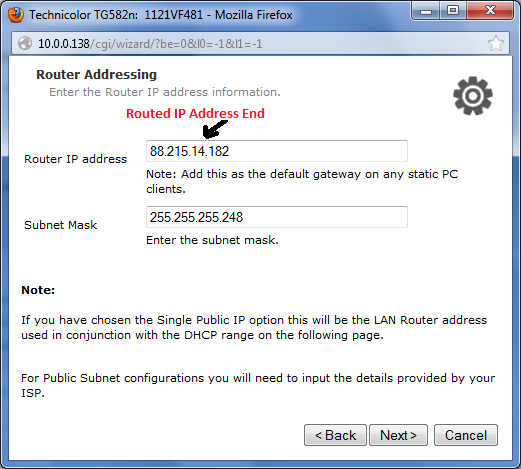
Input the details you entered on Step 1.

Step 9
Ensure you input the correct subnet mask that was provided with your routed IP request. The Router IP should be the end routed IP address, and not any other.

Step 10
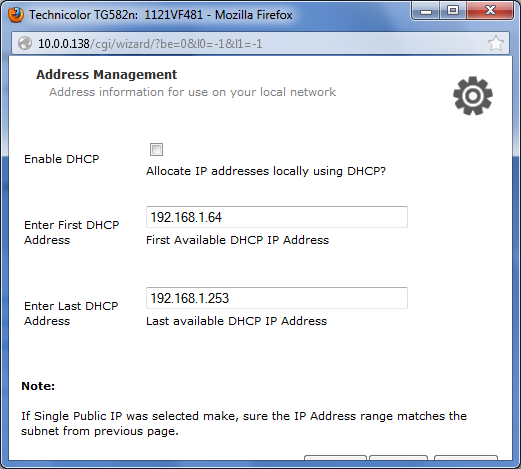
Ensure DHCP is unchecked.
Step 11
The remainder of the settings can be configured as you see fit.
DNS based Vulnerabilities and DDOS Attacks #
Open DNS relays and related malware are threats to local and remote users of the Internet, and typically employed to overload network resources by issuing multiple DNS requests which are then amplified by the systems responding. A useful explanation can be found here.
Users can check for open relays/resolvers on their systems by employing the checks detailed here.
In addition to the open-relay vulnerability similar attacks utilising DNS can also be launched by malware resident on the local system. Customers should employ virus and malware checking on all their systems and ensure that this is fully up to date.
IP Addresses #
WAN IP Address #
Gamma provides a single fixed IP address on all connections, free of charge.
Routed IP Address / Non-NAT Configurations #
Where the end customer does not want to use NAT and needs to assign public IP addresses to machines on their LAN, Gamma will provide the following routed IP subnets:
| Subnet size | Useable IPs |
|---|---|
4 | 2 |
8 | 6 |
16 | 14 |
Please see the Price List for charges.
Do I Need Routed IPs? #
You need routed IPs if you are running a complex set up and have multiple instances of the same service, such as multiple HTTPS servers or you have other network services that do not support being configured behind a NATed router.
In this instance, NAT is disabled on the router and a range of External IP addresses are assigned to the LAN side of the router (usually a range of 4 with 2 usable or a range of 8 with 6 usable). This then allows you to assign these externally accessible IP addresses to the devices on the network. However you will need to ensure that you have enough IP addresses for each device you wish to connect.
The WAN IP address is assigned to the WAN/ADSL port on the Customers router.
How do I configure the connection without routed IPs? #
The router can be configured using NAT with local IP addresses (for example 10.0.0.0/8, 172.16.0.0/12 or 192.168.0.0/16 ) assigned to the network devices on the LAN side.
If you are running services that need to be externally accessible port forwarding can then be used. Port forwarding allows you to forward traffic though for specific ports to individual devices on the local network for example SMTP onto a mail server or SIP traffic to a PBX.
DSL Credentials #
DSL credentials are also known as PPP Credentials, please see below for more information regarding these.
Gamma DSL Realms #
All new orders are provisioning on @b2bdsl.
Services migrated in from the old third party network will be on @business-dsl.co.uk
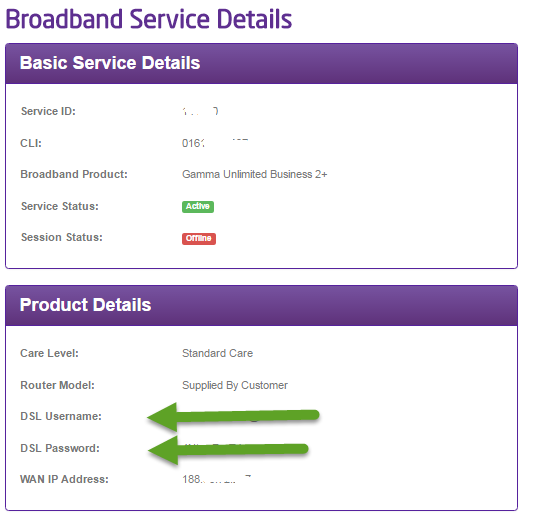
Finding User Credentials #
User credentials can be found in the Broadband Service Management page of the Gamma Portal.
Once you have logged on to the portal go to Data Services–> Broadband –> Broadband Service Management. Using the filters find the subscriber you are looking for:

Click on the Service ID, far left of the table as shown above, and you will be taken to a screen that shows all the service details for that subscriber. This includes the DSL credentials needed to configure the customer’s service.
Connecting to the SMTP Relay #
This is a closed service only available to Gamma NextGen Broadband customers. This is a relay service only and Gamma takes no responsibility for email content filtering or other regulatory compliance e.g. logging of message traffic.
Gamma’s SMTP relay can be found at smtprelay.business-access.co.uk. No other credentials are required.
Bulk Mailing #
Gamma’s SMTP Relay does not support bulk mailing. Bulk mailing is defined as:
E-mails with more than 120 recipients per email
Sending E-mails at a rate of over 10 emails per minute
Other Restrictions #
Gamma’s SMTP Relay will not process E-mails that are larger than 28 Mega Bytes (MB) in size.
Potential Error Messages #
Relaying denied – Not a recognised IP address.
Relaying denied by ISP – We have specifically blocked this user. Their may be an active ticket regarding it.
Admin Prob – Max recipients reached, as above.
Rate Limit exceeded – Limit above reached.
Size too big – As above, for the email and it’s attachments.
Gamma’s DNS servers are #
Primary: 88.215.61.255
Secondary: 88.215.63.255
Suspend and Resume #
Purpose #
This functionality allows you to stop a subscribers’ service from working without having to cease the line. Suspending a user simply removes them from our RADIUS disabling their service. The service can be resumed (using the same credentials and IP addresses) by simply reinstating them on the RADIUS.
Suspending or Resuming a Service #
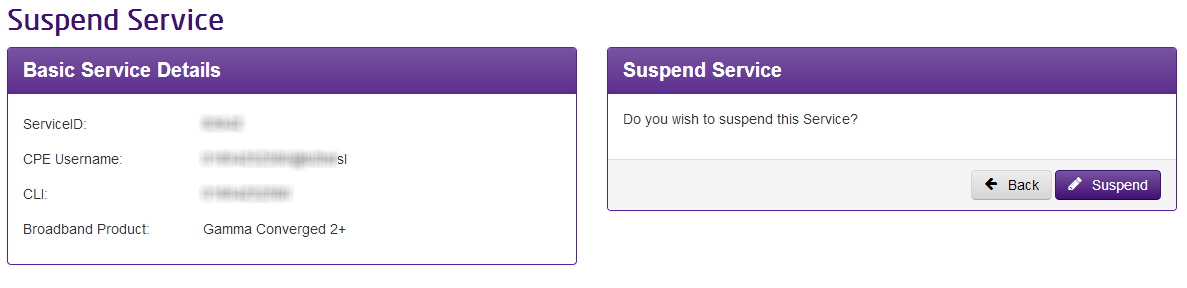
Step 1
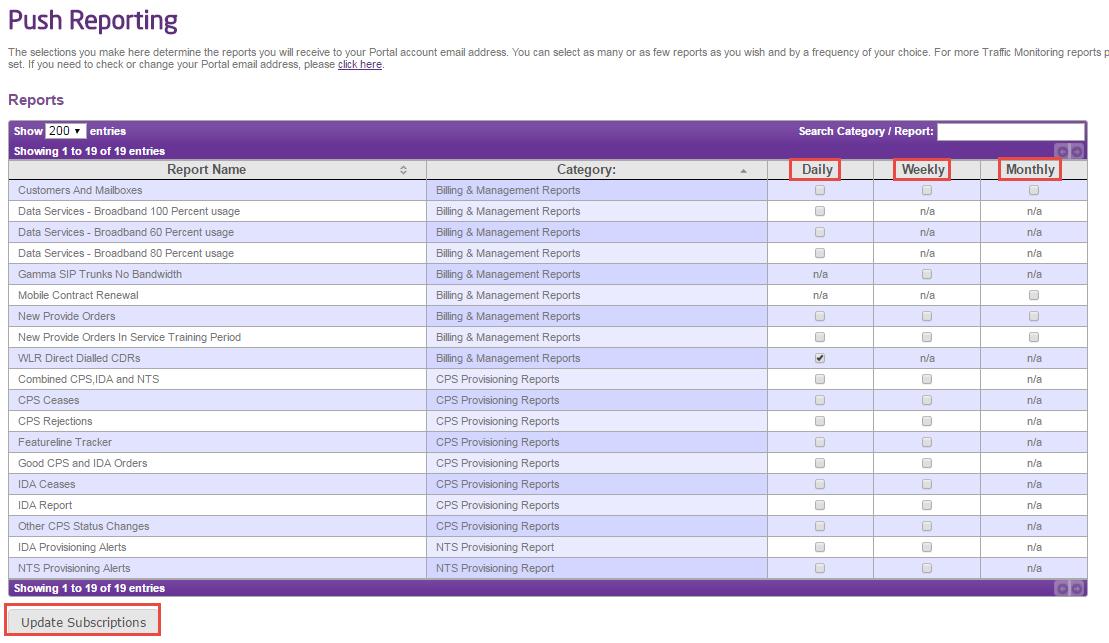
To Suspend / Resume services you can do this from the Service Management screen, identifying the circuit you want to suspend and then using the Actions menu select “Suspend Service”.
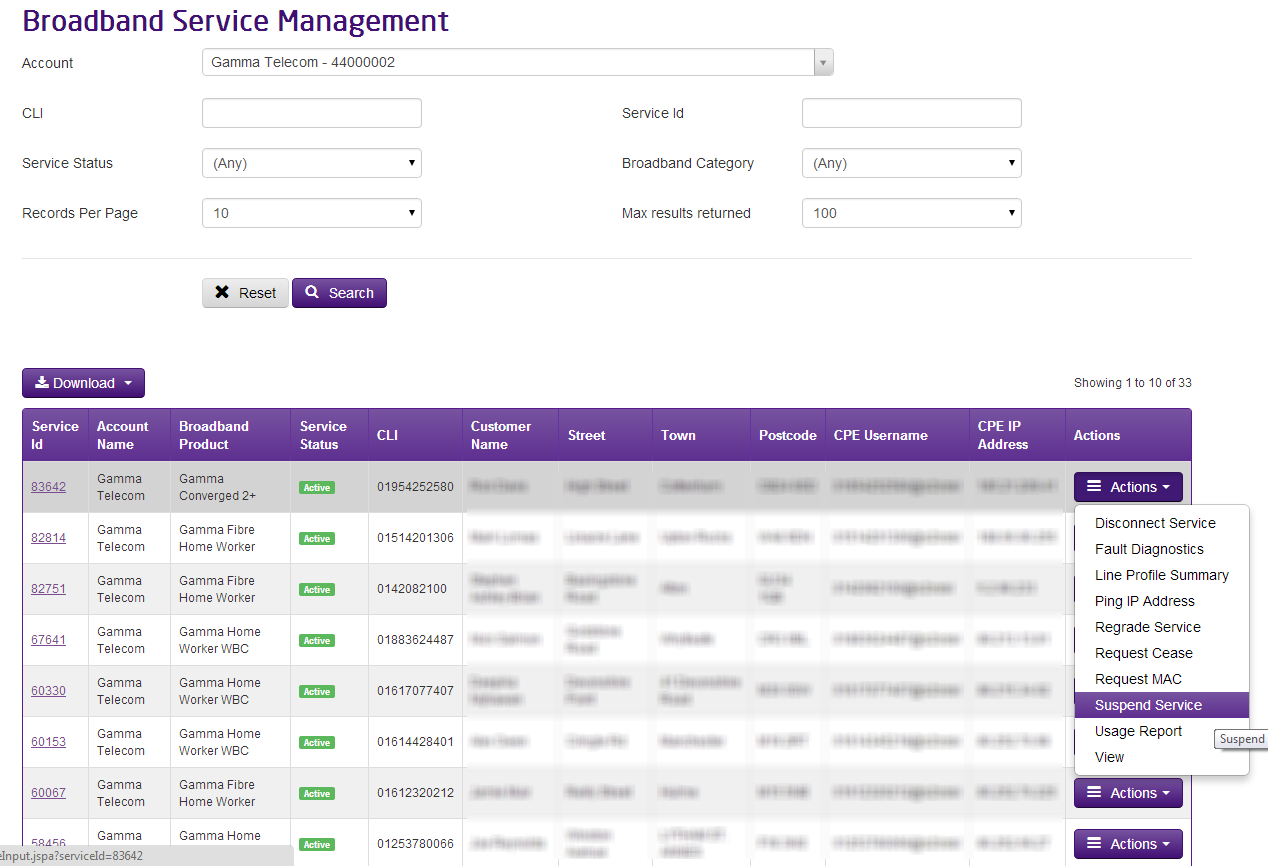
Step 2
To Suspend / Resume services you can do this from the Service Management screen, identifying the circuit you want to suspend and then using the Actions menu select “Suspend Service”, or if an account is already suspended you’ll be able to select “Resume Service”.
Please note: to find users who have been suspended, use the ‘Status’ filter when searching in the ‘Service Management’ page.
Signing Up to Push Reports #
Please use the below guide to help you set up push reports.
Step 1
Login to the Gamma Portal and hover over the ‘Reporting’ tab which will present a drop down list. From this list select reporting then push reporting.
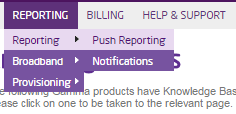
Step 2
The next page shown will allow you to select the reports that you want and will also allow you to select the frequency daily, weekly or monthly. Once you have selected these please press the update subscription button.
Usage Report #
If you’re wanting to see what a service is using data wise, you can do this using our Usage Report from the Service Management screen.
Step 1
Once you’re in the Service Management screen, using the Actions drop down select “Usage Report”.
Step 2
Select the start date and end date and whether you want to display the data broken down by each day or by each month. Click “Query” and then this will display the Upload, Download and Total data used for that circuit.

Incident Status #
Within this screen, you can check to see if there are any BT incidents (Major Service Failures, Planned Engineering Works etc), Gamma Broadband alerts, or any support calls linked to a service.
BT Network Incident Check #
This table will alert you to any known outages or planned engineering works which the service is linked to. If any issues are identified, you can find further information from here.
To find the further information, click on the number of either Major Service Failures, Planned Engineering works or BTW Trouble Tickets (highlighted in below screenshot)

Gamma Broadband Alerts Check #
This table will show you if there are any known Gamma Broadband alerts which have been raised in the last 7 days.
To find further information for any Gamma Broadband Alerts, click on the number of alerts as highlighted in the image below:

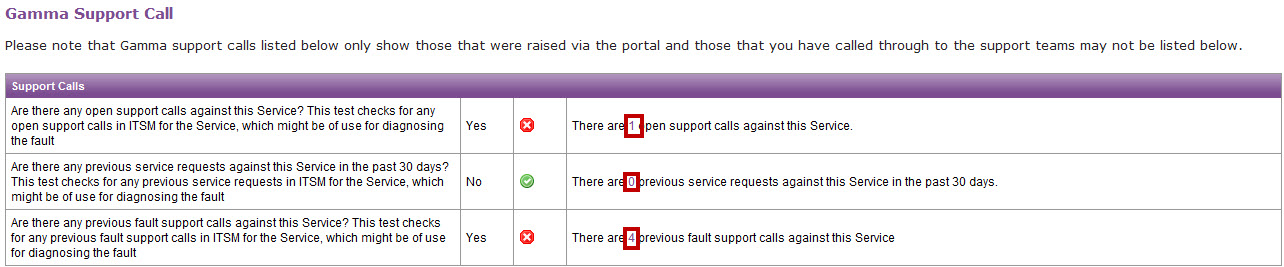
Gamma Support Call #
This table will show you the fault history of the circuit, including any service requests. You can get more information for open support calls against the service, previous service requests (30 day limit) and previous fault support calls.
To find this further information, click on the number of of support calls or service requests as highlighted in the image below.
#
Network Overview #
Gamma’s Next Generation Network provides the benefit of both the latest ADSL technologies, such as Annex 2+, FTTC, SoGea and FTTP, the coverage provide by BT’s IPStream network. The N+1 resilient design of the network ensures the level of service businesses would expect from their ISP.

Feedback #
| Name | Service Development |
| portalfeedback@gamma.co.uk | |
| Phone | 0333 240 7771 |
