Provisioning a New Company for Call Recording #
When creating your Horizon company, you will see there is an option to enable call recording. Don’t worry if you haven’t done this for the company you can add this on by following the in-life process, click here.
Selecting Your Recording Tier #
As you can see on the below image you are able to select three different types of recording, these are as follows..
Standard – This is Gamma’s legacy call recording solution where the call is recorded on the number not the user and calls are retrieved via the Horizon portal.
Business – This is one of the tier on the new platform. This uses SIPREC technology meaning that calls are recorded on the individual user not the number. The Business tier has a number of different retention options that are set at the company level. This means that all users would be on this retention period. The retention period can be increased or decreased but will only affect the future records. The retention options are 3,6,12,36 months.
Compliant – This is the MiFID II tier that will need to be selected should the user need to be MiFID II compliant. The retention period is for 84 months. Like the Business tier Complaint uses SIPREC and is recording the user and not the number.

Ordering the Bolt-Ons #
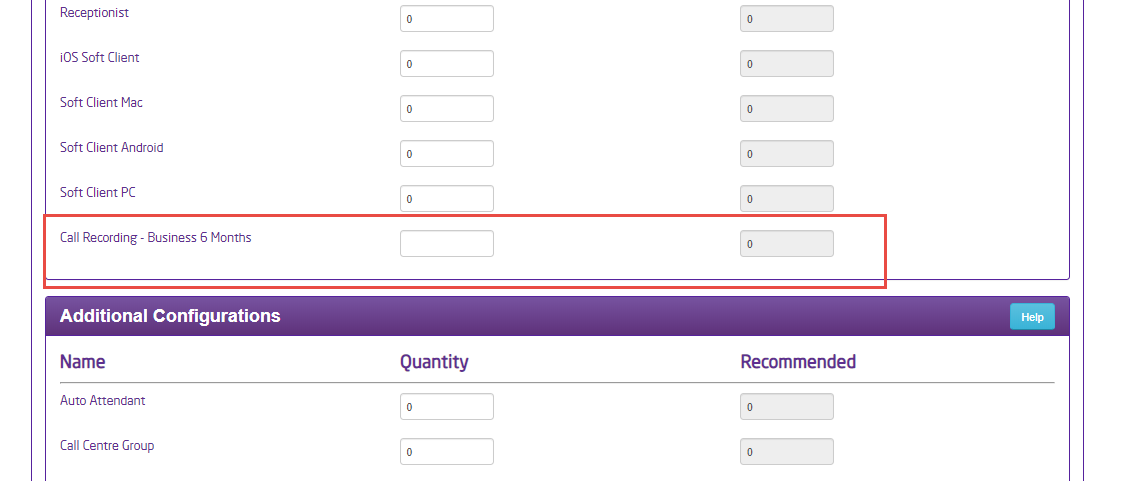
After you have completed this page click continue and you will be able to order the bolt-ons you need. You will see in the below table the specific call recording Bolt-on that will match your selection from the previous step.
Please note that as will all chargeable bolt-ons as soon as they are ordered billing for them will commence.
Complete the rest of the required fields before reviewing your order and then submitting it.

The next step is to activate via the Horizon portal, click here to follow that process.
Upgrade or Add Call Recording to a Live Company. #
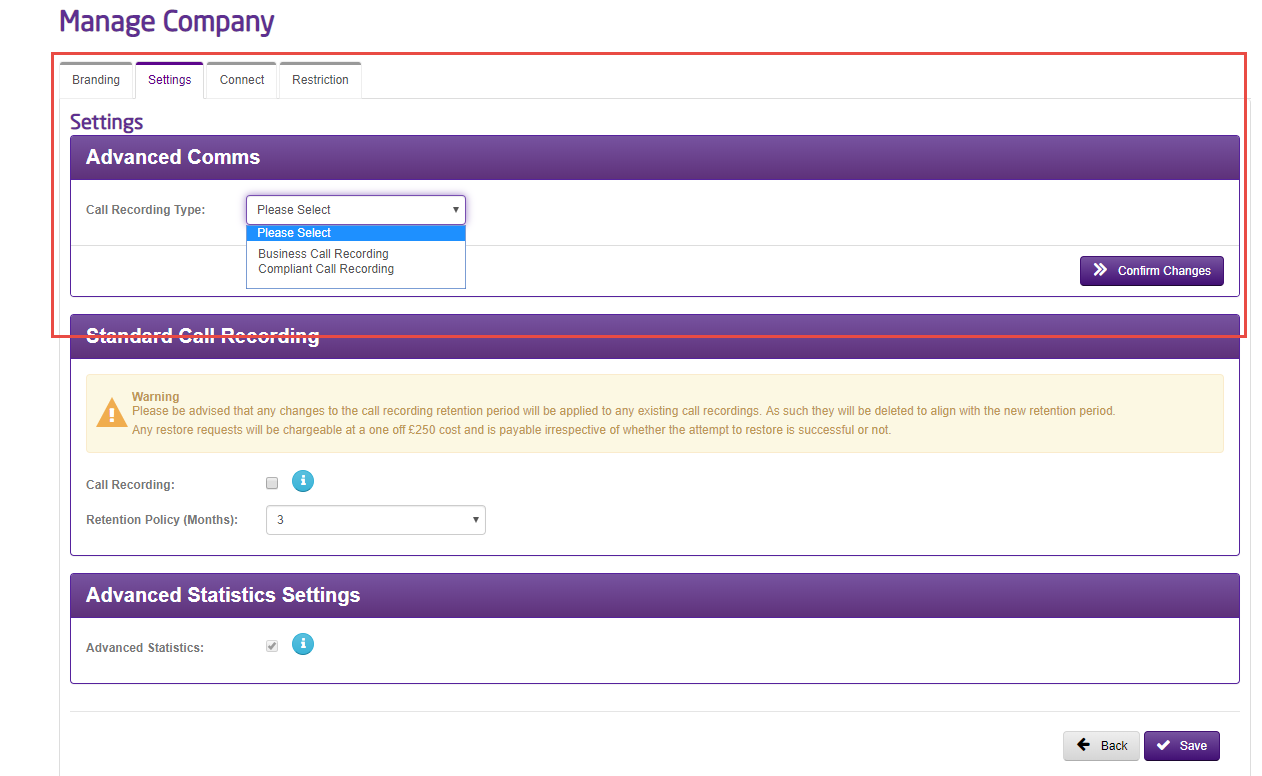
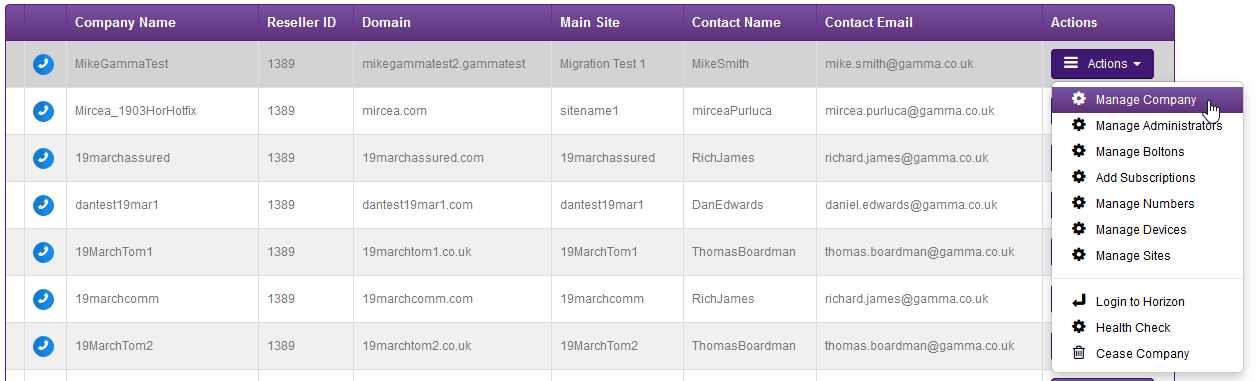
If you already have a live Horizon company then you will need to go to Horizon company management, then click the Manage Company icon.
Selecting Your Recording Tier #
From here you can select the settings tab and use the Call recording panel as shown below to choose the relevant tier. Once you’re happy then click the upgrade call recording button.
As you can see on the below image you are able to select two different types of recording, these are as follows..
Business – This is one of the tier on the new platform. This uses SIPREC technology meaning that calls are recorded on the individual user not the number. The Business tier has a number of different retention options that are set at the company level. This means that all users would be on this retention period. The retention period can be increased or decreased but will only affect the future records. The retention options are 3,6,12,24,36 months.
Compliant – This is the MiFID II tier that will need to be selected should the user need to be MiFID II compliant. The retention period is for 60 months with the option for a further 24months. Like the Business tier Complaint uses SIPREC and is recording the user and not the number.
Ordering the Bolt-Ons #
Once you have chosen the Call recording tier you will then be able to order the amount of bolt-ons that are needed. Please note you need to have 1 bolt-on per user.
Ordering bolt-ons is done in the same way you normally do by going to Horizon company management and then use the actions tab to select the Manage subscriptions tab. From here order the number needed and complete the order.
The next step is to activate via the Horizon portal, click here to follow that process.
Increase or Decrease Retention Period #
When increasing or decreasing retention periods it’s important to know that this will only impact future calls and the historic calls will keep the old retention period.
Head over to the Gamma portal and locate the horizon company, then use the actions menu and select manage company.
Select the settings tab, then select the new retention policy that is required from the drop-down. After this click to confirm changes.
This will now change the retention policy for all current recorded users and all new calls will take on the new retention policy.

Horizon Portal Setup #
Once you have created or added Call Recording to your Horizon Company you can log in to the Horizon portal to set up your users.
Step 1
The first step is to select who will be the Global user. The Global user is the first user of the call recording platform and who will be responsible for creating the users who need access to the platform. It is recommended that this is someone in the end users organisation.
Please note a user can be recorded and not have access to the platform. The platform will be to listen to the recordings and perform other actions.
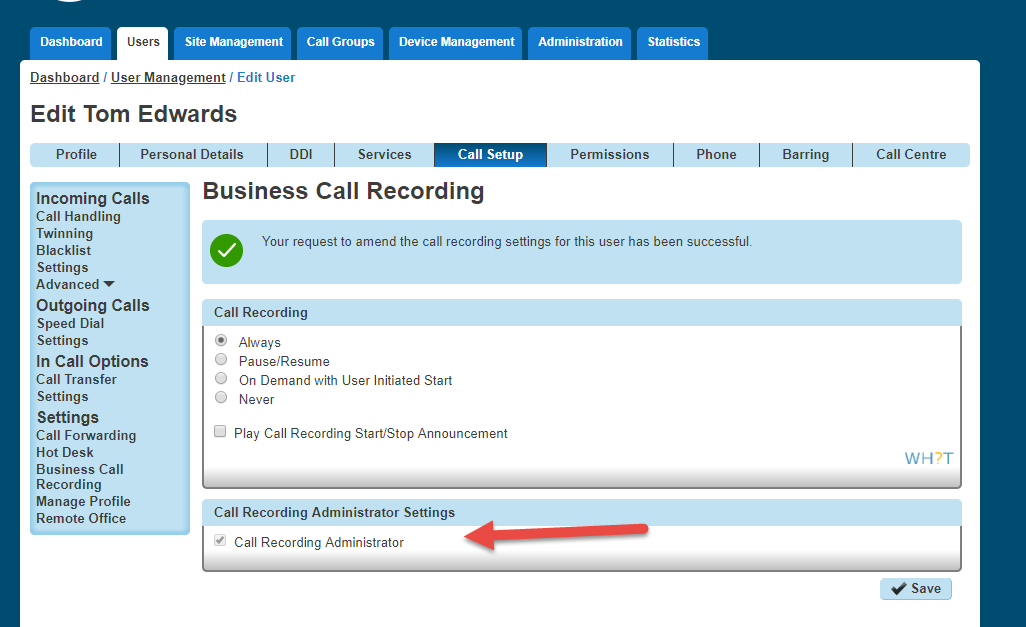
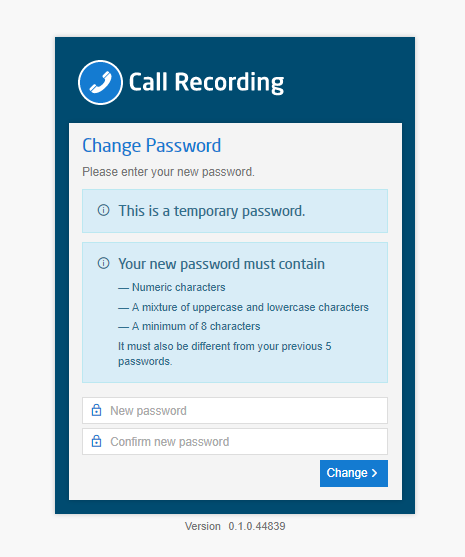
Select the user who will be the first Global user and go to the Call setup tab and then select Call recording from the left column. After selecting this you can then tick the ‘Call recording Administrator’, after selecting this there will be an email sent to this user with login details to the call recording portal.
Please note it may take up to 1hr for the user to receive the login credentials to the Call recording portal.
When the email is received it will time out after 60 mins, if this happens ask the global user to click the link to take them to the Recording platform and use the “Forgotten” password link. Use the username they were sent along with their email address.
Step 2
Once the Global user has received this email the call recording platform is then set up. It is recommended that a minimum of two Global users are created per account, additional Global users are created directly in the call recording platform. Please see the Call Recording Portal article for step-by-step instructions.
You can now enable the individual user for call recording.
Search for the user(s) then click edit, then select Call setup and then select Call Recording from the menu. From here click the ‘Enable Call Recording’ button then click save.
Please ensure you have enough ordered enough bolt-ons via the Gamma Portal when adding these to the users.
Step 3
The users will now have their calls recorded on the new platform. If they require access to the call recording platform then please see our TRCA platform guide for more information.
If the users still have the standard call recording enabled you can either keep this enabled and pay for both services or you can remove this. To remove this please click here.

Call Recording Modes #
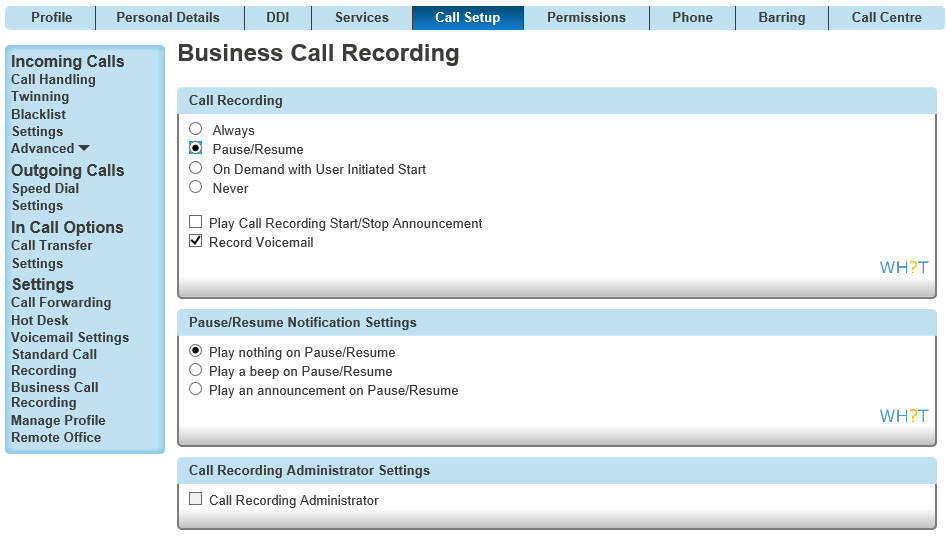
There are five modes that can be used on the Business tier for a call recording user, these are as follows.
Always mode: All calls are recorded.
Pause/Resume: All calls are recorded; the call recording user can pause and resume recording independent of the state of the recorded call. Please not for Pause/Resume you can choose to play nothing, a beep or an announcement for when Pause/Resume has been activated.
On-Demand User-initiated start: Calls are not recorded from the start, user must trigger recording to commence. Pause/Resume also available during recording.
On-Demand: All calls are recorded from the beginning, but are only retained if the call recording user triggers it. On Demand mode allows Pause/Resume mode when triggered.
Never: Meaning none of the user’s calls will be recorded.
Call Recording Controls #
If you are enabling the On Demand/Pause & Resume features then you can do this by either using short codes or via the interface on the phone itself or the Horizon desktop client.
Please Note – If you are using the feature access codes you will need to place the call on hold and then dial the feature access code for this to take effect.
Shortcodes
Feature Access Code Name | Feature Access Code |
Record Call | *44 |
Call Recording – Stop | *45 |
Call Recording – Pause | *48 |
Call Recording – Resume | *49 |
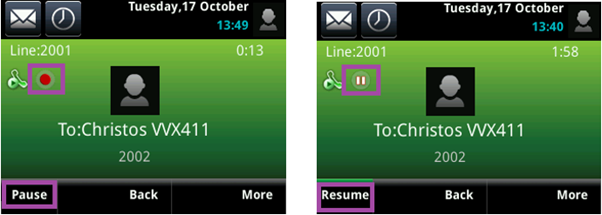
For the VVX 411 Polycom device you can use the phone interface to do this. Please note the red indicator will be present when the call is being recorded.
For Horizon desktop clients you can use the three dots to use the recording options. Please note the red indicator will be present when the call is being recorded.
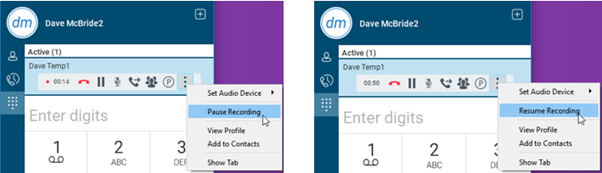
Please note if the user is not enabled for call recording then these options will not be visible. It will also depend on the call recording mode they have assigned to their profile. If they have the mode “Always” then they will not see any of these features.
Removing Standard Call Recording #
Once you are happy that the Call recording platform is working as expected then you can start the process of removing the Standard recording from your Numbers.
Step 1
As a horizon portal admin, you will now be able to view a table that will show you the number type (Hunt Group, End user etc) so that when you are removing call recording its a lot easier. You will also have a quick edit button to take you to the type.
Once you have found the number you will need to remove the Standard call recording.
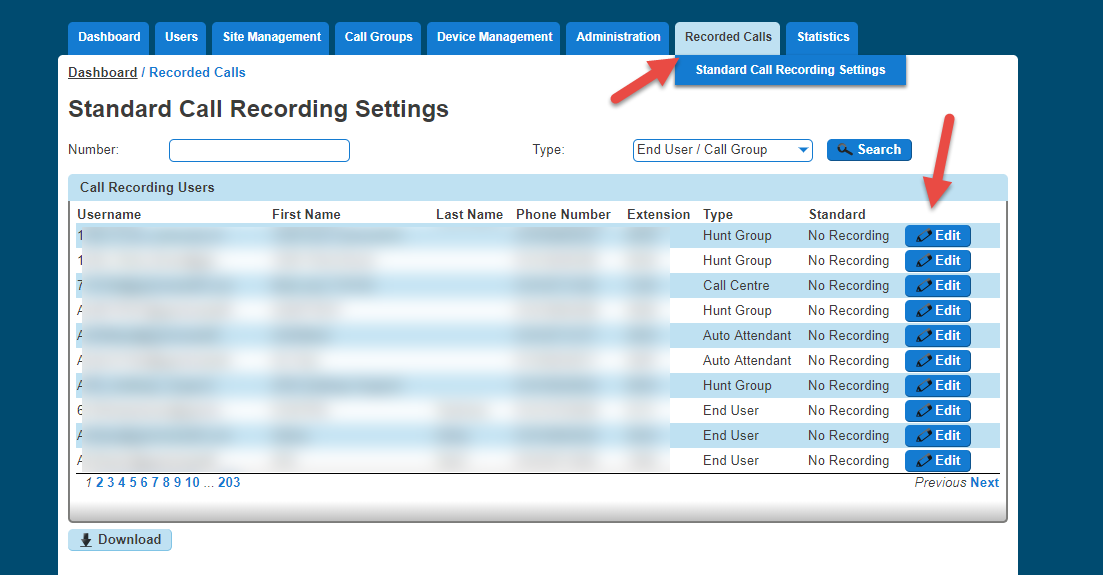
Step 2
For Numbers with a frequency > 0 then you will need to locate this number and set this to ‘Do not record calls’.
Please note: If these are not set to ‘Do not record calls’ then you will still be charged for legacy call recording.
Access Legacy Call Recording #
Accessing the legacy call recording is still done via the Horizon portal. Once you have logged into the Horizon portal you will see the ‘Recorded Calls’ tab.
Hovering over this will enable you to select the action you require. Calls will still appear here if you have numbers where legacy call recording is enabled. Nothing else changes with regards to your retention policy
Call Recording Platform #
Please see our guide titled Call Recording Portal for full details about the platform including all the features and known behaviours.
Policy controls #
There are a number of different policies that can be applied to give users different levels of access.
If the user is reporting they cannot see certain calls then it would be a good starting point to check the policy that they have as this could be restricting their access.
Please use the below to see what controls are available for each policy.
Policy Name | Policy Access |
Global User | Global user access is the highest level of access and this user can access the main three areas of the interface. These are Recordings, Users & Reporting. Within each of these sections the global user has full write permissions. |
Company User | Company user access allows the user to see the Recordings and Reporting tab. They have access to listen to all the call recordings for all users and run audit and usage reports. This user cannot see the users tab and will not have permissions to manage users. (Please note this policy doesn’t allow you to create your own teams, this policy will just give you reduced access vs the Global user) |
Team User | Team User access allows the user to see the Recordings and Teams Tab (read only access). This policy is aimed at team leaders who will need to listen to their own/ teams’ calls for training and improvement purposes. They do not have access to the reports tab or the users tab and read only access to Teams tab. |
Staff User | Staff user access allows a user to see the recordings tab only and will only show them their own call recordings. This policy is aimed at staff who will need to listen to their calls for training and improvement purposes. They do not have access to the reports tab or the users tab. |
Support User | Support user access is used for anyone who isn’t in the end user’s organisation but may need access to help support. The support user access will show relevant information on the recordings and user tabs to help with any potential issues. There will be a reduced detail to comply with GDPR. You can create a support user directly from the interface or alternatively you can use the Single sign on from the Gamma Portal. See more below on this tool. |
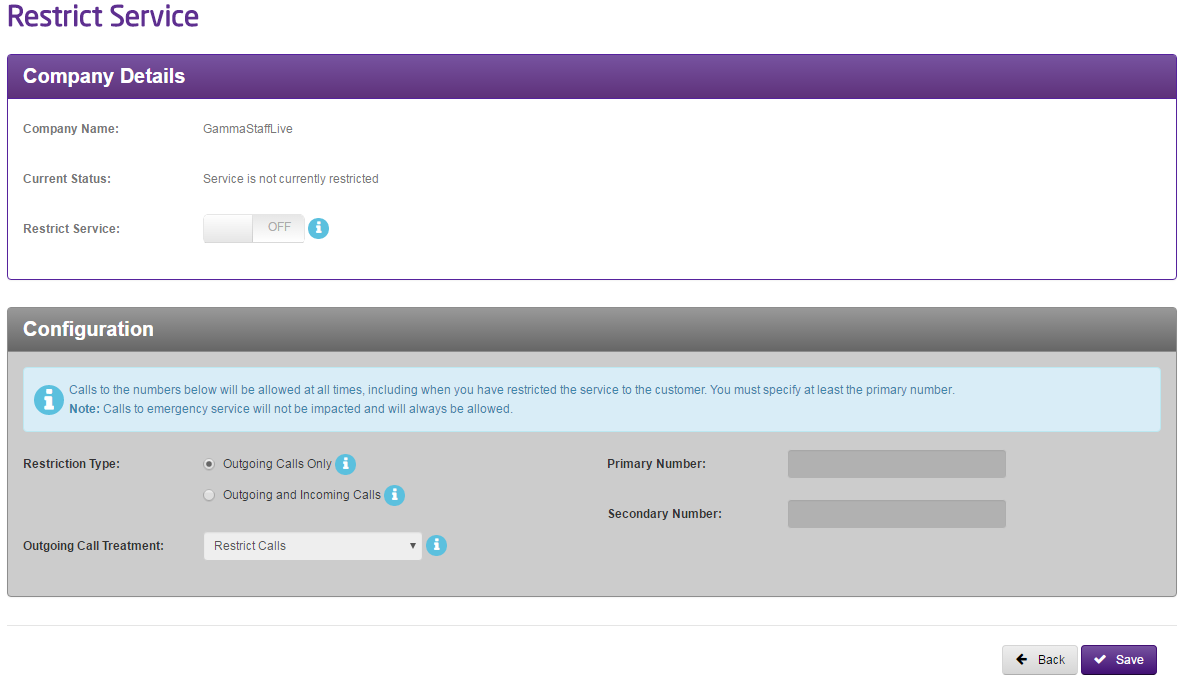
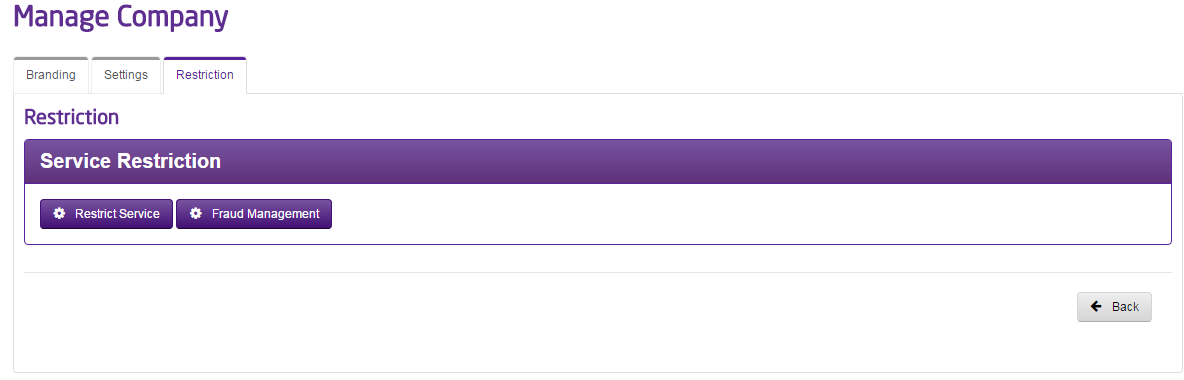
Restrict Service #
Restrict Service gives you the ability to restrict and unrestrict calls from a Company using the Gamma Portal.
Step 1
From the Gamma Portal, go to “Provisioning and Service Management”, “Hosted”, “Horizon” and “Horizon Manage Company”.
Step 2
Find the company that you wish to add sites to using the Actions drop-down down select “Manage Company”
Step 3
From here you select the “Restriction” tab and select “Restrict Service”.
Step 4
You’re now presented with the Service Restriction page. This will let you know if there is already a current restriction in place.
You can then click the “Restrict Service” button at the bottom to switch on the Restrict Service option.
- Primary Number – you need to enter a primary telephone number which means that calls are allowed to this number.
- Secondary Number – you can choose to enter a second number that is set up on the Horizon Company that will allow calls there.
- Restriction Type – you can either restrict outgoing calls only, or outgoing and incoming calls.
- Outgoing Call Treatment – you and select either Restrict or Transfer:
Restrict | This will restrict calls to all numbers excluding emergency services and calls to the Primary and Additional numbers. |
Transfer | This will transfer calls from any other number on the Horizon Company to the Primary contact number, and will allow calls to the emergency services and Primary and Additional Numbers. |
You can then click the “Restrict Service” button at the bottom to switch on the Restrict Service option.
Click “Save” to restrict the service. If you ever want to switch this off at any time you just click the “Restrict Service” button so it is showing “Off”