Skip to content
  • Academy KB Home Redesign
  • Broadband Home
  • CCaaS
  • Channel Partner Support
  • Circle Loop Home
  • Collaborate
  • Connectivity
  • Courses
  • Documentation
  • Ethernet
  • FibreXchange
  • FUSION IoT
  • Gamma AI Concierge
  • Gamma Plus
  • Gamma SIP for Cloud Connect
  • Gamma SIP Global Communications Enablement
  • Gamma SIP Trunks for Genesys Cloud
  • Hannah – Homepage WIP
  • Home
  • Horizon
  • Horizon Contact
  • Horizon Forms
  • Horizon Service Description Home
  • Horizon with Webex
  • Inbound
  • iPECS
  • Knowledge Base Intro
  • Knowledgebase Directory
  • LoginPress
  • Microsoft
  • Microsoft Teams Direct Routing Home
  • Microsoft Teams Operator Connect
  • Mobile
  • Multiple KB
  • My Courses
  • No Access
  • No active page
  • Numbering and Porting
  • Phoneline+
  • Product Homepage
  • Quick Download Button
  • Release Notes
  • Release Notes
  • SIP Home
  • Test
  • UCaaS
  • User Account
  • Voice
  • Voice Enablement
  • Webex for Gamma
  • Webex for Gamma Release Notes
  • Gamma Academy Knowledge Base
Gamma Academy Knowledge Base
  • Cloud Calling and Collaboration
    • Webex for Gamma
    • Horizon with Webex
    • Horizon
    • Phoneline+
    • Operator Connect
    • Direct Routing
    • Inbound
    • Akixi CX Analytics
    • Red Cactus
  • Connectivity and Networking
    • Numbering and Porting
    • Broadband
    • FibreXchange
    • Ethernet
    • SIP Trunking
    • Gamma FUSION IoT
  • CX
    • Horizon Contact
    • AI Concierge
  • Mobile Services
    • Gamma Mobile
  • CyberSecurity
    • SafeWeb
  • Partner & Portal Support
Gamma Academy Knowledge Base

Provisioning and In-Life Changes

  • Before Ordering Horizon
    • Example Checklist of a Horizon Installation
    • Horizon Site Survey
    • Customer Site and Horizon Service
    • Horizon Number Requirements
    • Horizon Network Configuration Guidelines
    • Horizon After Care
    • Horizon Glossary
  • Ordering Horizon on the Gamma Portal
    • Ordering a Horizon Company
  • Configuring Your Horizon Company
    • Horizon Sites
    • Add Horizon Users
  • In-Life Ordering
    • Horizon Change Branding
    • Horizon Bolt-Ons
    • Horizon: Managing Subscriptions
    • Horizon Numbers & Porting
  • In-Life Configuration
    • Multi factor Authentication (MFA)
    • Horizon: Configuring the New Solution
    • Horizon Fraud Management
    • Cease a Horizon Company

Features

  • Device Management
    • Device Customisation
    • Yealink DECT – Multiple Users Assigned to a Single Base Station
  • Outgoing Call Settings
    • Click to Dial
    • Call Barge
  • Call Groups
    • Nuisance Call Management for Horizon Call Groups
    • Instant Conference Group
    • Hunt Groups
    • Call Queue Groups
    • Call Pickup
    • Call Park
    • Call Paging
    • Auto Attendant
  • Voicemail
    • Voice Portal
    • Voicemail
    • Horizon Voicemail Map
  • Scheduling
    • Schedules
    • Create a Call Group Schedule
    • Configuring Additional Routing for Christmas Schedules
    • Configuring Schedules for Auto Attendants using a Hunt Group
  • User Call Setup
    • Availability Profiles
    • Busy Lamp Field (BLF)
    • Comfort Messages
    • CLI Presentation
    • Distinctive Ringing for External Calls
    • Do Not Disturb
    • Hot Desking
    • Remote Office
    • Sequential Ringing
    • Twinning
    • 1 or 2 Digit Dialling (Speed Dials)
  • Company Admin
    • Site-to-Site Presentation Policy
    • Music on Hold
    • Horizon Shortcodes
    • Directory
    • Departments
    • Account and Authorisation Codes
  • Incoming Call Settings
    • Call Waiting
    • Call Transfer
    • Call Recording
    • Call Forwarding
    • Call Barring
    • Automatic Call Back
    • Anonymous Call Rejection

Advanced Feature Guides

  • Horizon Integrator
  • Horizon Receptionist Console User Guide
  • Enable Horizon for Microsoft Teams
  • Call Recording
    • Call Recording Service
    • Call Recording – Portal User Guide
    • Call Recording – MFA How to Guide
    • Call Recording – MFA Technical Support
    • Call Recording – Known Behaviours
    • Call Recording – FAQs
  • Integrator
    • Horizon Integrator TAPI User Guide
    • Horizon Integrator Controlled Integrations
    • Horizon Integrator Standard Select Integrations
    • Horizon Integrator Client SDK Engagement Process
    • Horizon Salesforce (Lightning) Adaptor Add-in Guide
  • Call Center Guides
    • Horizon Call Centre Administrators Guide
    • Horizon Internet Explorer Settings for Full Screen Mode
  • Multi-Factor Authentication (MFA)
    • How-To Guide: Horizon Multi-Factor Authentication
    • Multi-Factor Authentication (MFA) FAQs
    • Technical Support Guide: Multi-Factor Authentication
  • Soft Phone Guides
    • Horizon Soft Phone Guide – iOS
    • Horizon Android Soft Phone Guide
    • Horizon Soft Phone Client PC Guide
    • Horizon Setup Soft Phone Client for a user Guide
  • Akixi
    • Akixi Documentation

Technical Support

  • What APIs are Available?
  • Diagnosing and Raising a Fault
    • Horizon Health Check
    • I Have a Problem With Call Connection/Calls are Dropping
    • I Have a Problem With Call Quality
    • I Have a Problem With a Feature
    • I Have a Problem With the Horizon Portal
    • New Call Recording Technical Support
    • Raise a Fault
  • Handset Support
    • Poly Profile Rules and Recovery
    • Cisco Profile Rules and Recovery Process
    • Yealink Profile Rules and Recovery Process
    • Handset Returns
    • Horizon RMA Check List
  • Handset User Guides
    • Poly Handset User Guides
    • Cisco Handset User Guides
    • Yealink Handset User Guides
    • Sennheiser Handset User Guides
  • Known Behaviours
    • Horizon Known Behaviours
    • Horizon SIP ALG

Service Description

  • Horizon Service Descriptions

Horizon Release Notes

  • Horizon Release Notes

T&Cs and SLAs

  • Horizon – Terms and Conditions
  • Horizon – SLAs

Horizon Forms

  • Horizon Forms
  • Home
  • Home
  • Horizon
  • Features
  • Scheduling
  • Create a Call Group Schedule
View Categories

Create a Call Group Schedule

Schedules are used to determine what happens to calls when a business is closed. Horizon operates by always being open meaning it’s always possible to receive calls. When a schedule is applied this will signal to the system that the business is closed and calls need to be routed to an alternative destination.  

Schedules can be created for Hunt Groups and Call Queue Groups and we recommend creating the schedules at the individual group level allowing you to set specific schedules for each group. For help managing Auto Attendants please refer to Configuring Schedules for Auto Attendants using a Hunt Group. 

Note: Once you create a schedule it will be available to select from the dropdown when configuring schedules in other places. Therefore, if you have multiple groups on the same schedule this can be easily applied.  

Enable the scheduling option  #

First we need to enable scheduling on a group. This is only possible if the Group Advanced Settings bolt-on has been provisioned.  

  • 1. Navigate to the relevant Call Group
  • 2. Select Advanced Settings
  • 3. Click Edit next to Schedule
  • 4. Set the Forward To destination and click Use the following schedule
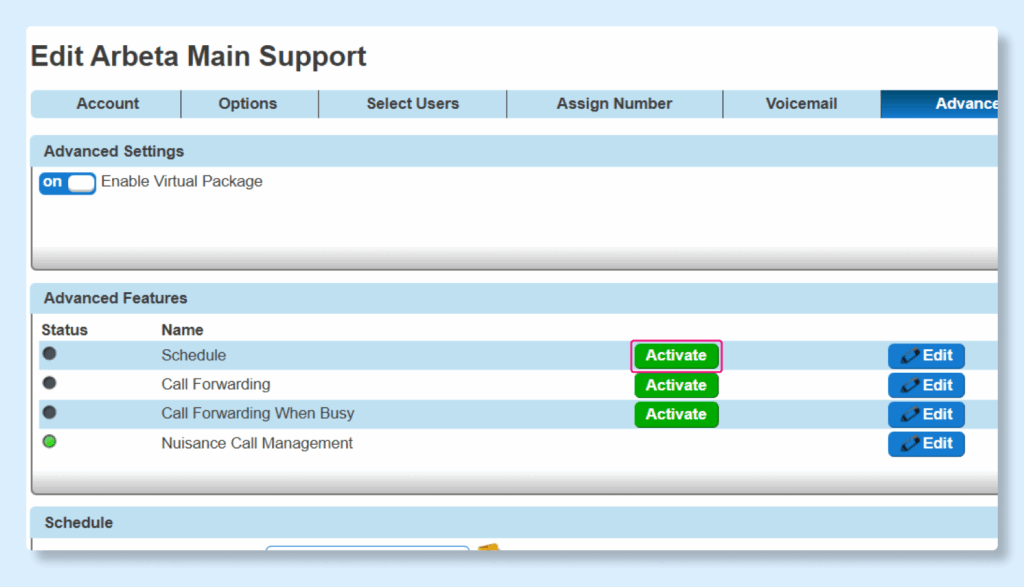
  1. Log into the Horizon Portal  
  2. Navigate to the relevant Call Group 
  3. Select the Advanced Settings tab 
  4. Enable the toggle next to Enable Virtual Package 
  5. Click Edit next to Schedule 
  6. Enter (or look up and select) the forwarding destination 
  7. Select Use the following schedule 
  8. Click the + plus icon 
    • You can also select an existing schedule from the dropdown list 

This will open the scheduling editor so we can start to create a schedule.  

Configure the schedule  #

In this example the business hours are Monday to Friday 9am to 5:30pm. They have an hour lunch break and are closed on weekends. To build this we will need to add the following events to the schedule: 

  • AM Closed (00:00 – 09:00) 
  • Lunch Closed (12:00 – 13:00) 
  • PM Closed (17:30 – 23:59) 
  • Weekend Closed (All Day Event) 
  • 1. Click the + plus icon (or select an existing schedule)
  • 2. Enter the Schedule name and click Create
  • 3. Configure the first event as required and click Create
  • 4. Click + Add
  • 5. Configure all the required events
  1. In the schedule editor enter a schedule name 
    • Optional – customise the colour 
  2. Click Create + 
  3. Enter the event name (AM Closed) 
  4. Disable the checkbox next to All Day Event 
  5. Set the Start Date (enter the date you want the schedule to start) and Time (00:00) 
  6. Set the End Date (set this as the same date as the start date) and Time (09:00) 
  7. Set the recurs option to Weekly and apply the following options 
    • Tick the checkboxes next to Monday through Friday 
    • For Stops Recurring select Never 
  8. Click Create 
  9. Click + Add 
  10. Repeat the steps for Lunch Closed with the following settings: 
    • All Day Event – Disabled 
    • Start Date (same as AM Closed) Time (12:00) 
    • End Date (same as AM Closed) Time (13:00) 
    • Recurs – Weekly Monday through Friday
    • Stops Recurring – Never 
  11. Click + Create 
  12. Click + Add 
  13. Repeat the steps for PM Closed with the following settings: 
    • All Day Event – Disabled 
    • Start Date (same as AM Closed) Time (17:30)
    • End Date (same as AM Closed) Time (23:59)
    • Recurs – Weekly Monday through Friday
    • Stops Recurring – Never
  14. Click + Create 
  15. Click + Add 
  16. Repeat the steps for Weekend Closed with the following settings: 
    • All Day Event – Enabled 
    • Start date (the Saturday after the schedule start date) 
    • End date (same as Weekend Closed Start Date) 
    • Recurs – Weekly on Saturday and Sunday 
    • Stops Recurring – Never
  17. Click + Create 

The events will all have been added to the schedule.

Preview a Schedule #

You can check how the schedule looks by clicking the eye icon.  

  • Click the eye icon to preview the schedule
  • Schedule preview

Activate the Schedule #

Once you have configured the schedule and are happy with how it’s been set up the final thing you need to do is activate it. If the schedule is created but not active the system will act as if the group is open at all time and able to accept calls.

Activate the schedule by clicking Activate in the Advanced Features Schedule row.

Advanced scheduling  #

So far we have set up the system to accept incoming calls into the group during opening hours. During closed hours the calls will be forwarded to the destination has been set in Forward to.  

It’s only possible to add one option in Forward to however in some instances you might want calls to forward to a different destination during lunch vs at the weekend. In this scenario we will need to configure multiple levels of groups that the calls will be routed through in order to direct calls to the relevant destination.  

What about one off events?  #

In order to manage one-off events such as Christmas we need to apply an additional routing schedule. This will override the schedule hours and forward calls to the destination that has been set. For help configuring additional routing please refer to Configuring additional routing for Christmas Schedules.  

Updated on 05/12/2025
SchedulesConfiguring Additional Routing for Christmas Schedules
Contents
  • Enable the scheduling option 
  • Configure the schedule 
    • Preview a Schedule
  • Activate the Schedule
  • Advanced scheduling 
  • What about one off events? 

Copyright © 2026 -  Gamma Telecom Ltd

Gamma API
We use cookies to measure performance and make improvements to this service. This includes page views, device/browser, location, and page interactions. We do not collect any information you upload to this site. By agreeing, you consent for your data to be used for this purpose.